本文最后更新于:4 个月前
1 JS
1.1 JavaScript-导入导出
JS 提供的导入导出机制,可以实现按需导入。
命名导出:
1
2
3
4
5
6
7
8
9
10
11
12
13
|
function simpleMessage(msg){
console.1og(msg)
}
function complexMessage(msg){
console.log(new Date()+":"+msg)
}
export {simpleMessage,complexMessage}
|
命名导入:
1
2
3
4
5
6
7
8
9
10
11
12
13
14
|
<body>
<div>
<button id="bn">点我展示信息</button>
</div>
<script type="module">
import {complexMessage} from './showMessage.js'
document.getElementById("btn").onclick function(){
complexMessage('bbbbb');
}
</script>
</body>
|
导入和导出的时候,可以使用 as 重命名
当 js 中的方法过多时可以采用默认导出导入方式。
默认导出(导出一个 js 对象,通过对象的方式调用方法):
1
2
3
4
5
6
7
8
9
10
11
|
function simpleMessage(msg){
console.1og(msg)
}
function complexMessage(msg){
console.log(new Date()+":"+msg)
}
export default {simpleMessage,complexMessage}
|
导入默认:
1
2
3
4
5
6
7
8
9
10
11
12
| <!-- message.html -->
<body>
<div>
<button id="bn">点我展示信息</button>
</div>
<script type="module">
import messageMethods from './showMessage.js'
messageMethods.simpleMessage('aaa');
messageMethods.complexMessage('bbb');
}
</script>
</body>
|
1.2 …的用法
- 扩展运算符(Spread Operator)
数组展开:
1
2
| const arr1 = [1, 2, 3];
const arr2 = [...arr1, 4, 5];
|
函数调用:
1
2
3
4
5
6
| function sum(a, b, c) {
return a + b + c;
}
const numbers = [1, 2, 3];
const result = sum(...numbers);
|
对象字面量:
1
2
3
| const obj1 = { x: 1, y: 2 };
const obj2 = { ...obj1, z: 3 };
|
- 剩余参数(Rest Parameters): 剩余参数允许我们将多个参数收集到一个数组中,可以在函数定义时使用。
1
2
3
4
5
6
7
8
9
10
| function sum(...numbers) {
let total = 0;
for (let number of numbers) {
total += number;
}
return total;
}
console.log(sum(1, 2, 3));
console.log(sum(4, 5, 6, 7));
|
在上面的例子中,剩余参数 ...numbers 接收了所有传递给 sum 函数的参数,并将它们作为一个数组存储在 numbers 中。
2 Vue
2.1 快速入门
- 准备工作
- 引入 Vue 模块
- 创建 Vue 的应用实例
- 定义元素(div),交给 Vue 控制
- 构建用户界面
2.1.1 渐进式用法
1
2
3
4
5
6
7
8
9
10
11
12
13
14
15
16
17
18
19
20
21
22
23
24
25
26
27
28
29
30
31
32
33
34
35
36
37
38
39
40
41
42
43
44
45
| <!DOCTYPE html>
<html lang="en">
<head>
<meta charset="UTF-8">
<meta name="viewport" content="width=device-width, initial-scale=1.0">
<title>Document</title>
</head>
<body>
<div id="app">
<h1>{{message}}</h1>
<p>点击次数:{{count}}</p>
<p>得分:{{double()}}</p>
<button @click="increment">+</button>
</div>
<script type="module">
import { createApp, ref } from 'https://unpkg.com/vue@3/dist/vue.esm-browser.js'
const app = createApp({
setup() {
const message = ref('hello world')
const count = ref(0)
const increment = () => {
count.value++
}
const double = () => {
return count.value * 2
}
return {
message,
count,
increment,
double
}
}
})
app.mount('#app')
</script>
</body>
</html>
|
2.2 常用指令
指令:HTML 标签上带有 V-前缀的特殊属性,不同的指令具有不同的含义,可以实现不同的功能。
常用指令:
| 指令 |
作用 |
v-for |
列表渲染,遍历容器的元素或者对象的属性 |
v-bind |
为 HTML 标签绑定属性值,如设置 href,css 样式等 |
v-if/v-else-if/v-else |
条件性的渲染某元素,判定为 true 时渲染,否侧不渲染 |
v-show |
根据条件展示某元素,区别在于切换的是 display 属性的值 |
v-model |
在表单元素上创建双向数据绑定 |
v-on |
为 HTML 标签绑定事件 |
2.2.1 v-for
作用:列表渲染,遍历容器的元素或者对象的属性
语法:v-for="(item,ndex)in items"
参数说明:
- items 为遍历的数组
- item 为遍历出来的元素
- index 为索引/下标,从 0 开始;可以省略,省略 index 语法:
v-for="item in items"
[!WARNING] 注意
遍历的数组,选择式必须在 data 中定义,组合式直接定义响应式数据;要想让哪个标签循环展示多次,就在哪个标签上使用 V-for 指令。
1
2
3
4
5
6
7
8
9
10
11
12
13
14
15
16
17
18
19
20
21
22
23
24
25
26
27
28
29
30
31
32
33
34
35
36
37
38
39
40
41
42
43
44
45
46
47
48
49
50
51
52
53
54
55
56
57
58
59
60
61
62
63
64
65
66
67
68
69
| <!DOCTYPE html>
<html lang="en">
<head>
<meta charset="UTF-8">
<meta name="viewport" content="width=device-width, initial-scale=1.0">
<title>Document</title>
</head>
<body>
<div id="app">
<ul>
<li v-for="item in list">
{{item}}
</li>
</ul>
<ol>
<li v-for="(item,index) in list">
{{index}}-{{item}}
</li>
</ol>
<table border="1" width="100%" align="center" cellspacing="0" cellpadding="0">
<thead>
<tr style="text-align: center;">
<th>姓名</th>
<th>年龄</th>
<th>性别</th>
</tr>
</thead>
<tbody style="text-align: center;">
<tr v-for="(item,index) in objLs">
<td>{{index}}-{{item.name}}</td>
<td>{{index}}-{{item.age}}</td>
<td>{{index}}-{{item.sex}}</td>
</tr>
</tbody>
</table>
</div>
<script type="module">
import { createApp, ref, reactive } from 'https://unpkg.com/vue@3/dist/vue.esm-browser.js'
const app = createApp({
setup () {
const list = ref(['a', 'b', 'c'])
const objLs = reactive([
{
name: 'ruan',
age: 12,
sex: '🚹'
},
{
name: 'alleyf',
age: 20,
sex: '🚹'
},
{
name: 'wang',
age: 21,
sex: '🚺'
}
])
return {
list,
objLs
}
}
})
app.mount('#app')
</script>
</script>
</body>
</html>
|
2.2.2 v-bind
作用:动态为 HTML 标签绑定属性值,如设置 href,src,style 样式等。
语法:v-bind:属性名="属性值"
简化::属性名="属性值"
v-bind 所绑定的数据,必须在 data 中定义。
1
2
3
4
5
6
7
8
9
10
11
12
13
14
15
16
17
18
19
20
| <body>
<div id="app">
<a :href="url" style="text-decoration:solid;color:red;">{{title}}</a>
</div>
<script type="module">
import { createApp, ref, reactive } from 'https://unpkg.com/vue@3/dist/vue.esm-browser.js'
const app = createApp({
setup () {
const url = ref("https://www.baidu.com")
const title = ref("百度一下")
return {
url,
title
}
}
})
app.mount('#app')
</script>
</script>
</body>
|
2.2.3 v-if/v-show
作用:这两类指令,都是用来控制元素的显示与隐藏的
==v-if==
- 语法:v-if="表达式",表达式值为 true,显示;false,隐藏
- 其它:可以配合 v-else-if/v-else 进行链式调用条件判断
- 原理:基于条件判断,来控制创建或移除元素节点(条件渲染)
- 场景:要么显示,要么不显示,不频繁切换的场景
==v-show==
- 语法:v-show=”表达式”,表达式值为 true,显示;false,隐藏
- 原理:基于 CSS 样式 display 来控制显示与隐藏
- 场景:频繁切换显示隐藏的场景
1
2
3
4
5
6
7
8
9
10
11
12
13
14
15
16
17
18
19
20
21
22
23
24
25
26
27
28
29
| <body>
<div id="app">
v-if-手串的价格为:<span v-if="customer.level === 0">¥{{price}}</span>
<span v-else-if="customer.level === 1">¥{{price+20}}</span>
<span v-else>¥{{price+50}}</span><br>
v-show-手串的价格为:<span v-show="customer.level === 0">¥{{price}}</span>
<span v-show="customer.level === 1">¥{{price+20}}</span>
<span v-show="customer.level >= 2">¥{{price+50}}</span>
</div>
<script type="module">
import { createApp, ref, reactive } from 'https://unpkg.com/vue@3/dist/vue.esm-browser.js'
const app = createApp({
setup () {
const price = ref(100)
const customer = reactive({
name: '小王',
age: 18,
level: 1
})
return {
customer,
price
}
}
})
app.mount('#app')
</script>
</script>
</body>
|
2.2.4 v-on
作用:为 html 标签绑定事件
语法:v-on:事件名="函数名"
简写为:@事件名="函数名"
选择式函数需要定义在 methods 选项内部,组合式直接定义箭头函数并 return 函数名即可。
1
2
3
4
5
6
7
8
9
10
11
12
13
14
15
16
17
18
19
20
21
| <body>
<div id="app">
<button type="button" v-on:click="handleClick(1)">按钮</button>
<button type="button" @click="handleClick(2)">按钮</button>
</div>
<script type="module">
import { createApp, ref, reactive } from 'https://unpkg.com/vue@3/dist/vue.esm-browser.js'
const app = createApp({
setup () {
const handleClick = (num) => {
console.log('你点击了按钮' + num)
}
return {
handleClick
}
}
})
app.mount('#app')
</script>
</script>
</body>
|
2.2.5 v-model
作用:在表单元素上使用,双向数据绑定。可以方便的获取或设置表单项数据
1
2
3
4
5
6
7
8
9
10
11
12
13
14
15
16
17
18
19
20
21
22
23
24
25
26
27
28
29
30
31
32
33
34
35
36
37
38
39
40
41
42
43
44
45
46
47
48
49
50
51
52
53
54
55
56
57
58
59
60
61
62
63
64
| <body>
<div id="app">
<form action="#app" method="get">
<input type="text" placeholder="请输入姓名" v-model="queryForm.name" name="name" id="1">
<input type="text" placeholder="请输入年龄" v-model="queryForm.age" name="age" id="2">
<br>
当前输入的姓名:{{queryForm.name}} 当前输入的年龄:{{queryForm.age}}
<br>
<button type="submit">搜索</button>
<button type="reset" @click="resetForm">重置</button>
</form>
<br>
<table border="1" width="100%" align="center" cellspacing="0" cellpadding="0">
<thead>
<tr style="text-align: center;">
<th>姓名</th>
<th>年龄</th>
<th>性别</th>
</tr>
</thead>
<tbody style="text-align: center;">
<tr v-for="(item,index) in objLs">
<td>{{index}}-{{item.name}}</td>
<td>{{index}}-{{item.age}}</td>
<td>{{index}}-{{item.sex}}</td>
</tr>
</tbody>
</table>
</div>
<script type="module">
import { createApp, ref, reactive } from 'https://unpkg.com/vue@3/dist/vue.esm-browser.js'
const app = createApp({
setup () {
const queryForm = ref({
"name": "",
"age": null
})
const resetForm = () => {
queryForm.value = {
"name": "",
"age": null
}
}
const objLs = reactive([
{
name: 'ruan',
age: 12,
sex: '🚹'
},
{
name: 'alleyf',
age: 20,
sex: '🚹'
},
])
return {
queryForm, resetForm, objLs
}
}
})
app.mount('#app')
</script>
</script>
</body>
|
2.2.6 生命周期
每个 Vue 组件实例在创建时都需要经历一系列的初始化步骤,比如设置好数据侦听,编译模板,挂载实例到 DOM,以及在数据改变时更新 DOM。在此过程中,它也会运行被称为生命周期钩子的函数,让开发者有机会在特定阶段运行自己的代码。
生命周期:指一个对象从创建到销毁的整个过程。
生命周期的八个阶段 :每个阶段会自动执行一个生命周期方法(钩子),让开发者有机会在特定的阶段执行自己的代码

| 状态 |
阶段周期 |
beforeCreate |
创建前 |
beforeMount |
载入前 |
beforeUnmount |
组件销毁前 |
beforeUpdate |
数据更新前 |
created |
创建后 |
mounted |
挂载完成 |
unmounted |
组件销毁后 |
updated |
数据更新后 |
| 生命周期函数用法示例: |
|
1
2
3
4
5
6
7
8
9
10
11
12
13
14
15
16
| <script type="module">
import { createApp, ref, reactive, onMounted } from 'https://unpkg.com/vue@3/dist/vue.esm-browser.js'
const app = createApp({
setup () {
const mounted = ref(false)
onMounted(() => {
console.log(`组件挂在完毕`)
})
return {
mounted
}
}
})
app.mount('#app')
</script>
|
2.2.7 axios 的使用
介绍:Axios 对原生的 Aja 进行了封装,简化书写,快速开发。
官网: https://www.axios-http.cn/
Axios 使用步骤
- 引入 Axios 的 js 文件(参照官网)
- 使用 Axios 发送请求,并获取相应结果
- method:请求方式,GET/POST.
- urL:请求路径
- data:请求敛据
Axios-请求方式别名
- 为了方便起见,Axos 已经为所有支持的请求方法提供了别名
- 格式:
axios.请求方式(urL[,data[,config])
GET:
axios.get(url).then((res)=>{...}).catch((err)=>{....)
POST:axios.post(url,data).then((res)=>{..]).catch((err)=>{....)
1
2
3
4
5
6
7
8
9
10
11
12
13
14
15
16
17
18
19
20
21
22
23
24
25
26
27
28
29
30
31
32
33
34
35
36
37
38
39
40
41
42
43
44
45
46
47
48
49
50
51
52
53
| <script type="module">
import { createApp, ref, reactive, onMounted } from 'https://unpkg.com/vue@3/dist/vue.esm-browser.js'
const app = createApp({
setup () {
axios.defaults.baseURL = 'http://127.0.0.1:8080'
axios.defaults.headers.post['Content-Type'] = 'application/json'
axios.defaults.crossDomain = true;
const getAllArticle = () => axios({
method: 'get',
url: '/api/article/list',
headers: {
'Authorization': localStorage.getItem('token')
}
}).then(({ data }) => {
console.log(data)
}).catch((err) => {
console.log(err)
})
const login = () => axios({
method: 'post',
url: '/api/user/login',
params: {
username: 'admin',
password: '123123'
}
}).then(({ data }) => {
console.log(data)
if (data.code === 200) {
localStorage.setItem('token', data.data)
}
}).catch((err) => {
console.log(err)
})
onMounted(() => {
console.log(`组件挂在完毕`)
login()
console.log(`token:${localStorage.getItem('token')}`)
getAllArticle()
})
return {
login,
getAllArticle
}
}
})
app.mount('#app')
</script>
|
2.3 局部使用案例
对大事件后端的文章做列表展示和分页搜索功能。
1
2
3
4
5
6
7
8
9
10
11
12
13
14
15
16
17
18
19
20
21
22
23
24
25
26
27
28
29
30
31
32
33
34
35
36
37
38
39
40
41
42
43
44
45
46
47
48
49
50
51
52
53
54
55
56
57
58
59
60
61
62
63
64
65
66
67
68
69
70
71
72
73
74
75
76
77
78
79
80
81
82
83
84
85
86
87
88
89
90
91
92
93
94
95
96
97
98
99
100
101
102
103
104
105
106
107
108
109
110
111
112
113
114
115
116
117
118
119
120
121
122
123
124
125
126
127
128
129
130
131
132
133
134
135
136
137
138
139
140
141
| <body>
<div id="app">
<input type="text" placeholder="请输入分类id" v-model="queryForm.categoryId" name="categoryId" id="1">
<input type="text" placeholder="请输入发布状态" v-model="queryForm.state" name="state" id="2">
<button type="submit" @click="queryArticle()">搜索</button>
<button type="reset" @click="resetForm()">重置</button>
<br>
<table border="1" width="100%" align="center" cellspacing="0" cellpadding="0">
<thead>
<tr style="text-align: center;">
<th>标题</th>
<th>分类</th>
<th>发表时间</th>
<th>状态</th>
<th>操作</th>
</tr>
</thead>
<tbody style="text-align: center;">
<tr v-for="(item,index) in objLs">
<td>{{item.title}}</td>
<td>{{item.categoryId}}</td>
<td>{{item.createBy}}</td>
<td>{{item.state}}</td>
<td>
<a href="javascript:void(0)" @click="editArticle(item.id)">编辑</a>
<b> | </b>
<a href="javascript:void(0)" @click="delArticle(item.id)">删除</a>
</td>
</tr>
</tbody>
</table>
</div>
<script type="module">
import { createApp, ref, reactive, onMounted} from 'https://unpkg.com/vue@3/dist/vue.esm-browser.js'
const app = createApp({
setup () {
const queryForm = ref({
"pageNum": 1,
"pageSize": 5,
"categoryId": null,
"state": null
})
const resetForm = () => {
queryForm.value = {
"pageNum": 1,
"pageSize": 5,
"categoryId": null,
"state": null
}
getAllArticle()
}
const objLs = ref([])
axios.defaults.baseURL = 'http://127.0.0.1:8080'
axios.defaults.headers.post['Content-Type'] = 'application/json'
axios.defaults.crossDomain = true;
const getAllArticle = () => axios({
method: 'get',
url: '/api/article/list',
}).then(({ data }) => {
console.log(data)
objLs.value = data.data
}).catch((err) => {
console.log(err)
})
const login = () => axios({
method: 'post',
url: '/api/user/login',
params: {
username: 'admin',
password: '123123'
}
}).then(({ data }) => {
console.log(data)
if (data.code === 200) {
localStorage.setItem('token', data.data)
}
}).catch((err) => {
console.log(err)
})
const queryArticle = () => {
axios({
method: 'get',
url: '/api/article/page',
headers: {
'Authorization': localStorage.getItem('token')
},
params: queryForm.value
}).then(({ data }) => {
console.log(data)
objLs.value = data.data.items
}).catch((err) => {
console.log(err)
if (err.response.status === 401) {
alert('登录失效,请重新登录')
}
})
}
const delArticle = (id) => {
axios({
method: 'delete',
url: `/api/article/${id}`,
}).then(({ data }) => {
console.log(data)
getAllArticle()
}).catch((err)=>{
console.log(err)
if (err.response.status === 401) {
alert('登录失效,请重新登录')
}
})
}
onMounted(() => {
login()
axios.defaults.headers['Authorization'] = localStorage.getItem('token')
getAllArticle()
})
return {
queryForm, resetForm, objLs, login, getAllArticle, queryArticle
}
}
})
app.mount('#app')
</script>
</script>
</body>
|
2.4 整站使用 Vue(工程化)
2.4.1 项目初始化
2.4.1.1 环境准备
介绍:create-vue 是 Vue 官方提供的最新的脚手架工具,用于快速生成一个工程化的 Vue 项目。
create-vue 提供了如下功能:
[!tip] 功能
- 统一的目录结构
- 本地调试
- 热部署
- 单元测试
- 集成打包
依赖环境:NodeJS
2.4.1.2 Vue 项目-创建
创建一个工程化的 Vue 项目,执行命令:npm init vue@latest 或 npm create vue@latest
[!NOTE] 新建 Vue 项目选项
- Project name: ——》项目名称,默认值:Vu e-project,可输入想要的项目名称。
- Add TypeScript?—-》是否加入 TypeScript 组件?默认值:No。
- Add JSX Support?———–》是否加入]SX 支持?默认值:No。
- Add Vue Router —–》是否为单页应用程序开发添加/ue Router 路由管理组件?默认值:No。
- Add Pinia —————》是否添加 inia 组件来进行状态管理?默认值:No。
- Add Vitest ————–》是否添加/itest 来进行单元测试?默认值:No。
- Add an End-to-End —————-》是否添加端到端测试?默认值 No。
- Add ESLint for code quality?————–》是否添加 ESLint 来进行代码质量检查?默认值:No。
2.4.1.3 Vue 项目-安装依赖
进入项目目录,执行命令安装当前项目的依赖:npm install
[!error] 注意
创建项目以及安装依赖的过程,都是需要联网的
2.4.1.4 Vue 项目-启动
执行命令:npm run dev ,就可以启动 vue 项目了。

2.4.2 Vue 项目开发流程
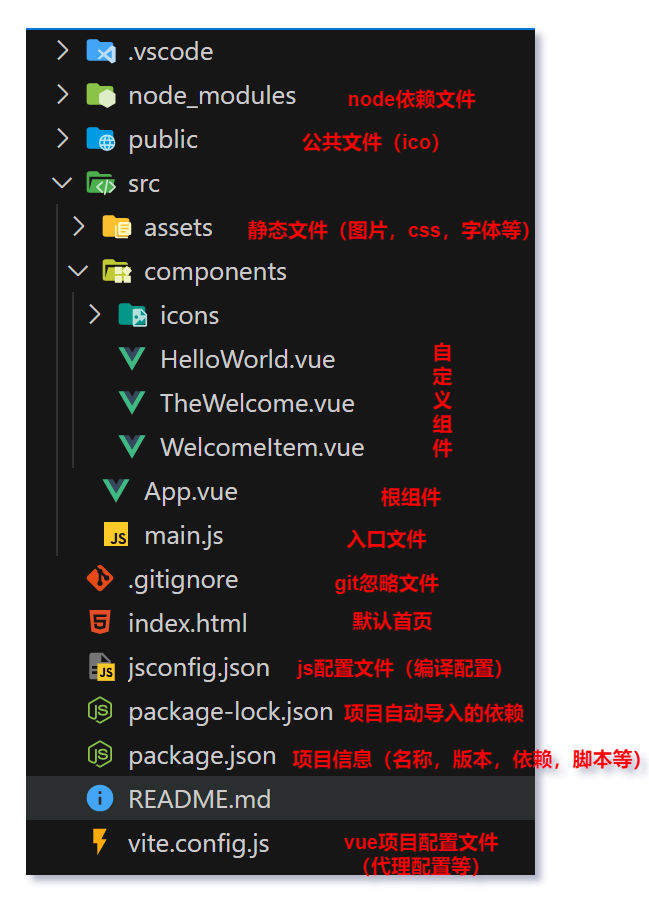
2.4.2.1 目录结构
1
2
3
4
5
6
7
8
9
| <script setup>
// 数据和行为
</script>
<template>
<!-- 骨架和布局 -->
</template>
<style scoped>
/* 样式和风格 */
</style>
|
2.4.3 API 风格
Vue 的组件有两种不同的风格:组合式 API 和选项式 API
[!warning]
setup:是一个标识,告诉 Vue 需要进行一些处理,让我们可以更简洁的使用组合式 API。ref ():接收一个内部值,返回一个响应式的 ref 对象,此对象只有一个指向内部值的属性 value。onMounted ():在组合式 API 中的钩子方法,注册一个回调函> 数,在组件挂载完成后执行。
组合式(推荐):
1
2
3
4
5
6
7
8
9
10
11
12
13
| <script setup>
import {onMounted,ref} from 'vue';
const count=ref(0);/声明响应式变量
function increment(){/声明函数
count value++;
}
onMounted(()=>{/声明钩子函数
console.log('Vue Mounted .')
})
</script>
<template>
<button @click="increment">count:count</button>
</template>
|
选项式:
1
2
3
4
5
6
7
8
9
10
11
12
13
14
15
16
17
18
19
20
| <script>
export default {
data(){/声明响应式对象
return {
count: 0
}
},
methods:{/声明方法,可以通过组件实例访问
increment:function(){
this.count++
}
},
mounted(){//声明钩子函数
console.log('Vue mounted ...')
}
}
</script>
<template>
<button @click="increment">count:{count }</button>
</template>
|
选项式 API,可以用包含多个选项的对象来描述组件的逻辑,如:data,methods,mounted 等。
2.4.4 定制 axios 为 request
2.4.4.1 拦截器
在请求或响应被 then 或 catch 处理前拦截它们

1
2
3
4
5
6
7
8
9
10
11
12
13
14
15
16
17
18
19
20
21
22
23
24
25
26
27
28
29
30
31
32
33
34
35
36
37
38
39
40
41
42
43
44
45
46
47
48
49
50
51
52
53
54
55
56
57
58
59
60
61
62
63
64
|
import axios from 'axios'
import {ElNotification} from 'element-plus'
const baseURL = '';
const instance = axios.create({
baseURL: baseURL,
timeout: 5000,
crossDomain: true,
headers: {
'Authorization': localStorage.getItem('token'),
}
})
instance.interceptors.response.use(
response => {
if (response.data.code === 200) {
return response.data
} else {
ElNotification({
title: '系统提示',
message: response.data.message ? response.data.message : '服务异常',
type: 'error',
duration: 3000
});
return Promise.reject(response.data);
}
},
error => {
ElNotification({
title: '系统提示',
message: error.message ? error.message : '服务异常',
type: 'error',
duration: 3000
})
return Promise.reject(error)
}
)
instance.interceptors.request.use(
config => {
if (config.method === 'post') {
config.headers['Content-Type'] = 'application/json'
}
return config
},
error => {
ElNotification({
title: '系统提示',
message: error.message ? error.message : '请求异常',
type: 'error',
duration: 3000
})
return Promise.reject(error)
}
)
export default instance
|
2.4.4.2 各种请求定制
不但可以避免使用同步等待 await和async,将回调函数以参数的形式传递给 axios 的回调函数进行执行。还可以自定义各种请求,设置参数和默认回调函数等。
1
2
3
4
5
6
7
8
9
10
11
12
13
14
15
16
17
18
19
20
21
22
23
24
25
26
27
28
29
30
| import instance from "./request";
function get (url, params = null, success = defaultSuccess, error = defaultError) {
return instance({
method: 'get',
url: url,
params: params
}).then(res => success(res)).catch(err => error(err));
}
function post (url, params = null, data = null, success = defaultSuccess, error = defaultError) {
return instance({
method: 'post',
url: url,
params: params,
data: data
}).then(res => success(res)).catch(err => error(err));
}
function defaultSuccess (response) {
console.log(response);
}
function defaultError (error) {
console.log(error);
}
export default {
get,
post
}
|
2.5 Element-Plus
Element:是饿了么团队研发的,基于 Vue3,面向设计师和开发者的组件库。
组件:组成网页的部件,例如超链接、按钮、图片、表格、表单、分页条等。
官网: https://element-plus.org/zh-CN/#/Zh-CN
2.5.1 快速入门
- 准备工作:
- 创建一个工程化的 vue 项目
- 参照官方文档,安装 Element Plus 组件库(在当前工程的目录下):
npm install element-plus --save
- main.js 中引入 Element Plus 组件库(参照官方文档)
1
2
3
4
5
6
7
8
| import './assets/main.css'
import 'element-plus/dist/index.css'
import { createApp } from 'vue'
import ElementPlus from 'element-plus'
import App from './App.vue'
const app = createApp(App)
app.use(ElementPlus)
app.mount('#app')
|
- 制作组件:
访问 Element 官方文档,复制组件代码,调整参数进行自定义。
2.5.2 常用组件
表格,卡片,表单,按钮,分页,下拉选项框。
1
2
3
4
5
6
7
8
9
10
11
12
13
14
15
16
17
18
19
20
21
22
23
24
25
26
27
28
29
30
31
32
33
34
35
36
37
38
39
40
41
42
43
44
45
46
47
48
49
50
51
52
53
54
55
56
57
58
59
60
61
62
63
64
65
66
67
68
69
70
71
72
73
74
75
76
77
78
79
80
81
82
83
84
85
86
87
88
89
90
91
92
93
94
95
96
97
98
99
100
101
102
103
104
105
106
107
108
109
110
111
112
113
114
115
116
117
118
119
120
121
122
123
124
125
126
127
128
129
130
131
132
133
134
135
136
137
138
139
140
141
142
143
144
145
146
147
148
149
150
151
152
153
154
155
156
157
158
159
160
161
162
163
164
165
166
167
168
169
170
171
| <template>
<div>
<div>
<el-card class="box-card">
<div class="card-header">
<span>文章管理</span>
<el-button type="primary" @click="addArticle">发布文章</el-button>
</div>
<hr>
<div>
<el-form :inline="true" :model="queryForm" class="el-form">
<el-form-item label="分类">
<el-select v-model="queryForm.categoryId" placeholder="分类id" clearable>
<el-option label="人文" value="17" />
<el-option label="科学" value="16" />
</el-select>
</el-form-item>
<el-form-item label="状态">
<el-select v-model="queryForm.state" placeholder="状态" clearable>
<el-option label="已发布" value="已发布" />
<el-option label="草稿" value="草稿" />
</el-select>
</el-form-item>
<el-form-item>
<el-button type="primary" @click="queryArticle" :icon="Search" />
<el-button type="warning" @click="resetForm" :icon="Loading" />
</el-form-item>
</el-form>
</div>
<div>
<el-table :data="objLs" width="100%" row-class-name="success-row">
<el-table-column prop="title" label="标题" />
<el-table-column prop="categoryId" label="分类" />
<el-table-column prop="createBy" label="发表时间" />
<el-table-column prop="state" label="状态" />
<el-table-column label="操作">
<template #default="{ row }">
<el-row>
<!-- <el-col :span="6"> -->
<el-button type="primary" disabled circle :icon="Edit" @click="editArticle(row)" />
<!-- </el-col> -->
<!-- <el-col :span="16"> -->
<el-button type="danger" disabled circle :icon="Delete" @click="deleteArticle(row)" />
<!-- </el-col> -->
</el-row>
</template>
</el-table-column>
</el-table>
</div>
<!-- 分页 -->
<div class="el-pag">
<el-pagination v-model:current-page="queryForm.pageNum" v-model:page-size="queryForm.pageSize"
:page-sizes="[2, 5, 10, 20]" :small="small" :disabled="disabled" :background="background"
layout="total,sizes, prev, pager, next,jumper" :total="total" @size-change="handleSizeChange"
@current-change="handleCurrentChange" />
</div>
</el-card>
</div>
</div>
</template>
<script setup>
import { ref, onMounted } from 'vue'
import { Edit, Delete, Search, Loading } from '@element-plus/icons-vue'
import user from '@/api/user'
import article from '@/api/article'
/**
* 分页配置
*/
const small = ref(false)
const background = ref(false)
const disabled = ref(false)
const total = ref(0)
const handleSizeChange = (val) => {
console.log(`${val} items per page`)
}
const handleCurrentChange = (val) => {
console.log(`current page: ${val}`)
}
/**
* 表单配置
*/
const queryForm = ref({
"pageNum": 1,
"pageSize": 5,
"categoryId": null,
"state": null,
})
/**
* 重置表单
*/
const resetForm = () => {
queryForm.value = {
"pageNum": 1,
"pageSize": 2,
"categoryId": null,
"state": null,
}
getAllArticle()
}
/**
* 文章列表
*/
const objLs = ref([
{
"id": 1,
"title": "标题1",
"categoryId": 1,
"createBy": "admin",
"state": 1
},
{
"id": 2,
"title": "标题2",
"categoryId": 2,
"createBy": "admin",
"state": 1
},
])
// 请求函数配置
const getAllArticle = () => {
article.articleGetByPage(queryForm.value, res => {
total.value = res.data.data.total
objLs.value = res.data.data.items
}, err => {
if (err.status === 401) {
alert('登录失效,请重新登录')
}
})
}
const login = () => {
user.login(
{
username: 'admin',
password: '123123'
}
)
}
const queryArticle = () => {
article.articleGetByPage(queryForm.value, res => {
objLs.value = res.data.data.items
}, err => {
if (err.status === 401) {
alert('登录失效,请重新登录')
}
})
}
onMounted(() => {
// login()
getAllArticle()
})
</script>
<style scoped>
.card-header {
margin: 10px 0;
display: flex;
align-items: center;
justify-content: space-between;
}
.el-form {
margin: 20px 0;
}
.el-pag {
margin: 20px 0;
display: flex;
justify-content: flex-end;
}
.el-table .success-row {
margin: 20px;
--el-table-tr-bg-color: var(--el-color-success-light-9);
}
</style>
|
下拉选项框
1
2
3
4
5
6
7
8
9
10
11
12
13
14
15
16
17
18
19
20
21
22
23
24
25
26
27
28
29
30
31
32
33
34
35
36
37
38
39
40
41
42
43
44
45
46
47
48
49
50
51
52
53
54
55
56
57
58
59
60
61
62
63
64
| <script setup>
// 路由
const router = useRouter();
// 状态
const tokenStore = useTokenStore();
// 用户信息
const userInfoStore = useUserInfoStore();
const logout = () => {
ElMessageBox.confirm('确定要退出登录吗?',
'温馨提示', {
confirmButtonText: '确定',
cancelButtonText: '取消',
type: 'warning'
}).then(() => {
// 清空个人信息和token
tokenStore.delToken();
userInfoStore.removeInfo();
// 跳转到登录页面
router.push('/login');
ElMessage.success('退出登录成功');
}).catch(() => {
ElMessage.info('取消退出登录');
});
}
// 获取用户信息并保存到store中
const getUserInfo = () => {
user.userInfoService(res => {
userInfoStore.setInfo(res.data);
}, err => {
console.log(err);
})
}
// 处理下拉选项框
const handleCommand = (command) => {
if (command === 'logout') {
logout();
} else {
router.push("/user/" + command);
}
}
</script>
<template>
<el-dropdown placement="bottom-end" @command="handleCommand">
<span class="el-dropdown__box">
<el-avatar :src="userInfoStore.info.userPic || userInfoStore.defaultAvatar || avatar"/>
<el-icon>
<CaretBottom/>
</el-icon>
</span>
<template #dropdown>
<el-dropdown-menu class="el-dropdown-menu--right">
<el-dropdown-item :icon="User" command="info">基本资料</el-dropdown-item>
<el-dropdown-item :icon="Crop" command="avatar">更换头像</el-dropdown-item>
<el-dropdown-item :icon="EditPen" command="resetPsd">重置密码</el-dropdown-item>
<el-dropdown-item :icon="SwitchButton" command="logout">退出登录</el-dropdown-item>
</el-dropdown-menu>
</template>
</el-dropdown>
</template>
|
el-dropdown-item 标签的 command 属性就是传递给@command回调函数的参数,对参数进行判断进行不同处理。
3 黑马大事件-前端
3.1 环境准备
- 创建 Vue 工程
npm init vue@latest
- 安装依赖
- Element-Plus
npm install element-plus --save
- Axios
npm install axios
- Sass
npm install sass -D
- 目录调整
- 删除 components 下面自动生成的内容
- 新建目录
api、utils、views
- 将资料中的静态资源拷贝到 assets 目录下
- 删除 App.vue 中自动生成的内容
3.2 细节要点
3.2.1 表单校验
- 数据绑定
参考接口文档给属性起名
- 表单校验
el-form 标签上通过 rules 属性,绑定校验规则
el-form-item 标签上通过 prop 属性,指定校验项1
2
3
4
5
6
7
8
9
10
11
12
13
14
15
16
17
18
19
20
21
22
23
24
|
const rePasswordValid = (rule, value, callback) => {
if (value == null || value === '') {
return callback(new Error('请再次确认密码'))
}
if (registerData.value.password !== value) {
return callback(new Error('两次输入密码不一致'))
}
callback()
};
const registerDataRules = reactive({
username: [
{required: true, message: '请输入用户名', trigger: 'blur'},
{min: 4, max: 16, message: '用户名的长度必须为4~16位', trigger: 'blur'}
],
password: [
{required: true, message: '请输入密码', trigger: 'blur'},
{min: 4, max: 16, message: '密码长度必须为4~16位', trigger: 'blur'}
],
rePassword: [
{validator: rePasswordValid, trigger: 'blur'}
]
});
|
- 请求校验
对提交的表单数据需要先进行验证数据有效性再发起请求。1
2
3
4
5
6
7
8
9
10
11
12
13
14
15
16
17
18
19
20
21
22
23
24
25
26
27
28
29
30
31
32
33
34
35
36
37
38
39
40
41
42
43
44
45
46
47
48
49
50
51
52
53
54
55
56
57
58
59
60
61
62
| import {User, Lock} from '@element-plus/icons-vue'
import {reactive, ref} from 'vue'
import {ElMessage} from "element-plus";
import user from '@/api/user'
const isRegister = ref(false);
const form = ref()
const registerData = ref({
username: '',
password: '',
rePassword: ''
});
const rePasswordValid = (rule, value, callback) => {
if (value == null || value === '') {
return callback(new Error('请再次确认密码'))
}
if (registerData.value.password !== value) {
return callback(new Error('两次输入密码不一致'))
}
callback()
};
const registerDataRules = reactive({
username: [
{required: true, message: '请输入用户名', trigger: 'blur'},
{min: 4, max: 16, message: '用户名的长度必须为4~16位', trigger: 'blur'}
],
password: [
{required: true, message: '请输入密码', trigger: 'blur'},
{min: 4, max: 16, message: '密码长度必须为4~16位', trigger: 'blur'}
],
rePassword: [
{validator: rePasswordValid, trigger: 'blur'}
]
});
const register = () => {
form.value.validate((valid) => {
if (valid) {
user.registerService(registerData.value, res => {
alert(JSON.stringify(res))
if (res.code === 200) {
ElMessage.success('注册成功')
} else {
ElMessage.error('注册失败:' + res.message)
}
}, err => {
console.log(err)
ElMessage.error('系统内部发生错误')
})
}
return false
})
};
const resetForm = (formEl) => {
if (!formEl) return
formEl.resetFields()
}
|
3.2.2 跨域处理
由于浏览器的同源策略限制,向不同源(不同协议、不同域名、不同端口)发送 ajax 请求会失败,解决办法一般通过代理实现。
后端接口路径格式为:
eg:
- http://localhost:8080/user/register
- http://localhost:8080/api/user/register
[!WARNING] 注意
- 第一种 baseURL 中需要添加 api,并且在代理配置处需要重写请求路径。
- 第二种 baseURL 中不需要添加 api,因为后端接口自带了 api,也不需要重写请求路径。
request.js 配置:
1
2
3
4
| import axios from 'axios';
const baseURL = '/api';
const baseURL = '';
const instance axios.create({baseURL})
|
vite.config.js 配置:
1
2
3
4
5
6
7
8
9
10
| server: {
proxy: {
'/api': {
target: 'http://localhost:8080',
changeOrigin: true,
}
}
}
|
3.2.3 未登录统一处理
对未登录或者 token 过期等响应异常情况进行统一处理跳转到登录页。
1
2
3
4
5
6
7
8
9
10
11
12
13
14
15
16
17
18
19
20
21
22
23
24
25
26
27
28
29
30
31
|
instance.interceptors.response.use(
response => {
if (response.data.code === 200) {
return response.data
} else {
ElNotification.error(response.data.message ? response.data.message : '服务异常');
return Promise.reject(response.data);
}
},
error => {
const errorMessages = {
401: '未登录',
403: '无权限',
404: '资源不存在',
500: '服务器内部异常',
};
const errorMessage = errorMessages[error.response.status] || '未知错误';
ElNotification.error(errorMessage);
if (error.response.status) {
router.push({path: '/login'})
}
return Promise.reject(error);
}
)
|
对 token 过期的路由跳转时进行异常处理路由前判断 token 决定是否放行:
1
2
3
4
5
6
7
8
9
10
11
12
| router.beforeEach((to, from, next) => {
const tokenStore = useTokenStore();
if (to.path === '/login' || to.path === '/register') return next()
if (tokenStore.token !== '') {
next()
} else {
ElMessage.error('请先登录')
return router.push('/login')
}
})
|
3.2.4 一对多关系前端 id 转义
对于响应数据中存在关联id数据需要转化为对应表id行的数据进行可视化展示,采用以下嵌套循环处理的方法进行:
1
2
3
4
5
6
7
8
9
10
11
12
13
14
15
16
17
18
19
| const getAllArticle = () => {
article.articleGetByPage(queryForm.value, res => {
total.value = res.data.total
articleLs.value = res.data.items
for (let i = 0; i < articleLs.value.length; i++) {
for (let j = 0; j < categorys.value.length; j++) {
if (articleLs.value[i].categoryId === categorys.value[j].id) {
articleLs.value[i].categoryName = categorys.value[j].categoryName
}
}
}
}, err => {
if (err.status === 401) {
alert('登录失效,请重新登录')
}
})
}
|
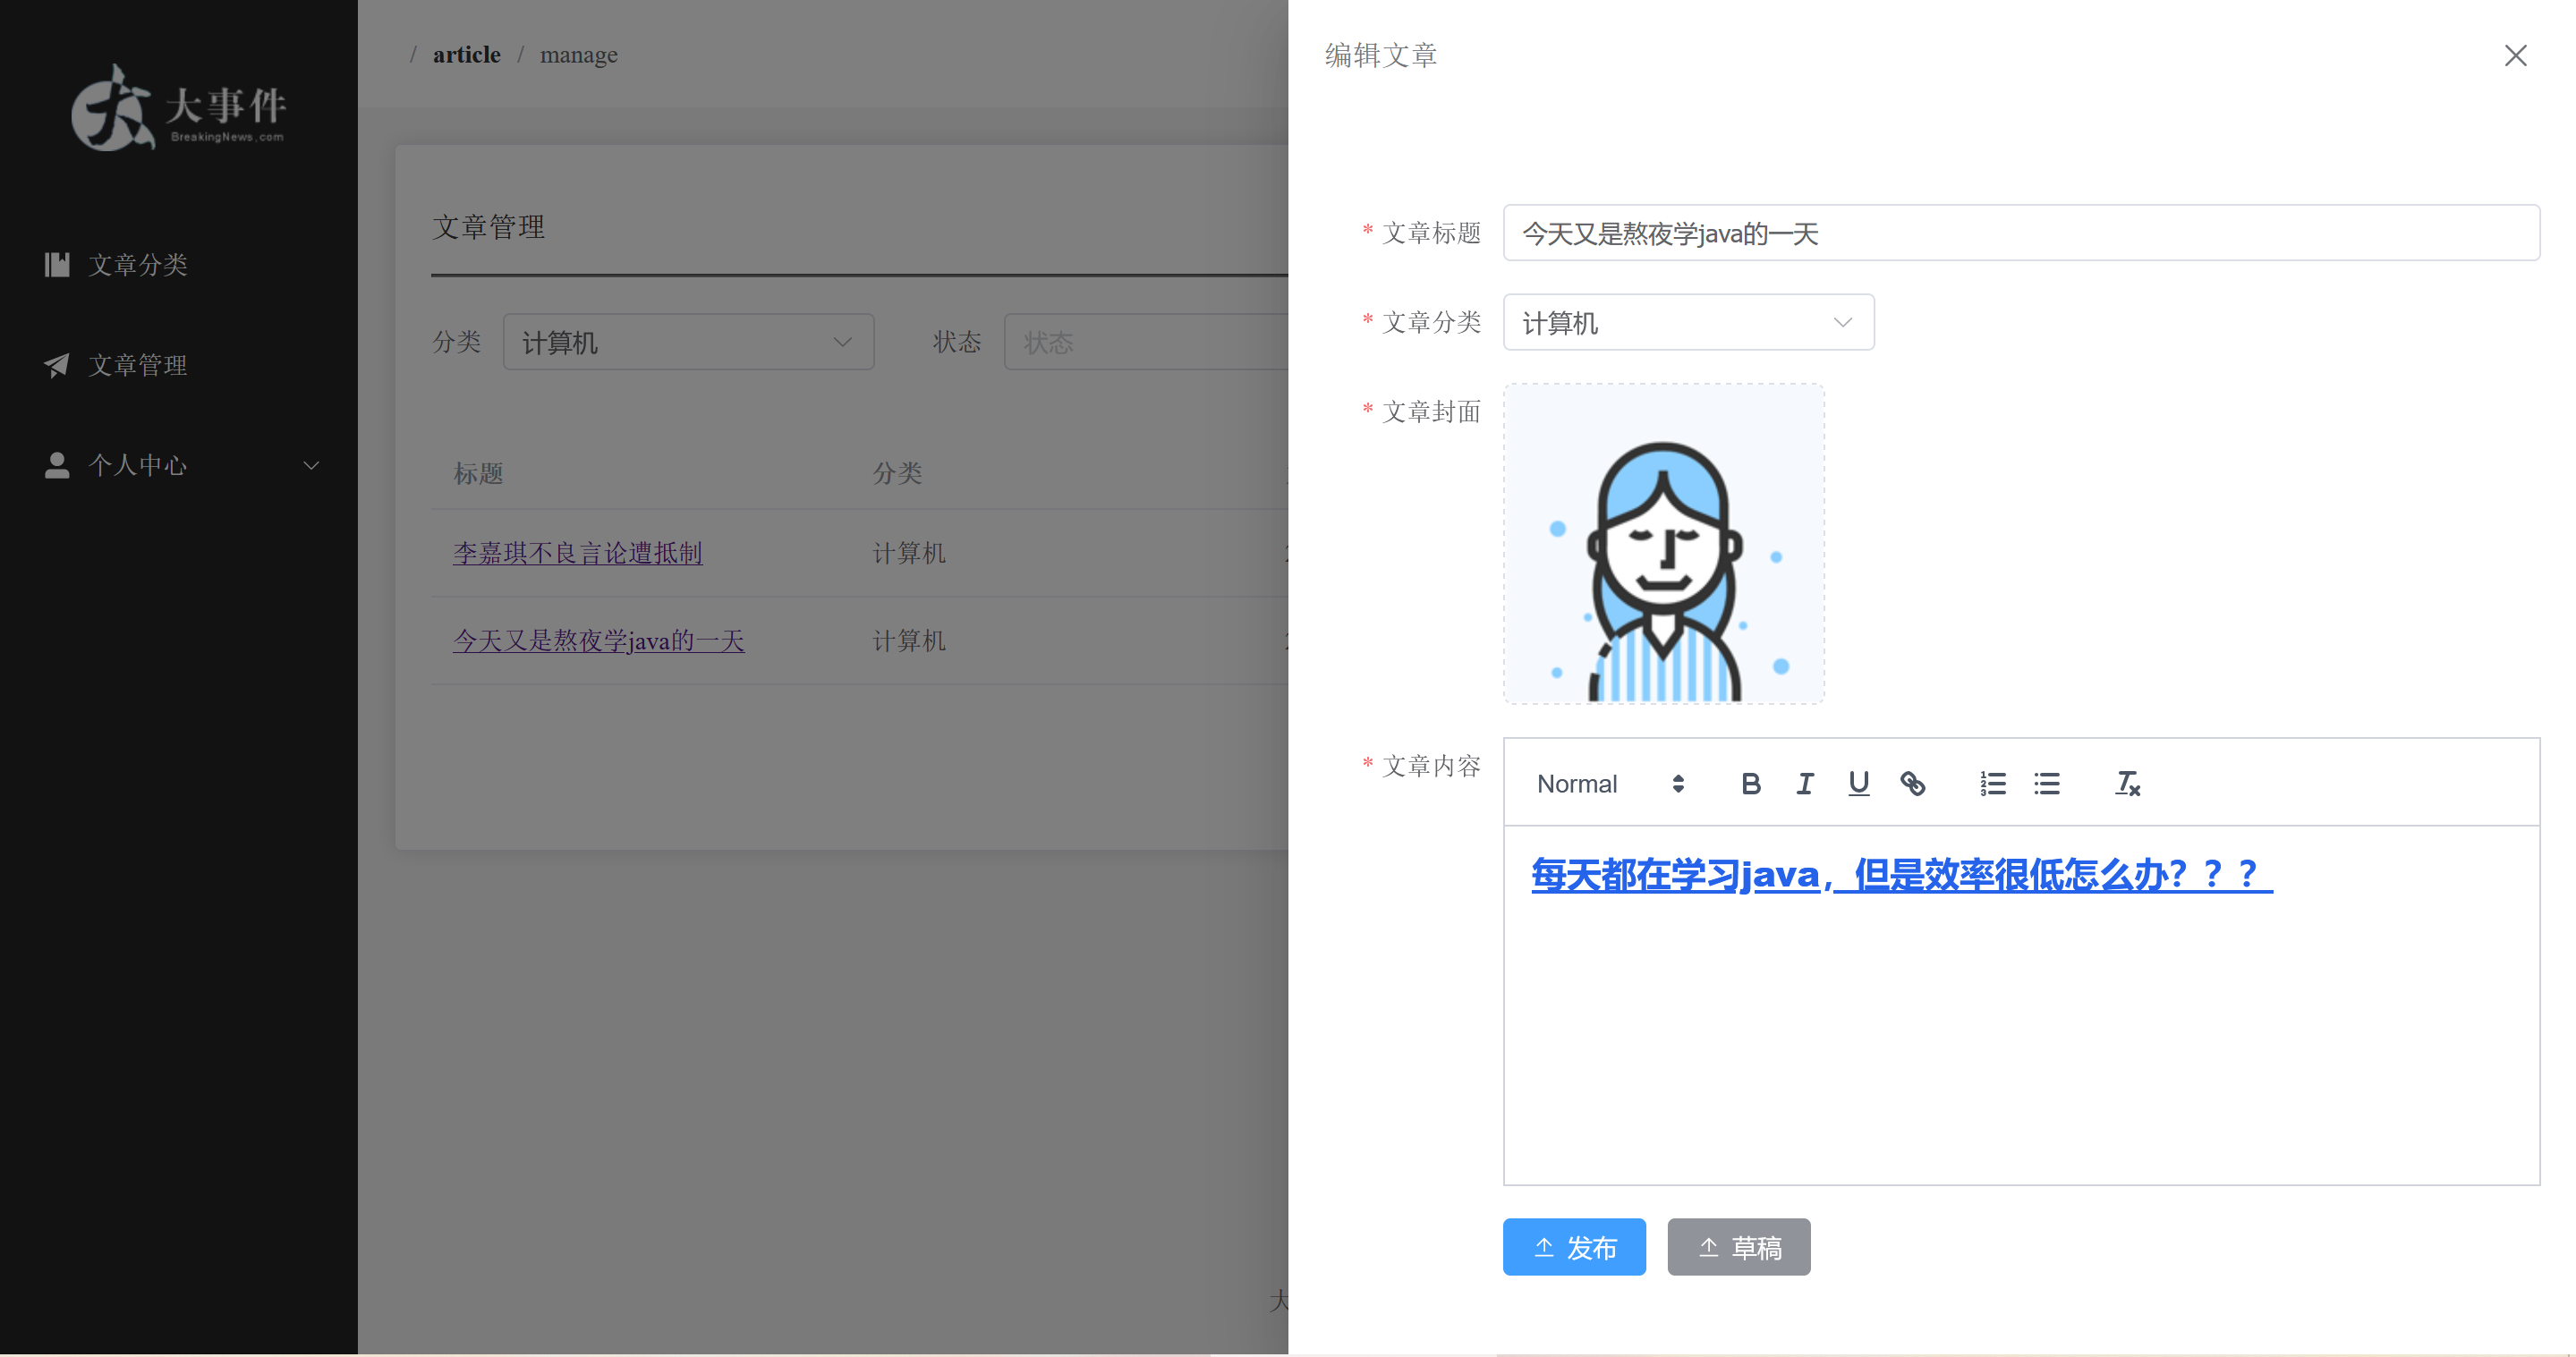
3.2.5 富文本编辑器
文章内容需要使用到富文本编辑器,这里咱们使用一个开源的富文本编辑器 Quill;除此以外还有tinymce(常用)。
官网地址: https://vueup.github.io/vue-quill/
安装:
1
| npm install @vueup/vue-quill@latest --save
|
导入组件和样式:
1
2
| import { QuillEditor } from '@vueup/vue-quill'
import '@vueup/vue-quill/dist/vue-quill.snow.css'
|
页面长使用quill组件:
1
2
3
4
5
6
| <quill-editor
theme="snow"
v-model:content="articleModel.content"
contentType="html"
>
</quill-editor>
|
样式美化:
1
2
3
4
5
6
| .editor {
width: 100%;
:deep(.ql-editor) {
min-height: 200px;
}
}
|
3.2.6 图片上传
将来当点击+图标,选择本地图片后,el-upload这个组件会自动发送请求,把图片上传到指定的服务器上,而不需要我们自己使用axios发送异步请求,所以需要给el-upload标签添加一些属性,控制请求的发送
[!tip] el-upload属性
- auto-upload:是否自动上传
- action: 服务器接口路径
- name: 上传的文件字段名
- headers: 设置上传的请求头
- on-success: 上传成功的回调函数
3.2.7
3.3 路由管理(vue-router)
[!tip] Vue Router
- 安装 vue-router
npm install vue-router@4
- 在
src/router/index.js 中创建路由器,并导出
- 在 vue 应用实例中使用
vue-route
- 声明
router-view 标签,展示组件内容
- 路由关系和路由器定义 index.js:
1
2
3
4
5
6
7
8
9
10
11
12
13
14
15
16
17
18
19
| import {createRouter, createWebHistory} from 'vue-router'
const routes = [
{
path: '/',
component: () => import("@/views/Layout.vue"),
},
{
path: '/login',
component: () => import("@/views/Login.vue"),
}]
const router = createRouter({
history: createWebHistory(),
routes: routes
})
export default router
|
- main.js 入口文件使用路由:
1
2
3
4
5
6
7
8
9
10
11
| import './assets/main.scss'
import 'element-plus/dist/index.css'
import zhCn from 'element-plus/dist/locale/zh-cn.mjs'
import {createApp} from 'vue'
import ElementPlus from 'element-plus'
import router from '@/router'
import App from './App.vue'
const app = createApp(App)
app.use(ElementPlus, {locale: zhCn})
app.use(router)
app.mount('#app')
|
- app.vue 根组件渲染路由:
1
2
3
4
5
6
7
8
9
| <script setup>
// 数据和行为
</script>
<template>
<router-view/>
</template>
<style scoped>
/* 样式和风格 */
</style>
|
- 路由切换:
1
2
3
4
| import {useRouter} from "vue-router";
const router = useRouter();
router.push({path: '/'})
|
3.3.1 子路由
配置子路由
- 定义子路由关系
- 声明
router-view 标签
- 为菜单项
el-menu-item 设置 index 属性,设置点击后的路由路径
- 子路由配置(包括路径,重定向,组件,子路由等信息):
1
2
3
4
5
6
7
8
9
10
11
12
13
14
15
16
17
18
19
20
21
22
23
24
25
26
27
28
29
30
31
32
33
34
35
36
37
38
39
|
const routes = [
{
path: '/',
redirect: '/article/category',
component: () => import("@/views/Layout.vue"),
children: [
{
path: 'article/category', component: () => import("@/views/article/ArticleCategory.vue"),
},
{
path: 'article/manage',
component: () => import("@/views/article/ArticleManage.vue"),
},
{
path: 'user/',
redirect: '/user/info',
children: [
{
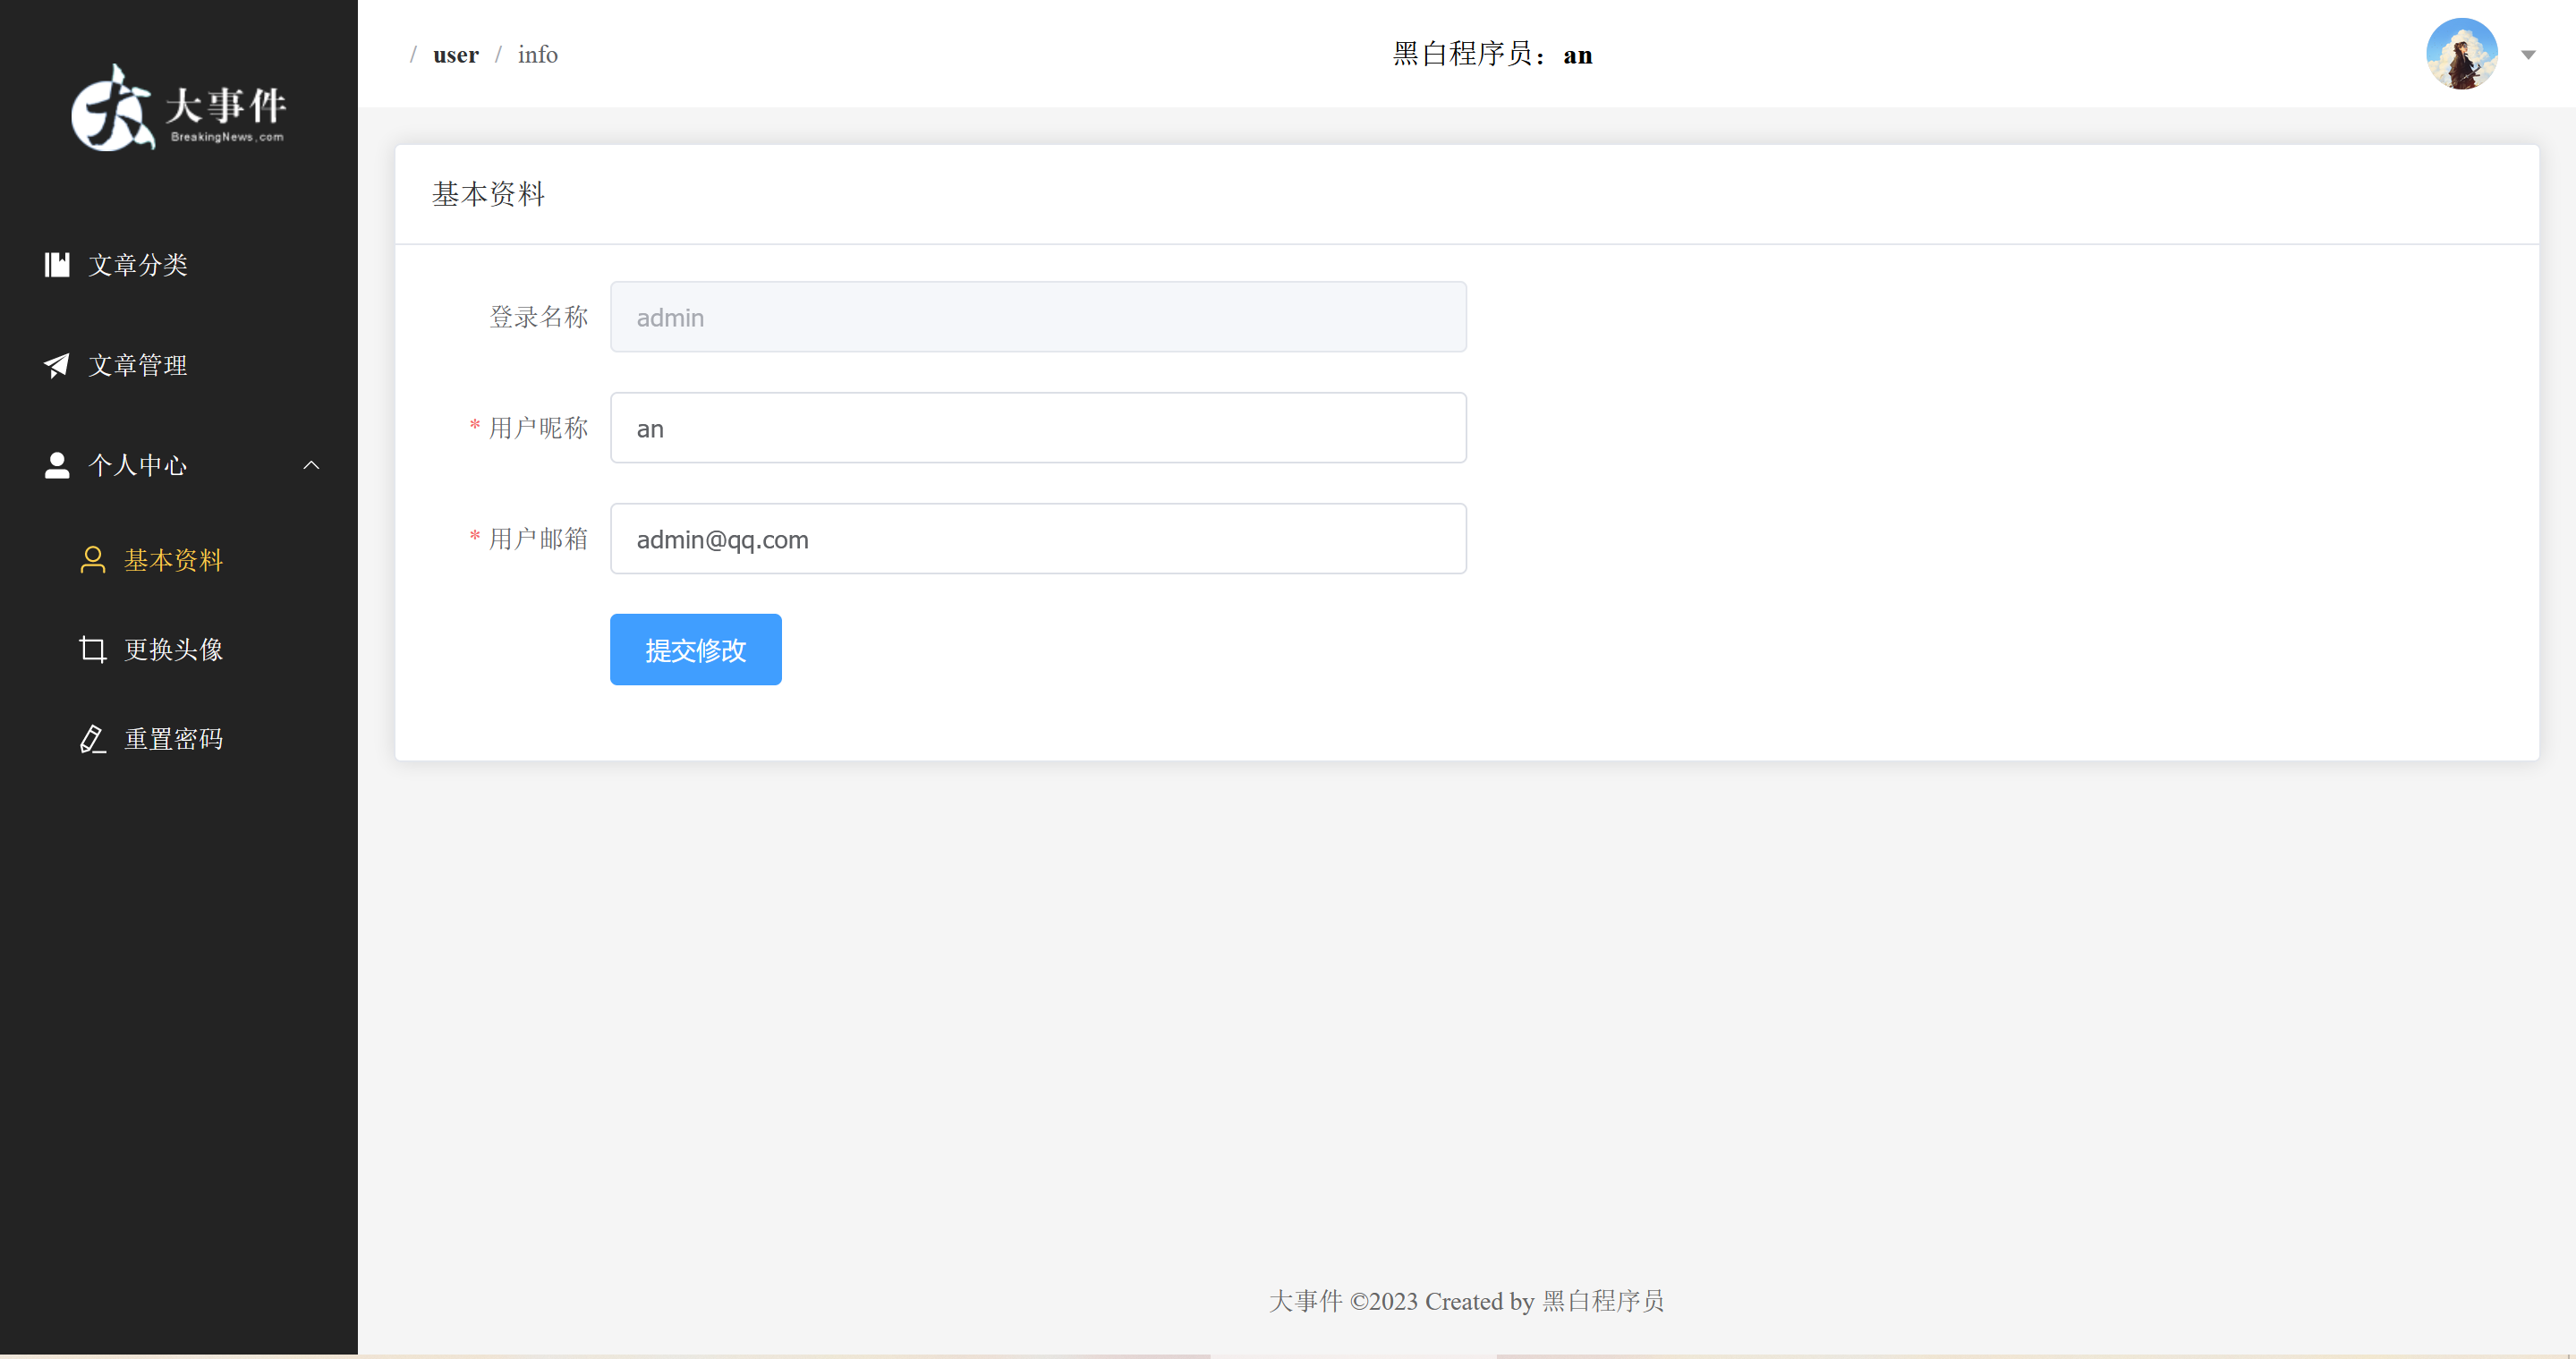
name: 'userInfo',
path: 'info',
component: () => import("@/views/user/UserInfo.vue"),
},
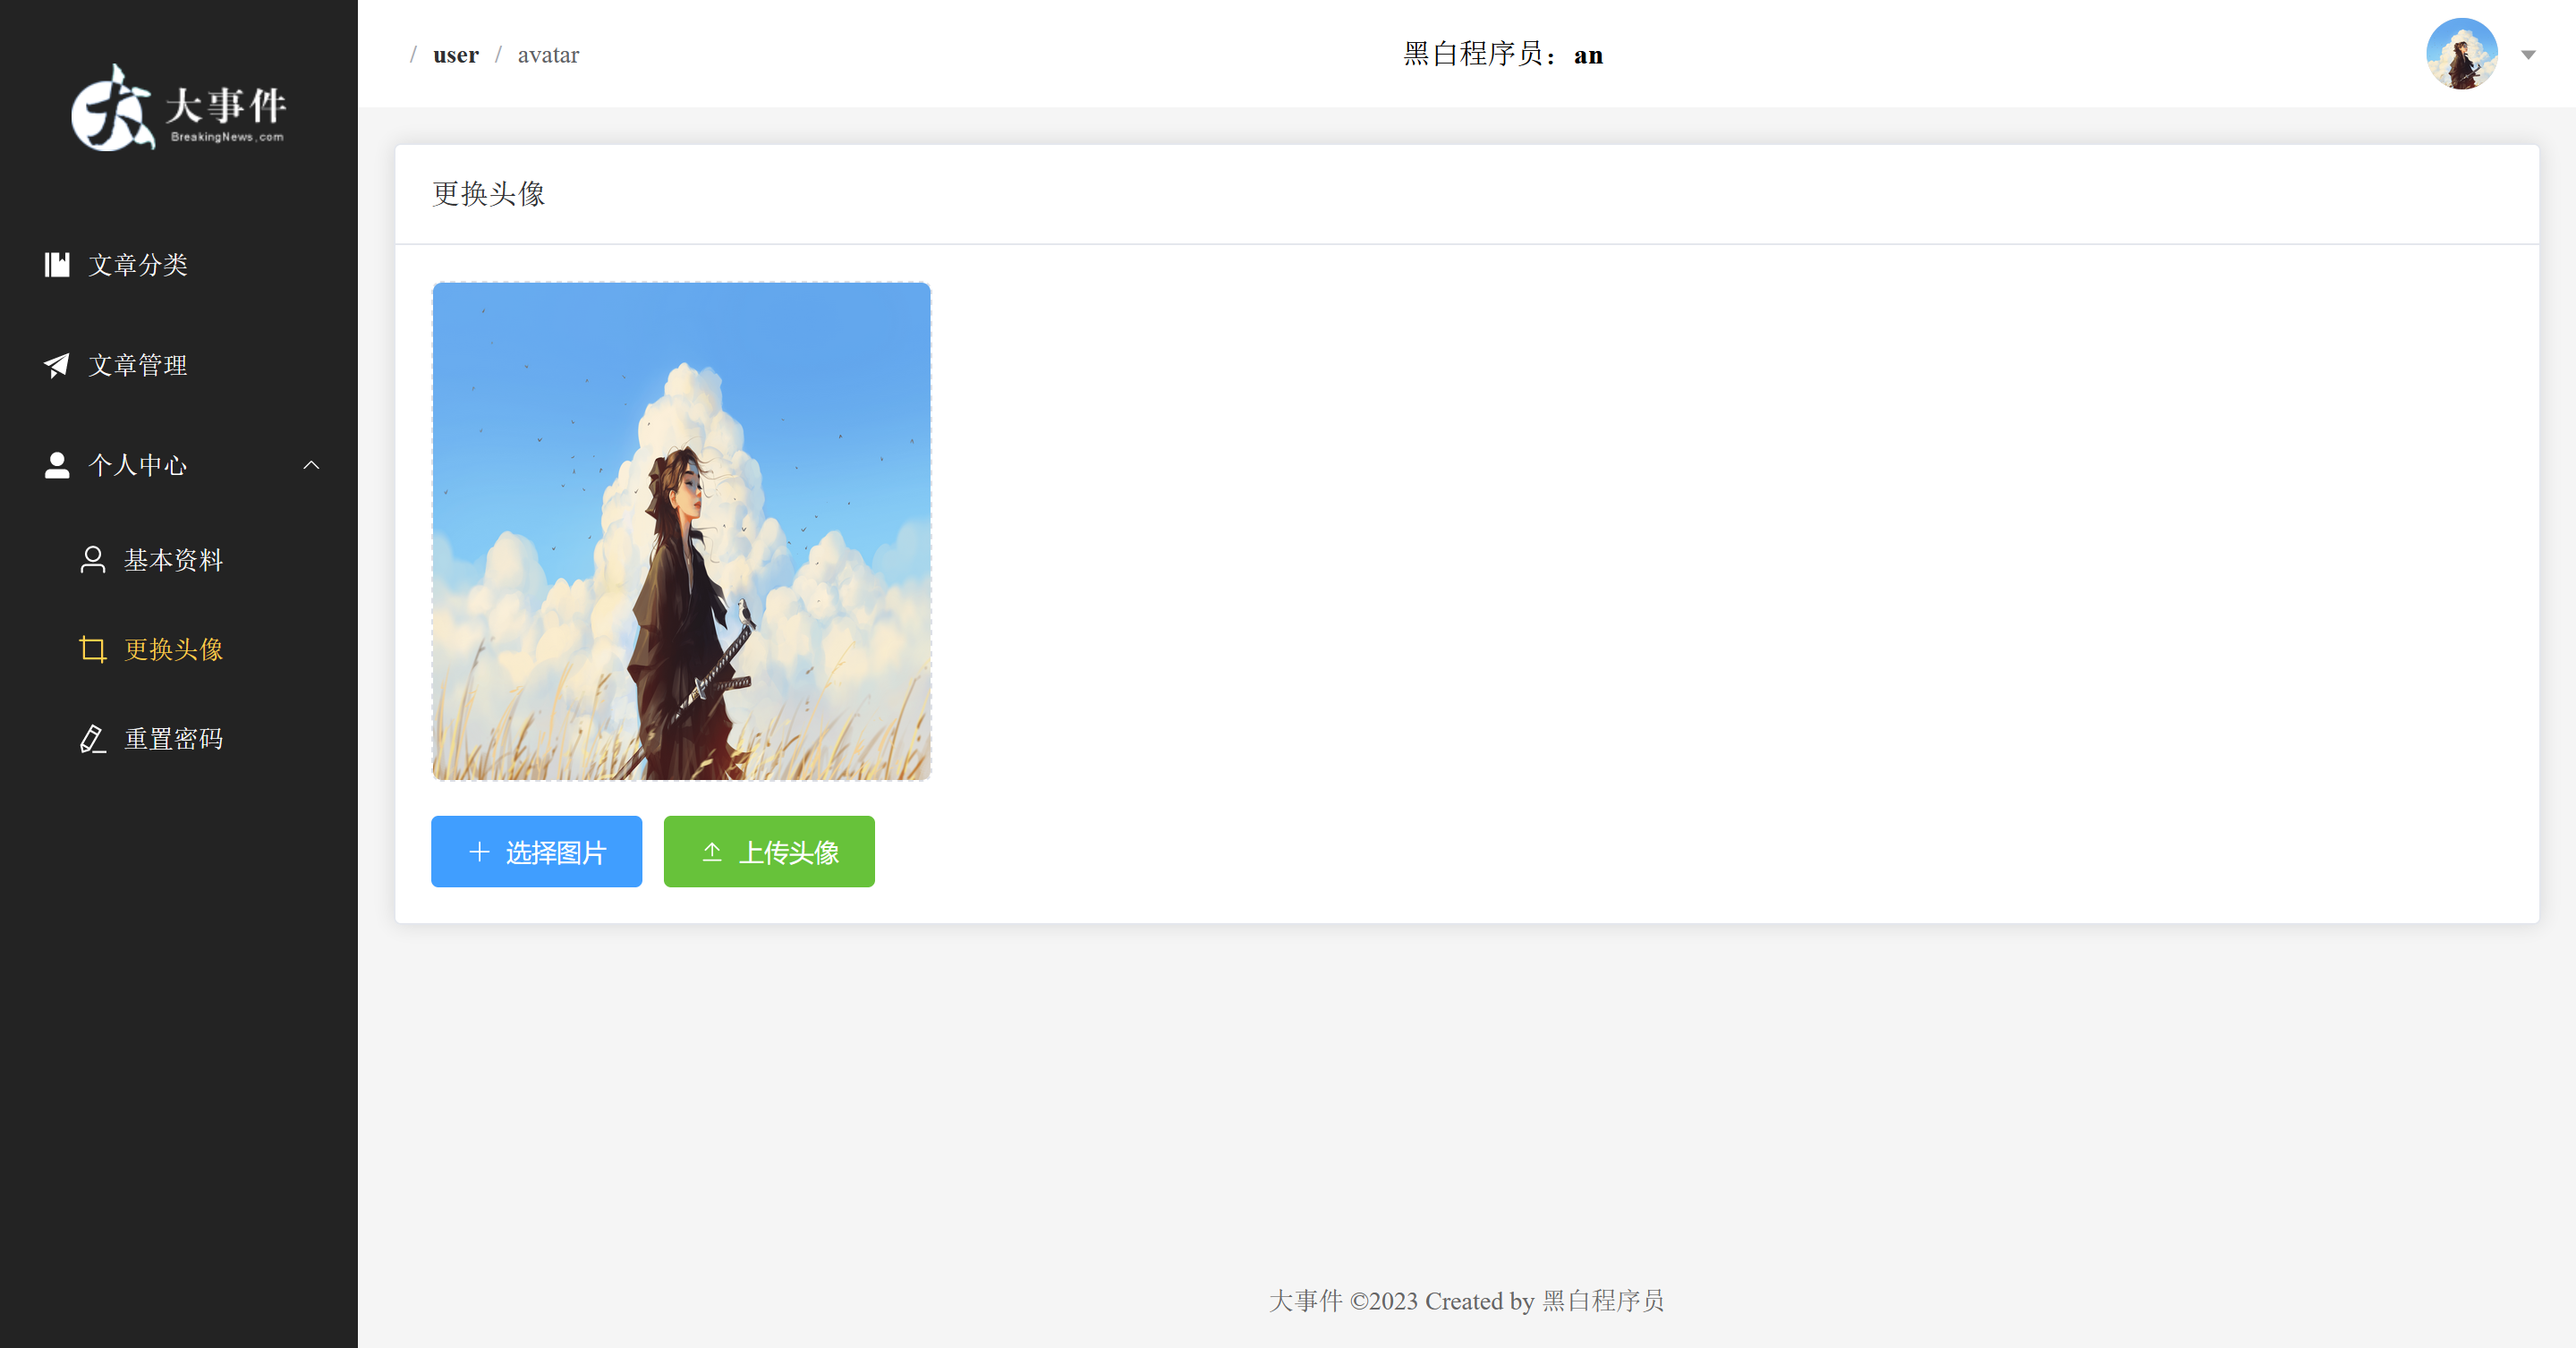
{
path: 'avatar',
component: () => import("@/views/user/UserAvatar.vue"),
},
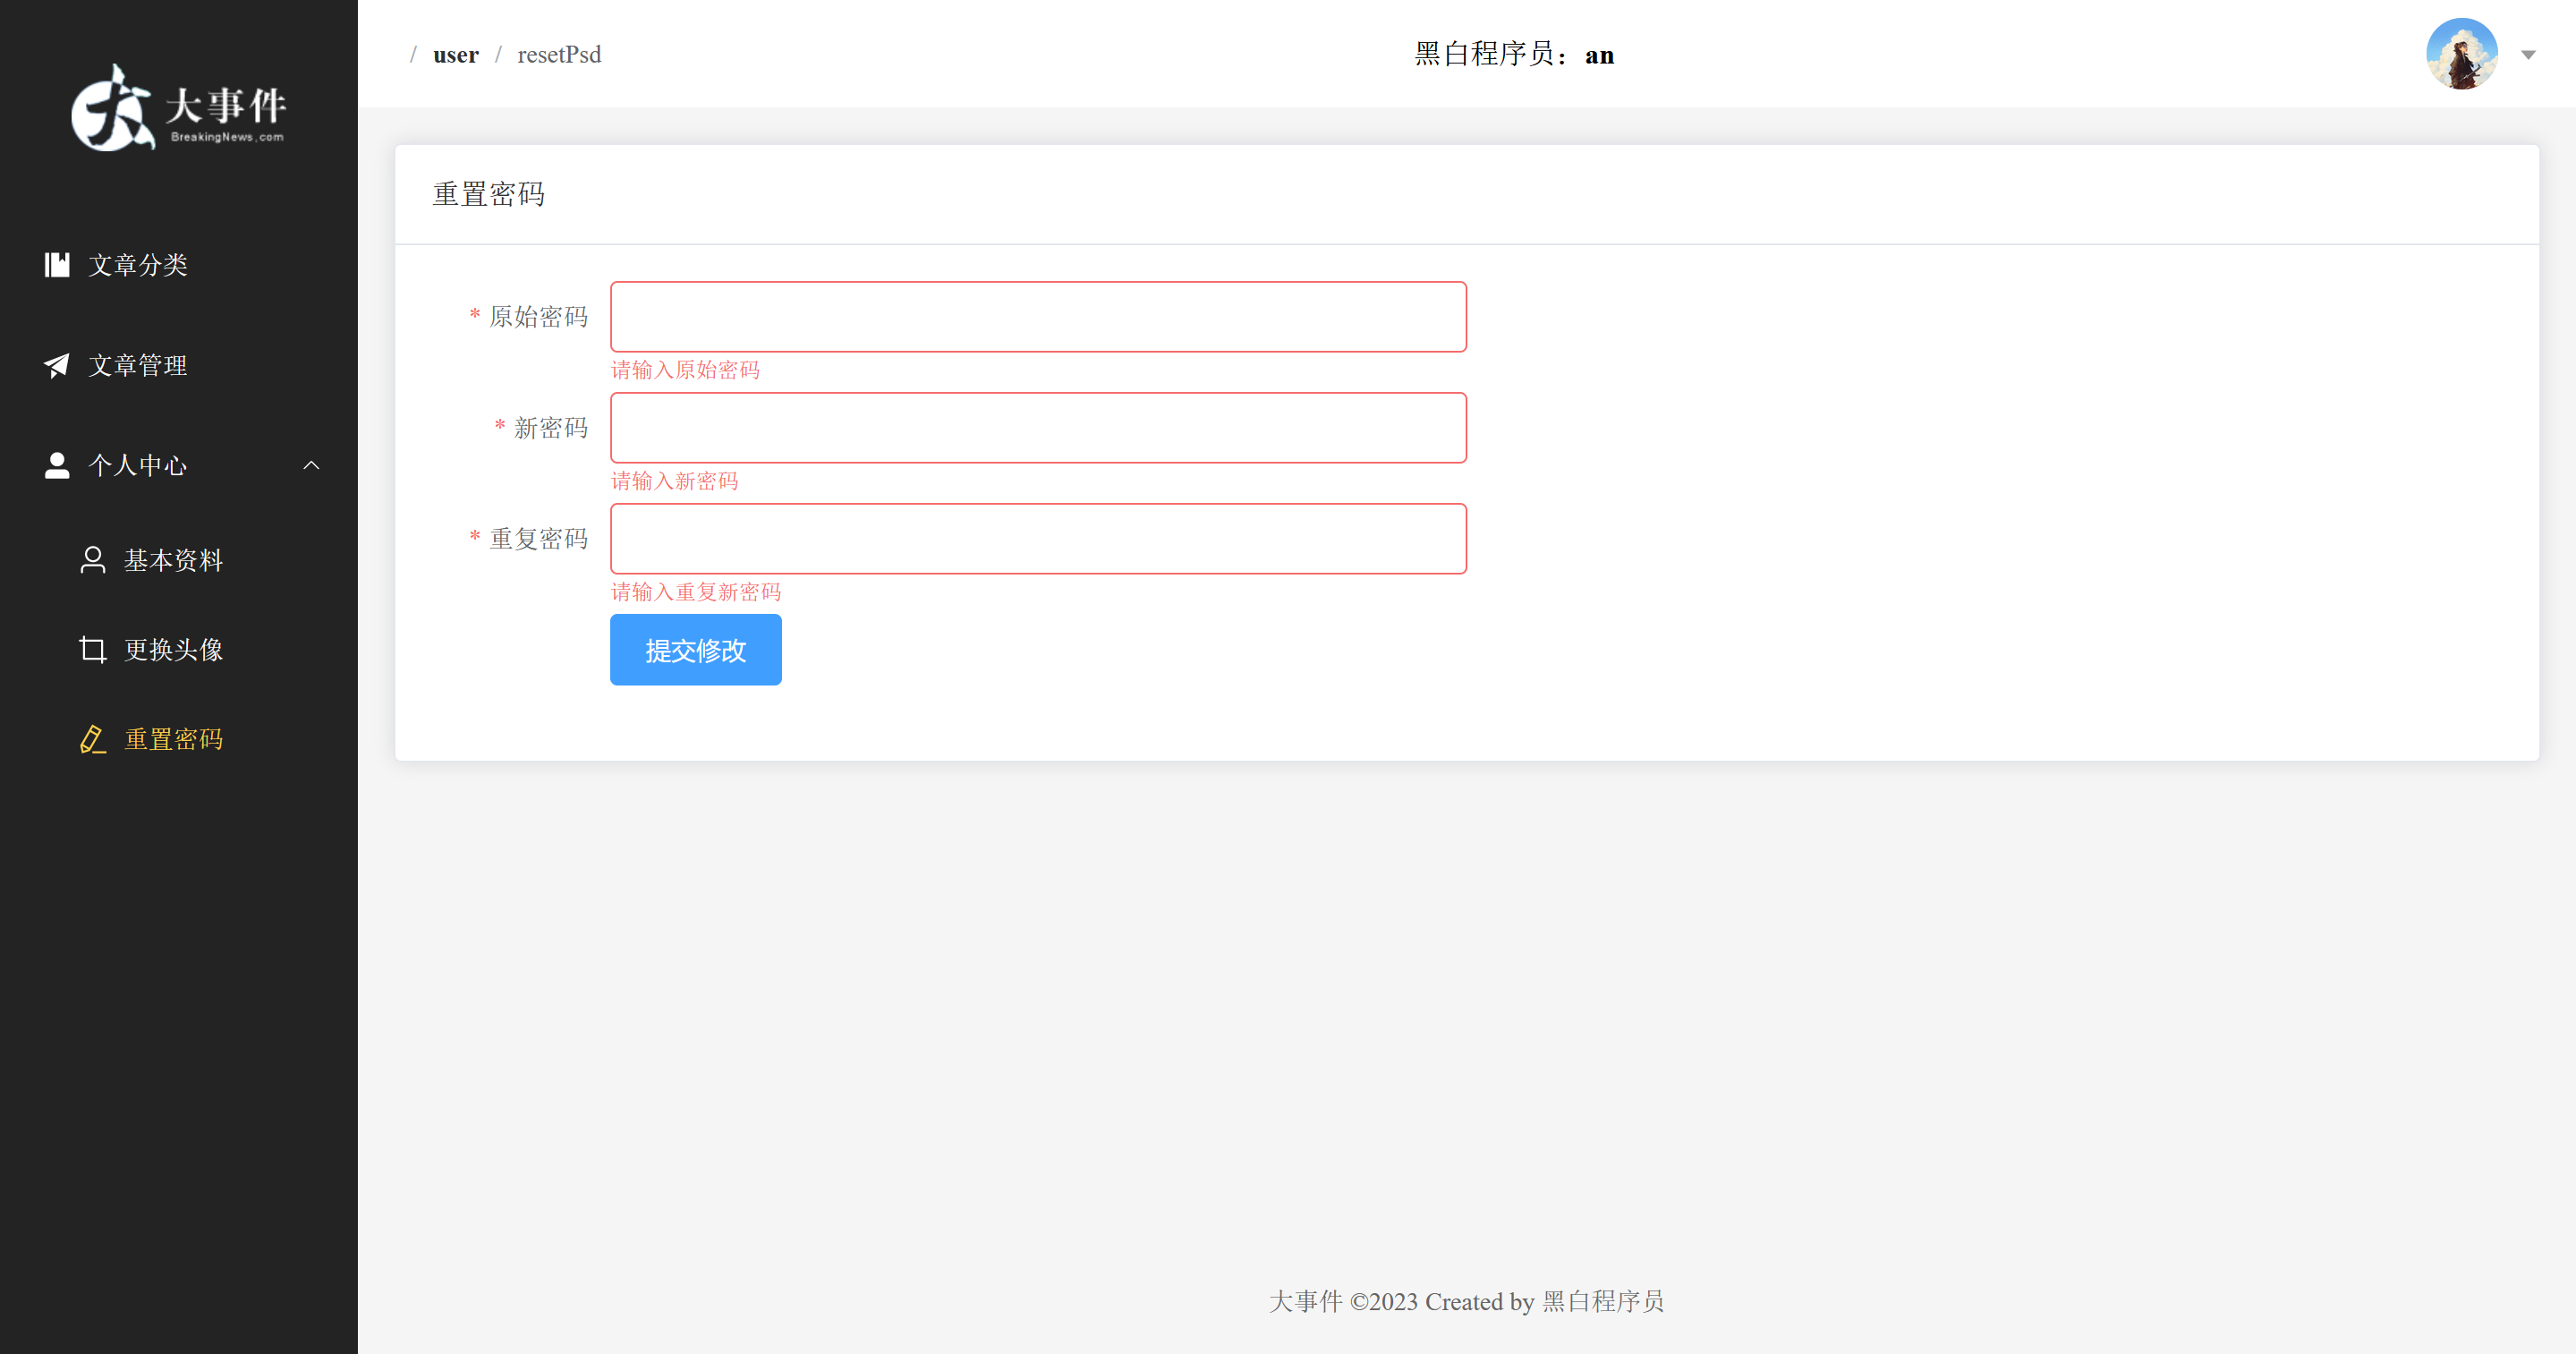
{
path: 'resetPsd',
component: () => import("@/views/user/UserResetPassword.vue"),
}
]
},
]
},
{
path: '/login',
component: () => import("@/views/Login.vue"),
}]
|
- 菜单设置
index 属性,值为路由地址1
2
3
4
5
6
7
8
9
10
11
12
13
14
15
16
17
18
19
20
21
22
23
24
25
26
27
28
29
30
31
32
33
34
35
36
37
38
39
40
41
| <el-menu active-text-color="#ffd04b" background-color="#232323" router
text-color="#fff">
<el-menu-item index="/article/category">
<el-icon>
<Management/>
</el-icon>
<span>文章分类</span>
</el-menu-item>
<el-menu-item index="/article/manage">
<el-icon>
<Promotion/>
</el-icon>
<span>文章管理</span>
</el-menu-item>
<el-sub-menu index="/user">
<template #title>
<el-icon>
<UserFilled/>
</el-icon>
<span>个人中心</span>
</template>
<el-menu-item index="/user/info">
<el-icon>
<User/>
</el-icon>
<span>基本资料</span>
</el-menu-item>
<el-menu-item index="/user/avatar">
<el-icon>
<Crop/>
</el-icon>
<span>更换头像</span>
</el-menu-item>
<el-menu-item index="/user/resetPsd">
<el-icon>
<EditPen/>
</el-icon>
<span>重置密码</span>
</el-menu-item>
</el-sub-menu>
</el-menu>
|
- 在需要显示路由组件的区域放置
router-view 标签
1
2
3
4
5
6
| <!-- 中间区域 -->
<el-main>
<div style="width: 1290px; height: 570px;border: 1px solid red;">
<router-view/>
</div>
</el-main>
|
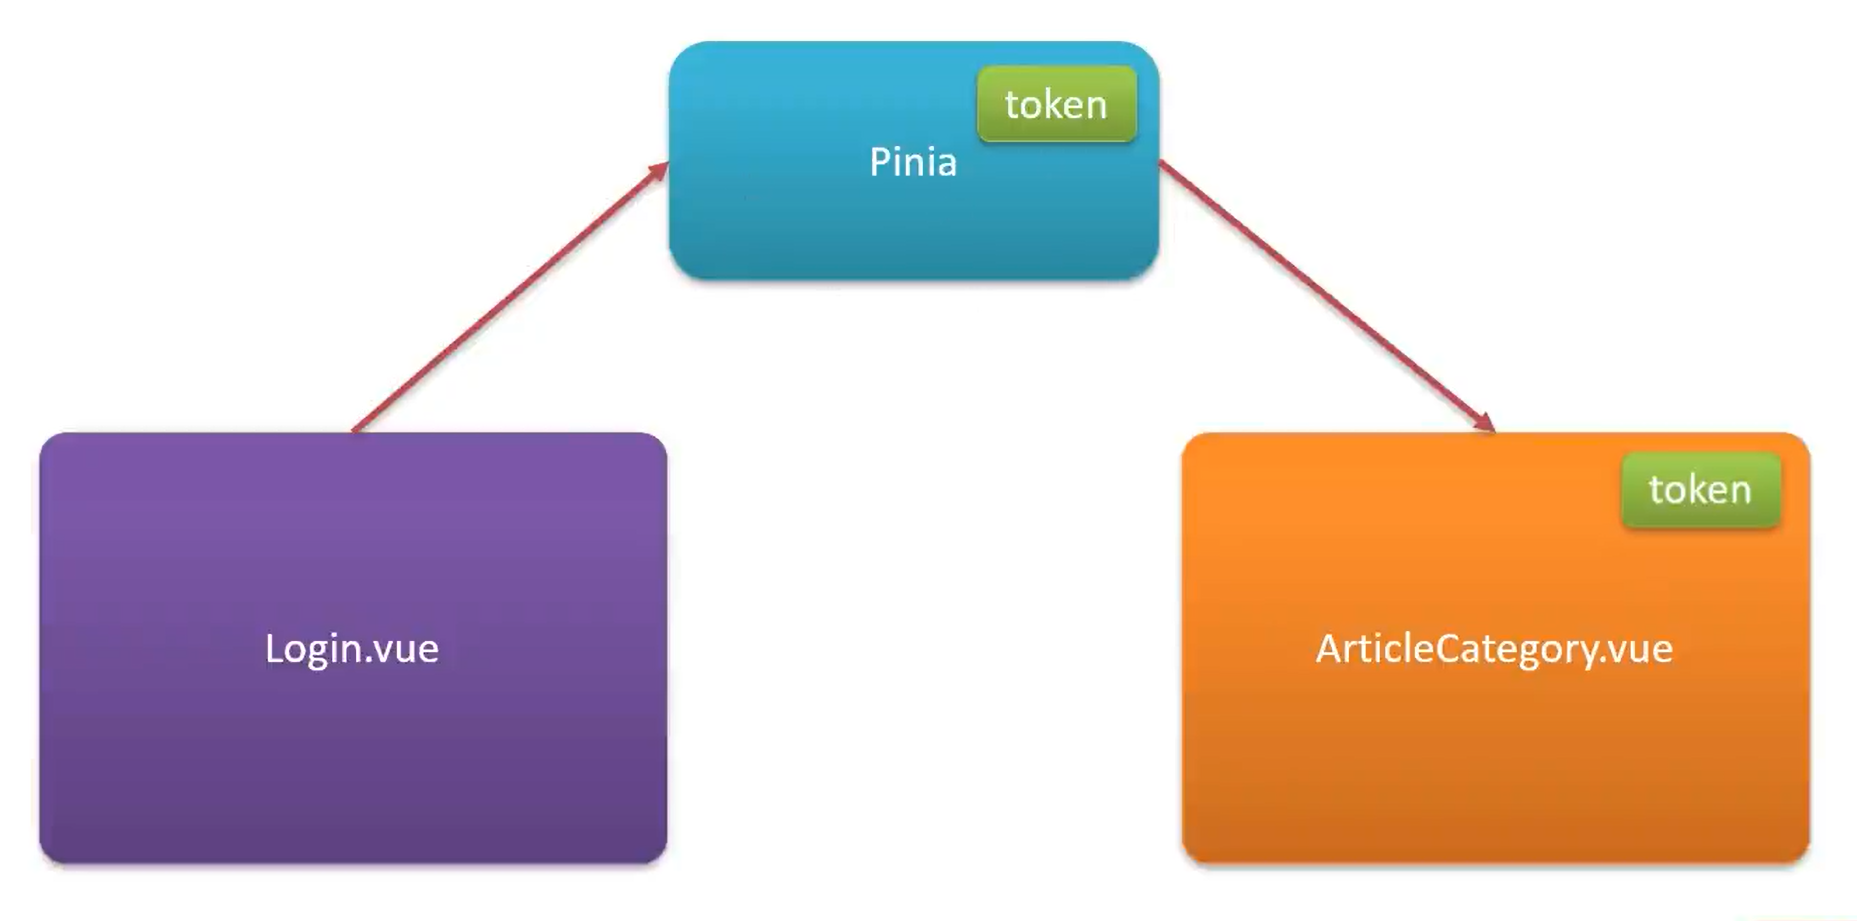
3.4 状态管理(Pinia)
Pinia 是 Vue 的专属状态管理库,它允许你跨组件或页面共享状态
[!tip] pinia 用法
- 安装 pinia,
npm install pinia
- 在 vue 应用实例中使用 pinia
- 在
src/stores/token.js 中定义 store
- 在组件中使用 store
用法详情:
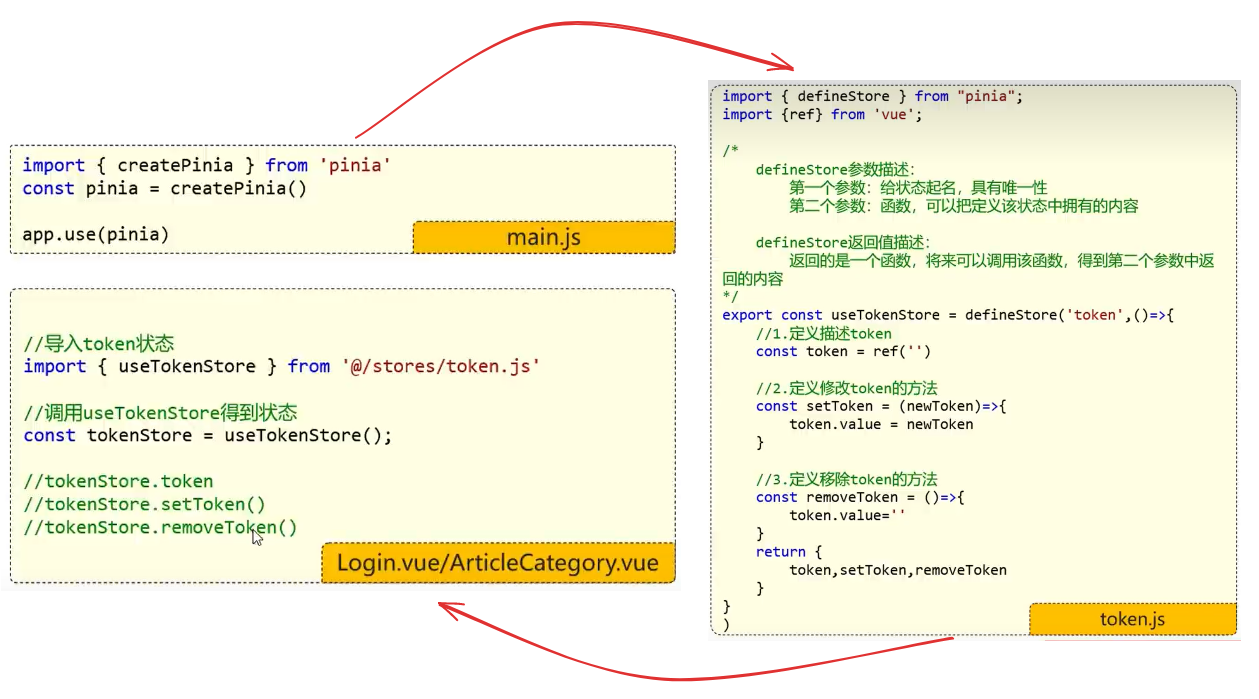
1. 将 pinia 挂载到 app 中:
1
2
3
4
5
6
7
| import {createApp} from 'vue'
import {createPinia} from "pinia";
import App from './App.vue'
const app = createApp(App)
const pinia = createPinia();
app.use(pinia)
app.mount('#app')
|
2. 在 store 文件夹下定义 store:
1
2
3
4
5
6
7
8
9
10
11
12
13
14
15
16
17
18
19
20
21
22
23
24
25
26
27
28
29
30
31
32
33
34
35
36
37
38
39
40
|
import {defineStore} from "pinia";
import {ref} from "vue";
export const useTokenStore = defineStore('token', () => {
const token = ref('')
const setToken = (newToken) => {
token.value = newToken
}
const delToken = () => {
token.value = ''
}
return {
token, setToken, delToken
}
}
)
|
3. 使用定义的 store:
1
2
3
4
5
| import {useTokenStore} from "@/stores/token.js";
const tokenStore = useTokenStore();
tokenStore.token
tokenStore.setToken(newToken)
tokenStore.delToken()
|
### 3.4.1 axios 请求拦截器
在 axios 的请求前拦截器中统一在请求头添加 token 便于后续接口认证。
1
2
3
4
5
6
7
8
9
10
11
12
13
14
15
16
17
18
19
20
|
instance.interceptors.request.use(
config => {
let tokenStore = useTokenStore();
console.log("token:" + tokenStore.token)
if ((config.url !== '/user/login' || config.url !== '/user/register') && tokenStore.token) {
config.headers.Authorization = tokenStore.token
}
if (config.method === 'post') {
config.headers['Content-Type'] = 'application/json'
}
return config
},
error => {
ElNotification.error(error.message ? error.message : '请求异常');
Promise.reject(error)
}
)
|
3.4.2 Pinia 持久化插件-persist
Pinia 默认是内存存储,当刷新浏览器的时候会丢失数据。
Persist 插件可以将 pinia 中的数据持久化的存储。
[!tip] 插件使用
- persist:
npm install pinia-persistedstate-plugin
- 在 piniat 中使用 persist
- 定义状态 Store 时指定持久化配置参数
具体使用详情:
- 导入持久化插件,pinia 使用该插件:
1
2
3
4
| import {createPinia} from "pinia";
const persist = createPersistedState()
pinia.use(persist)
app.use(pinia)
|
- 配置 defineStore 的配置项开启持久化:
1
2
3
4
5
6
7
8
9
10
11
12
13
14
15
16
17
18
19
20
| export const useTokenStore = defineStore('token', () => {
const token = ref('')
const setToken = (newToken) => {
token.value = newToken
}
const delToken = () => {
token.value = ''
}
return {
token, setToken, delToken
}
},
{
persist: true
}
)
|
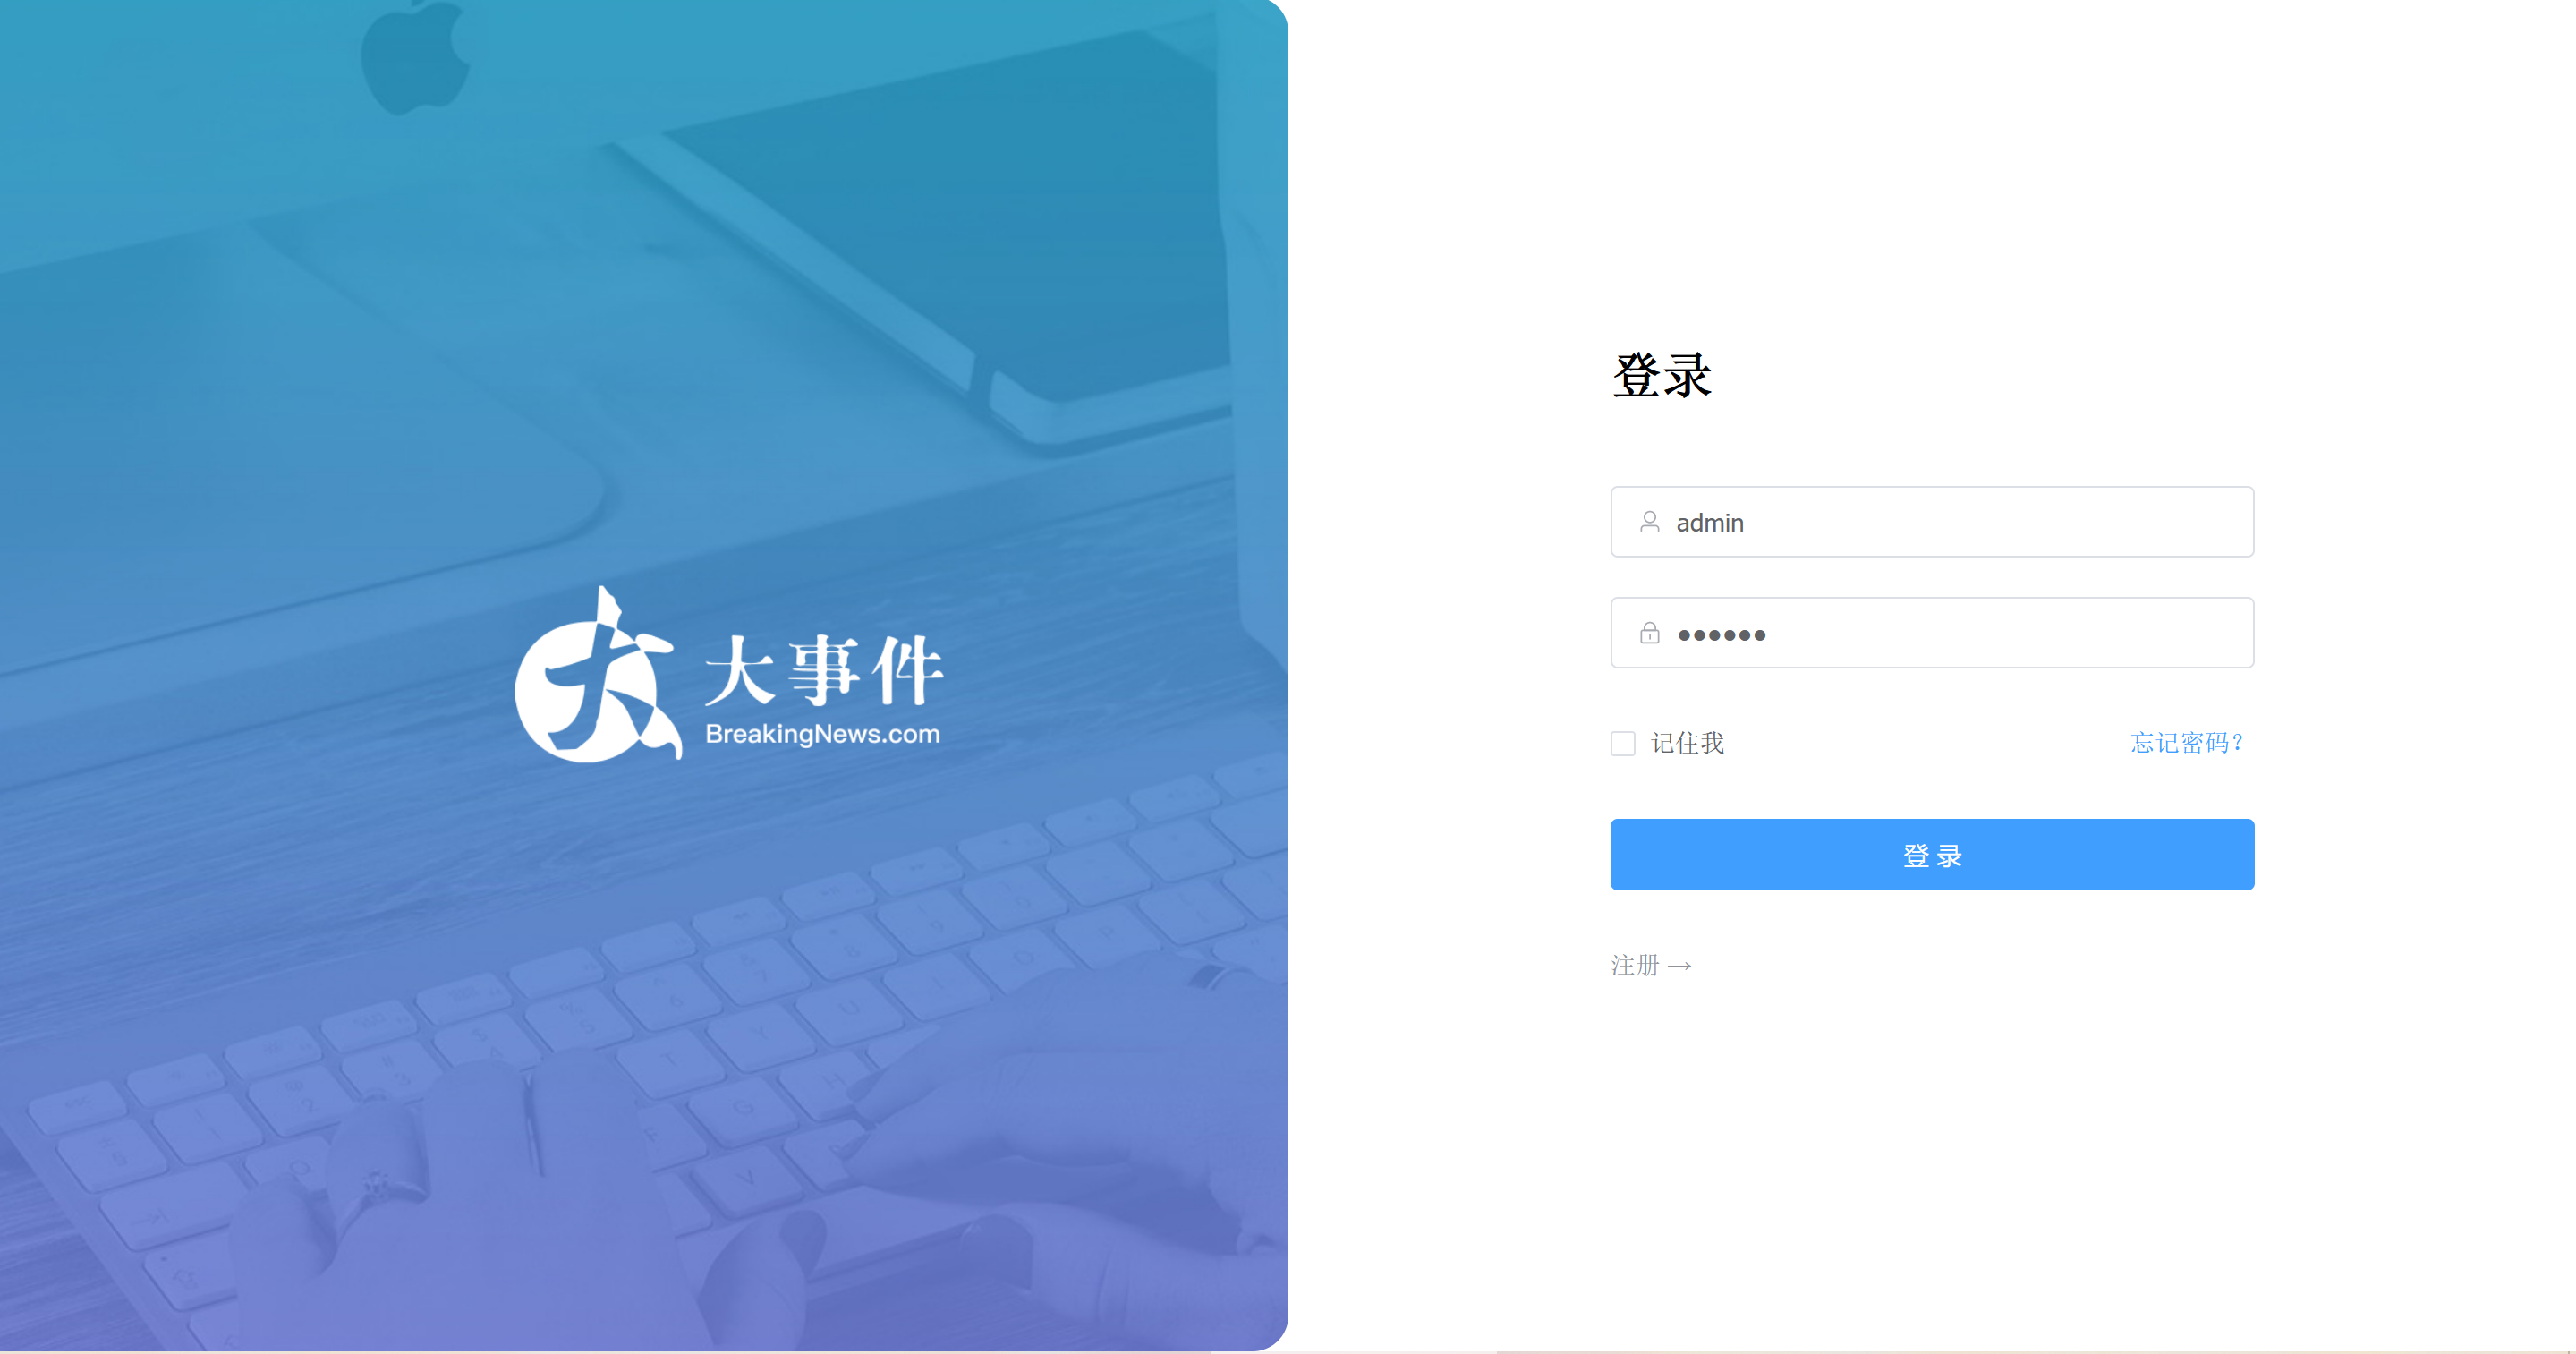
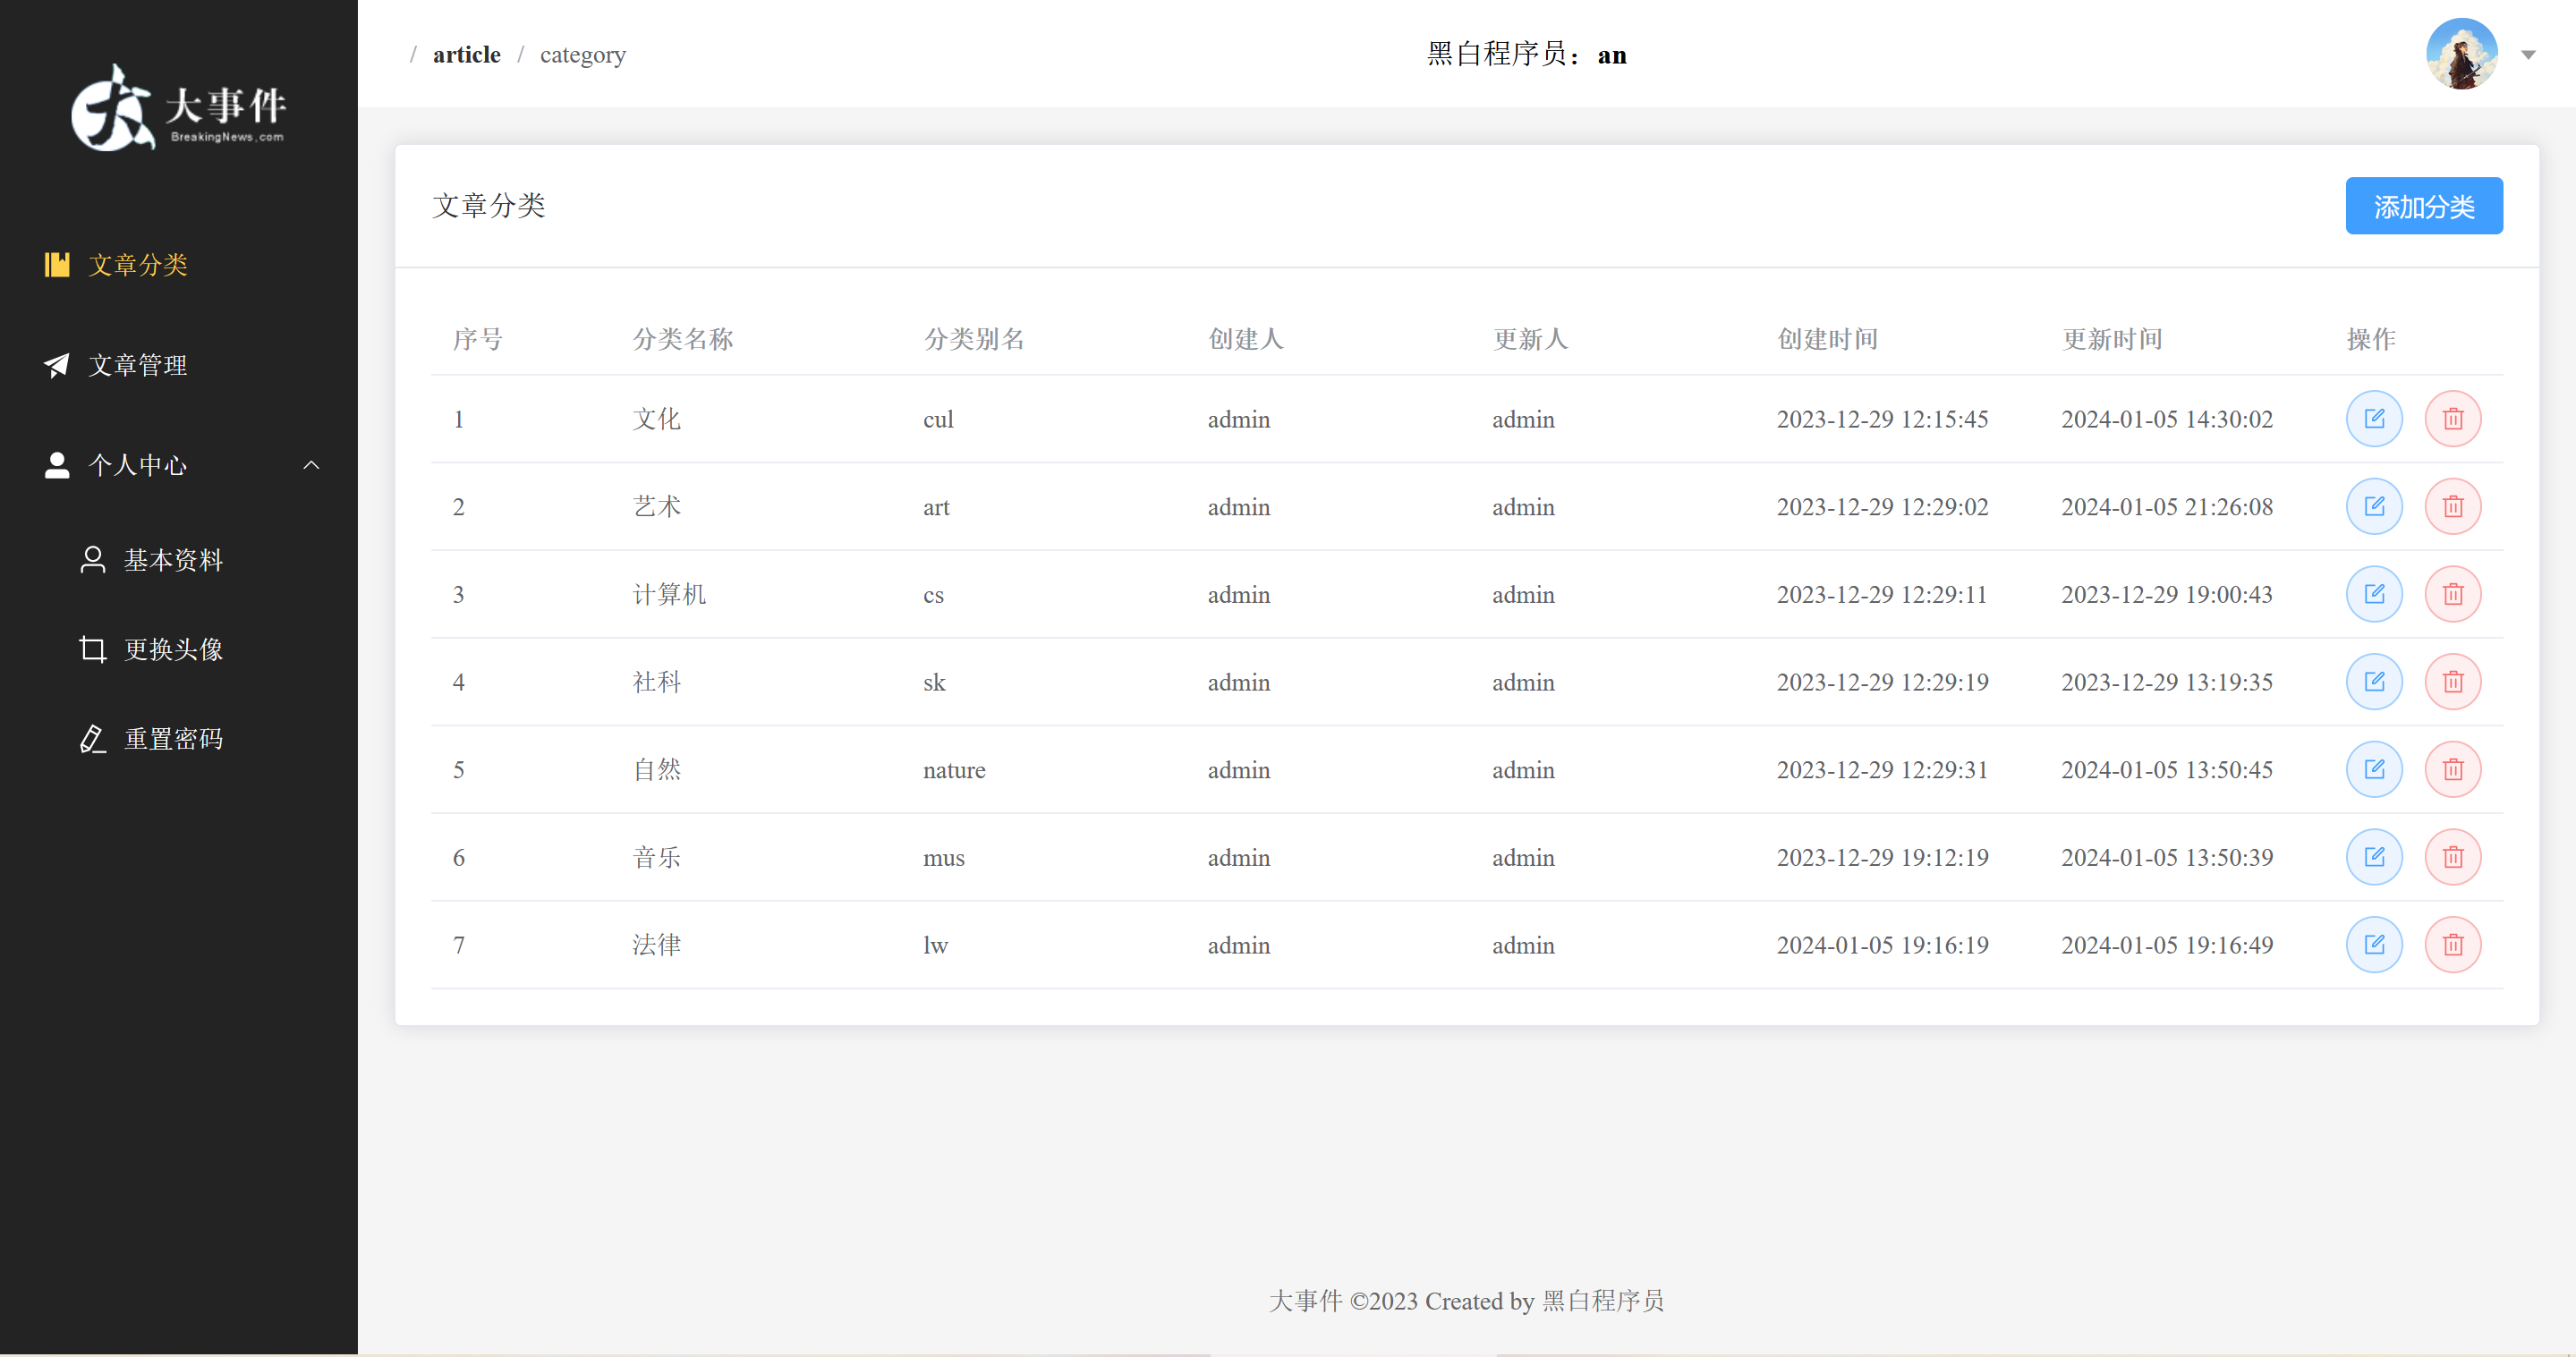
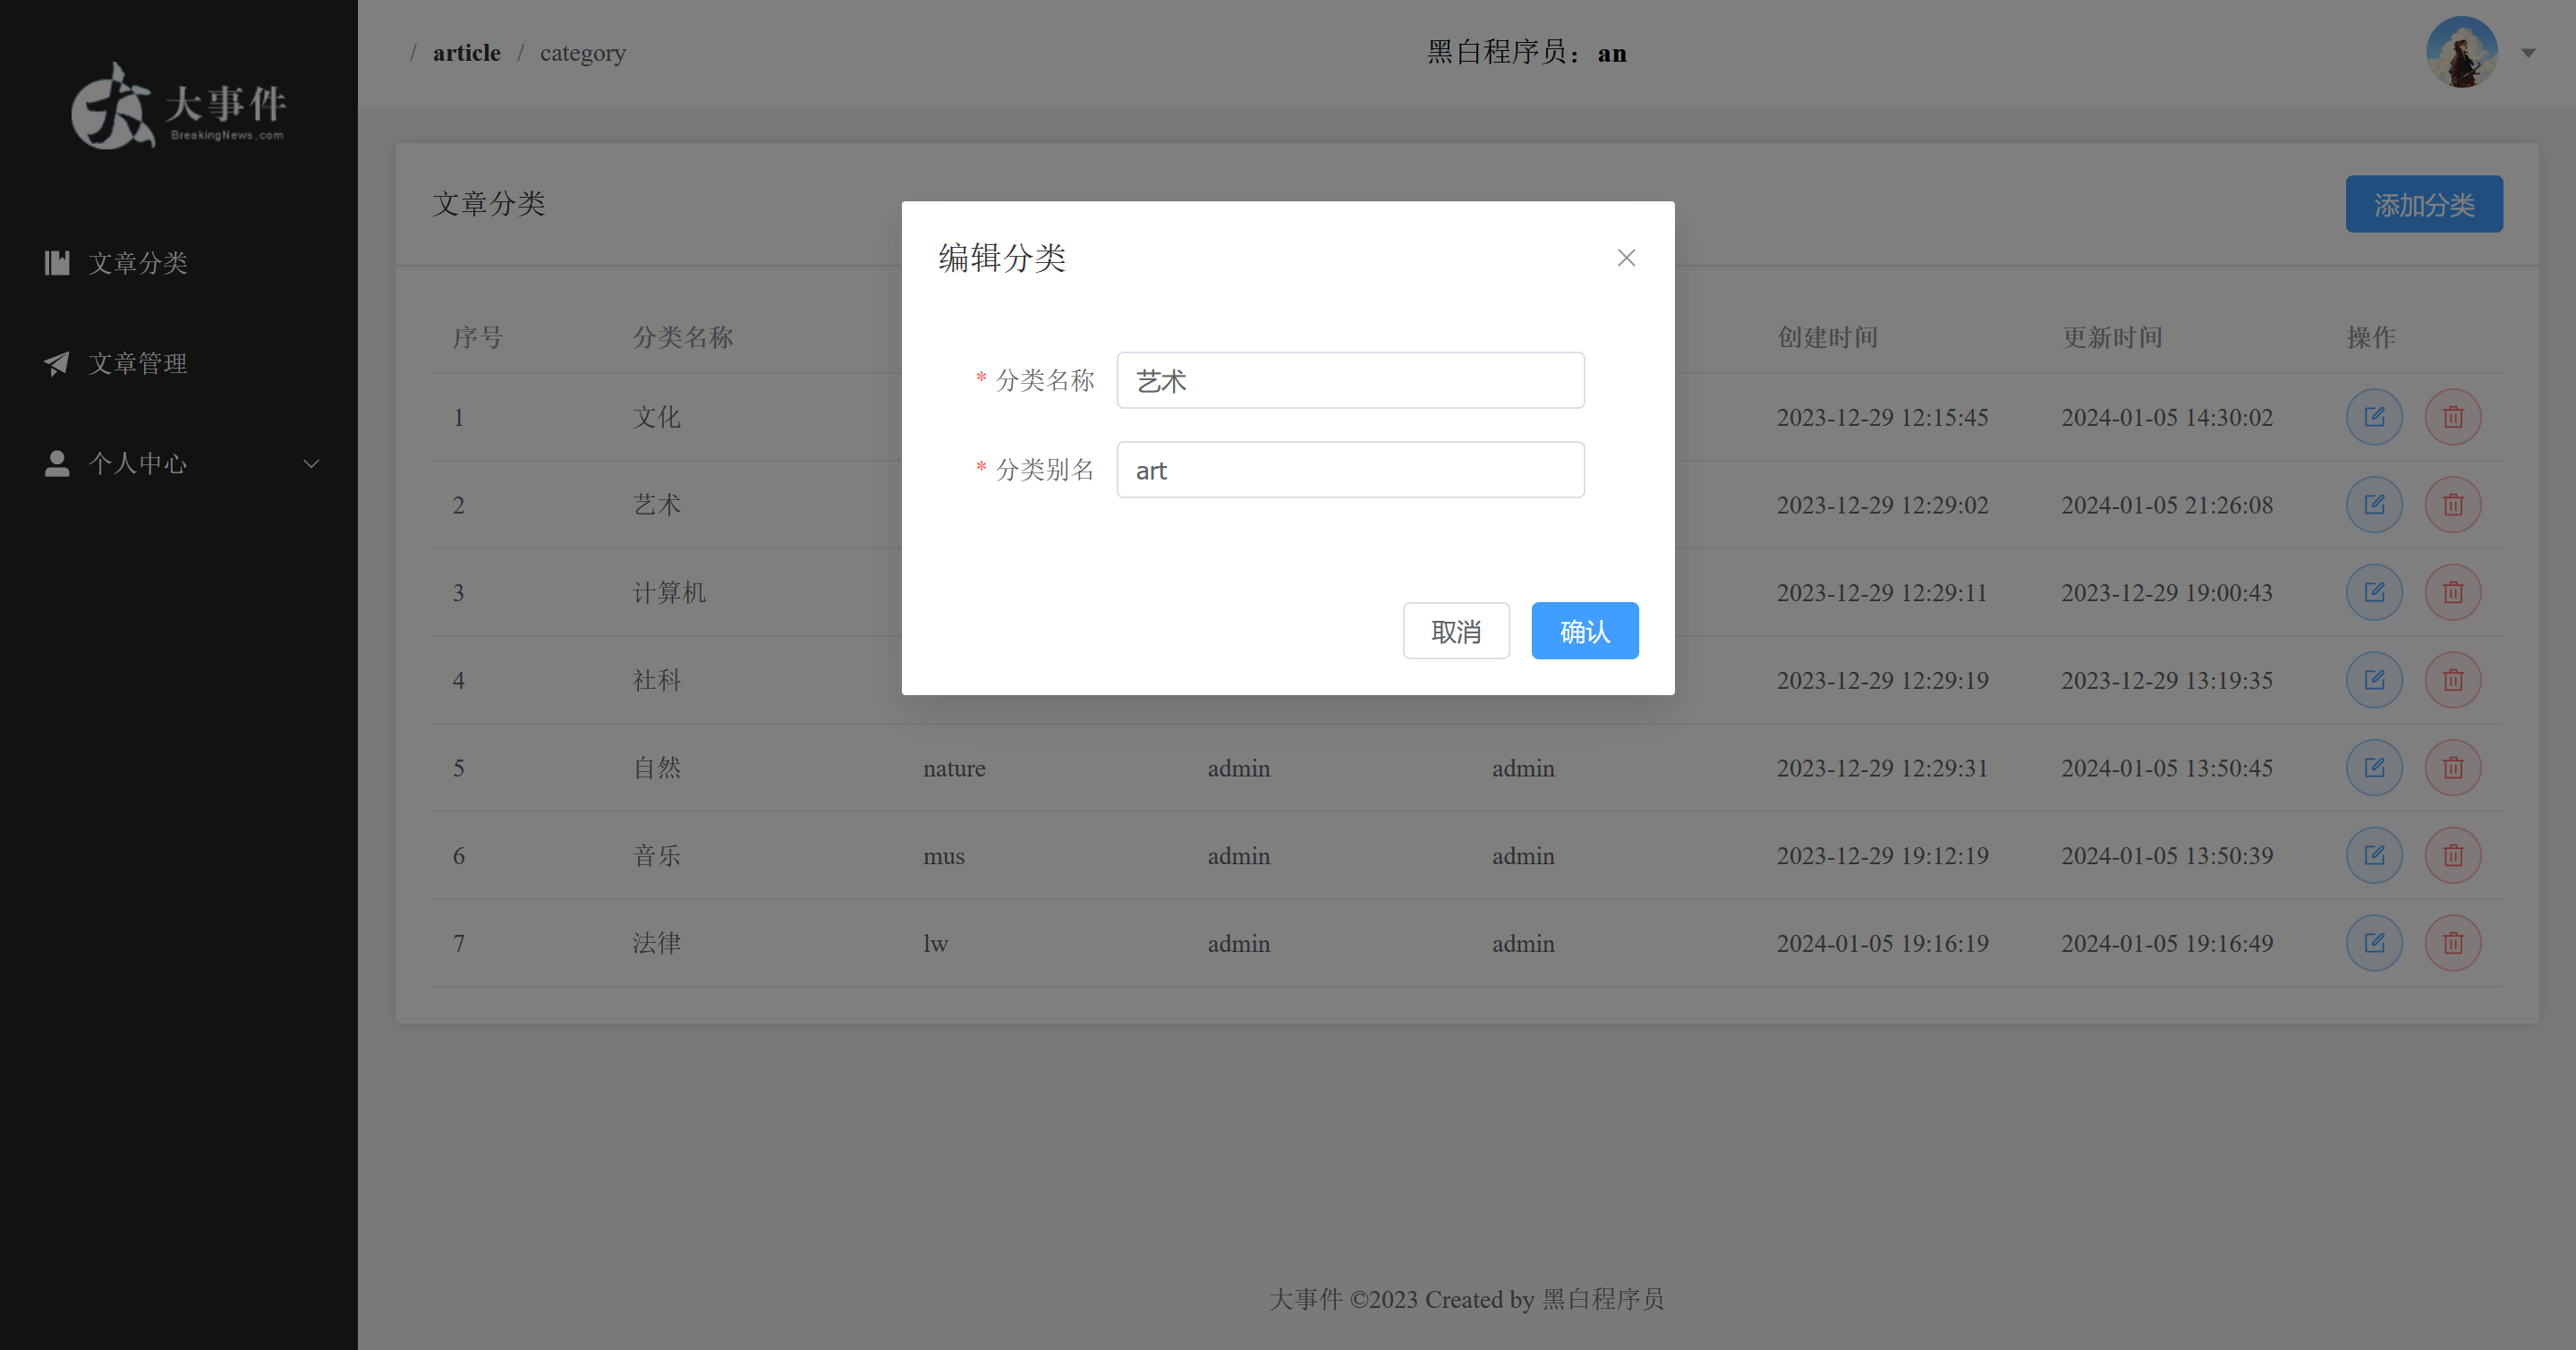
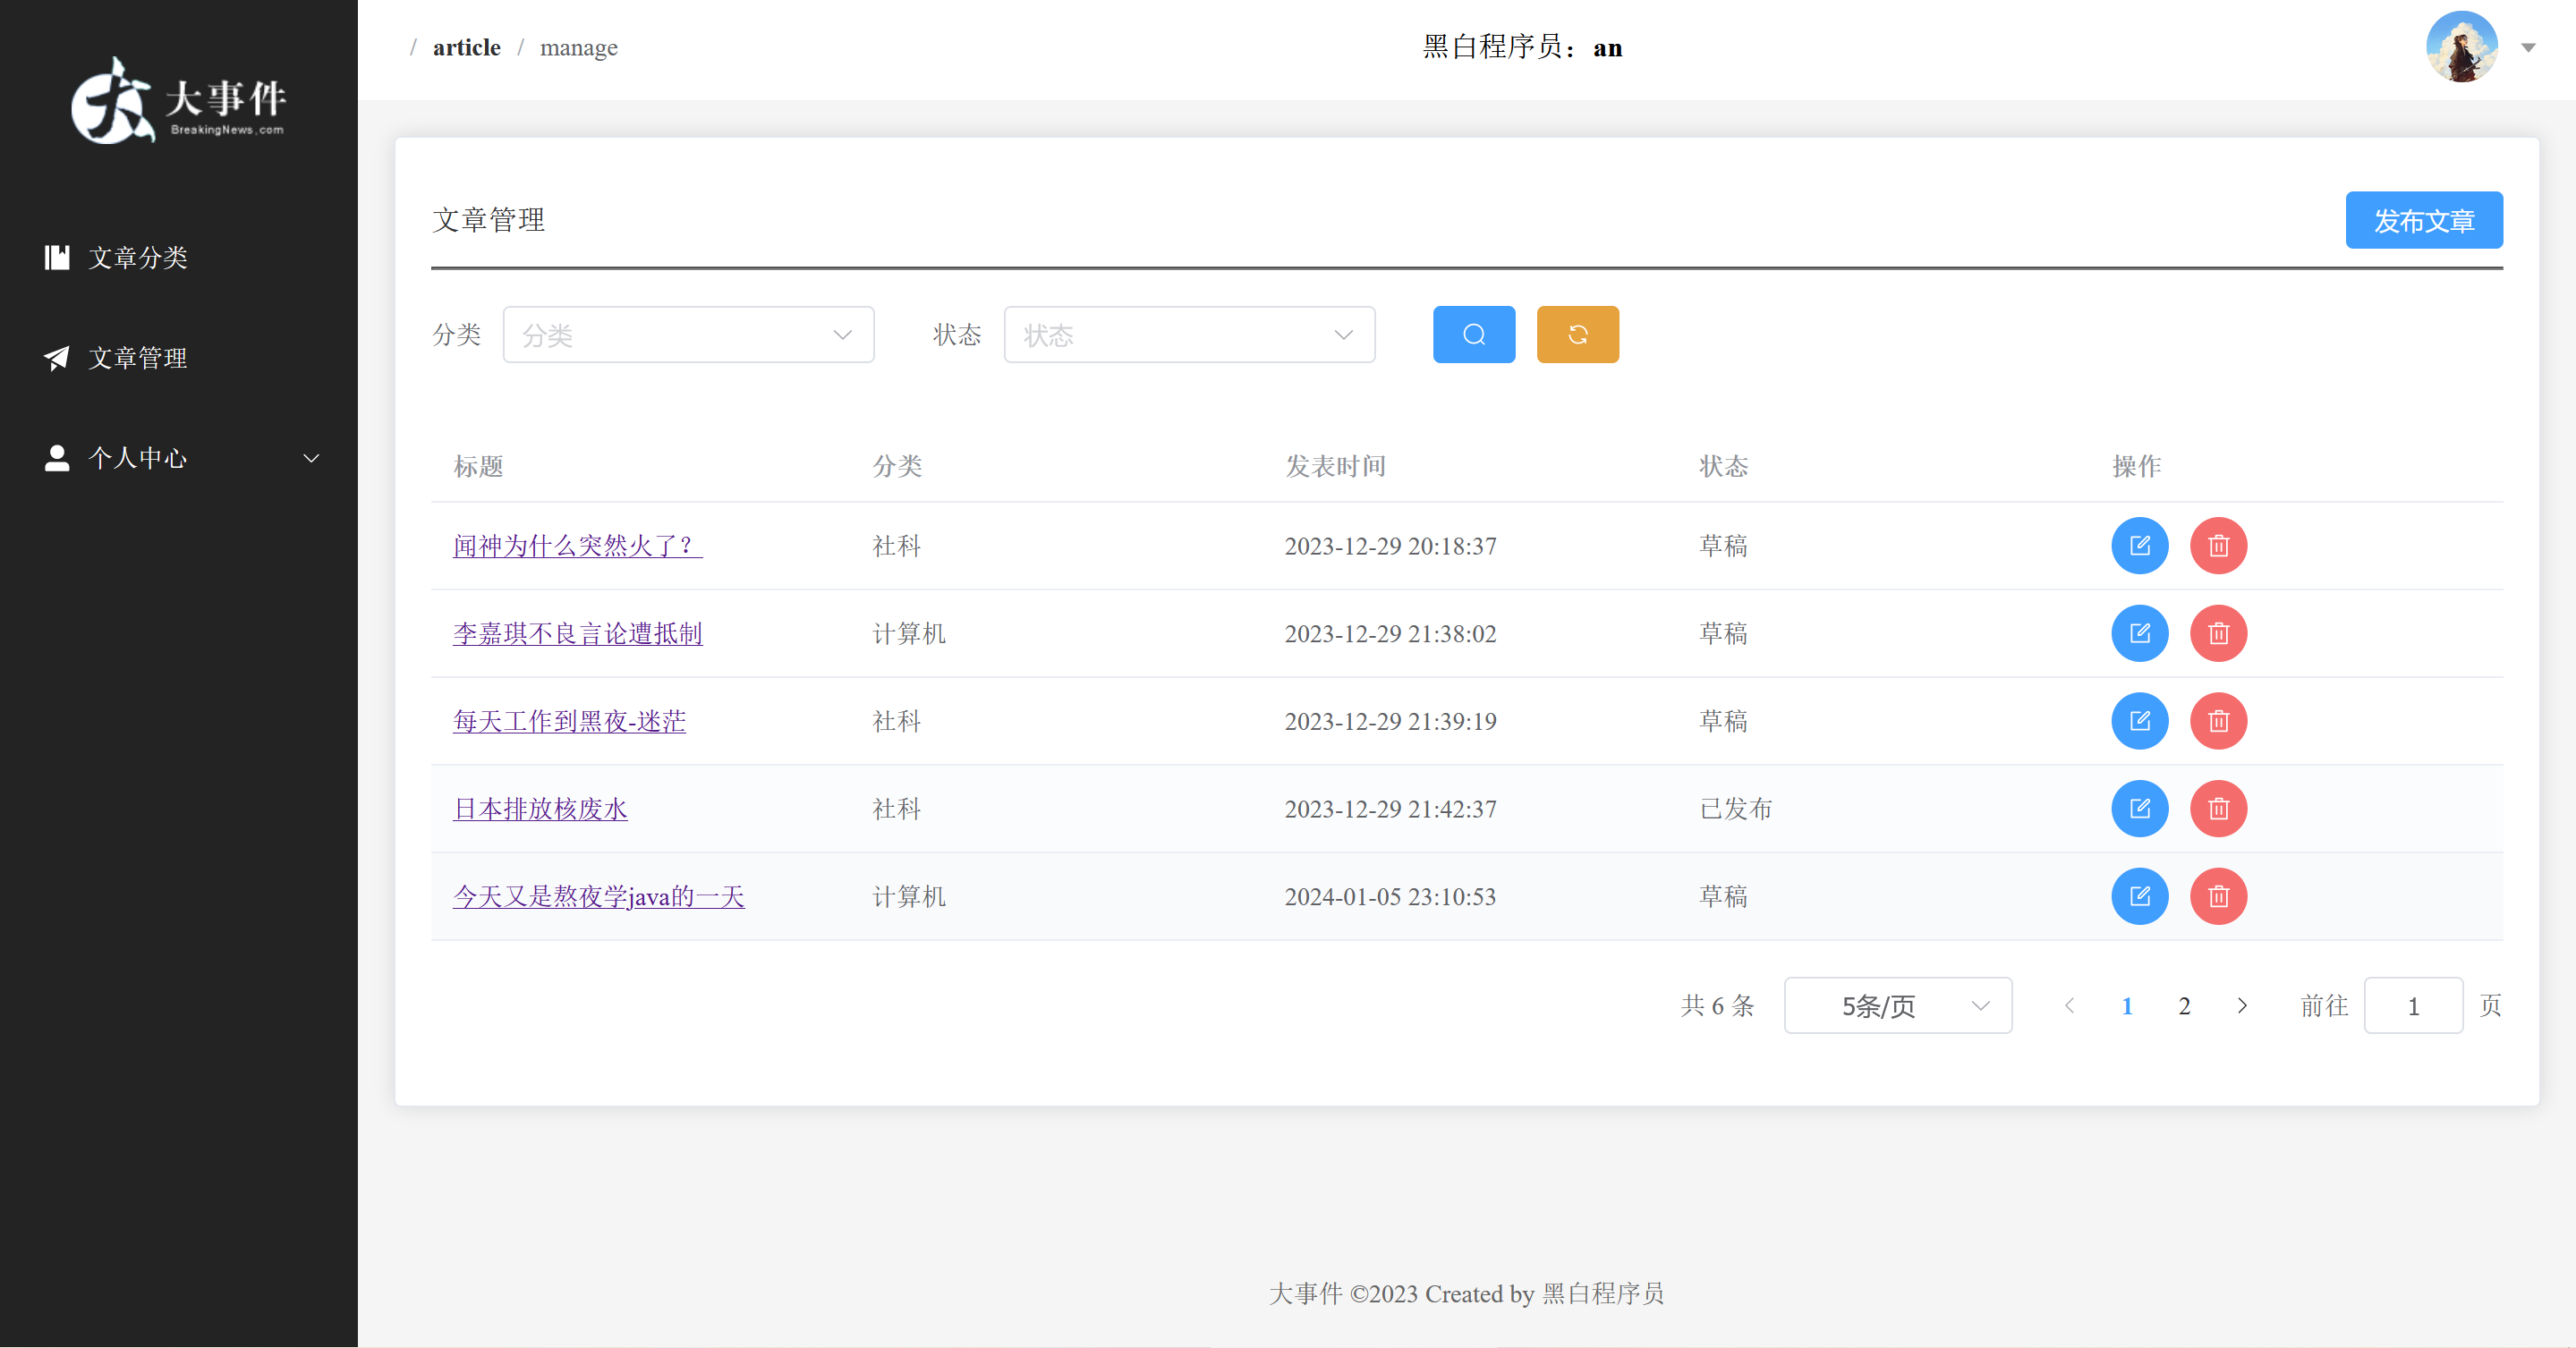
3.5 成果展示
4 参考
- 实战篇-38_vue指令_v-bind_哔哩哔哩_bilibili
- Java程序员用学前端么?java开发所需的前端技术全教程(HTML/CSS/js/vue2/vue3/react)_哔哩哔哩_bilibili
- 快速上手 | Vue.js
- javascript中…的用法_js中…-CSDN博客