本文最后更新于:4 个月前
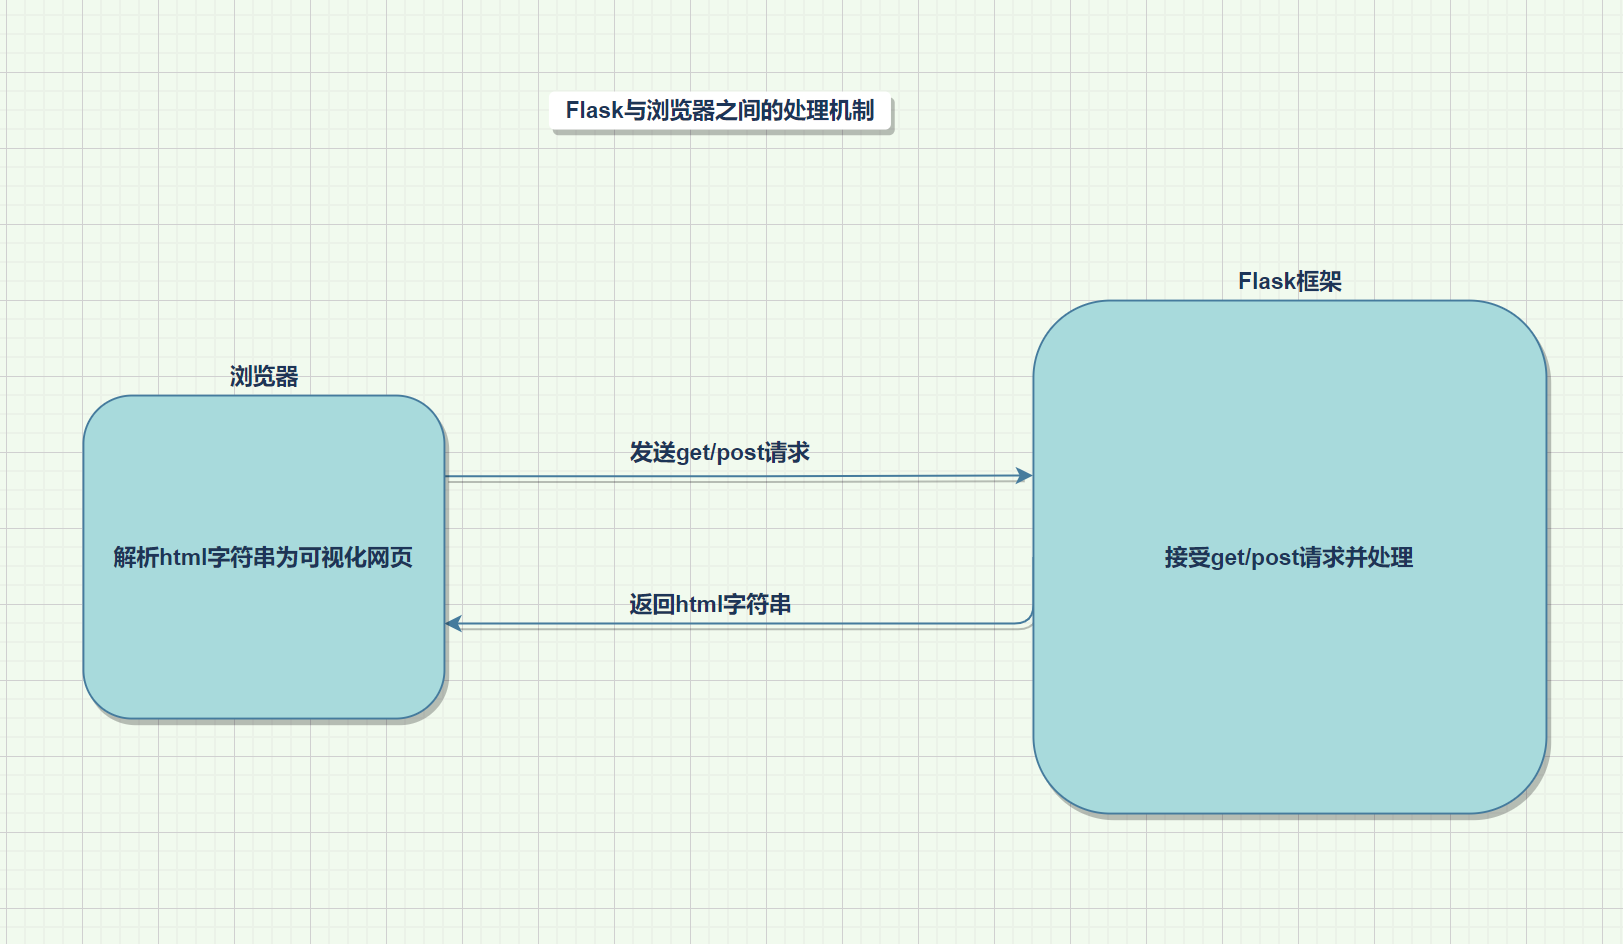
网页开发 1.快速开发网站 1.1初试Flask 返回字符串
1
2
3
4
5
6
7
8
9
10
11
12
13
14
from flask import Flask@app.route("/info" def index ():return "我的开发从这里开始" if __name__ == '__main__' :
返回一个html网页
1
2
3
4
5
6
7
8
9
10
11
12
13
14
15
from flask import Flask,render_template@app.route("/info" def info ():return render_template("./index.html" )if __name__ == '__main__' :
2.浏览器能识别的标签 2.1编码(head) 2.2title(head) 1 <title > LoveStory</title >
2.3标题(body) 1 2 3 4 5 6 <h1 > 一级标题</h1 > <h2 > 二级标题</h2 > <h3 > 三级标题</h3 > <h4 > 四级标题</h4 > <h5 > 五级标题</h5 > <h6 > 六级标题</h6 >
2.4div和span(body) 1 2 <div > 块级标签</div > <span > 行内标签/内联标签</span >
div独占一行,块级标签
span有多大占多大,行内标签也叫内联标签
div和span样式由CSS渲染设定。
2.5超链接(body) 1 2 3 4 <a href ="https://fcsy.fit" > 绝对跳转</a > <a href ="https://fcsy.fit" target ="_blank" > 绝对跳转</a >
1 2 <a href ="/time" > 相对跳转</a >
绝对跳转
2.6图片(body)
可以写内嵌式css ,eg:style="height:100px" ,以分号(;)隔开
1 2 <img src ="https://t7.baidu.com/it/u=1819248061,230866778&fm=193&f=GIF" style ="height:100px" />
1 2 <img src ="/static/picture.png" />
2.7音频(body) 1 2 3 4 <center > <audio src ="https://lo-sycdn.kuwo.cn/3f7fd58e7bca702aa2835729bbde7e1d/63764e76/resource/n1/62/42/3385123058.mp3" controls ="" preload ="metadata" > 暂时无法播放</audio > </center >
外联音频播放器
2.8视频(body) 1 2 3 4 <center > <video src ="https://vd4.bdstatic.com/mda-mkm388zceiim43xq/540p/h264_cae/1637547444425365643/mda-mkm388zceiim43xq.mp4" > </video > </center >
外链视频播放器
1 2 3 4 <div style ="position: relative; padding: 30% 45%;" > <iframe style ="position: absolute; width: 100%; height: 100%; left: 0; top: 0;" src ="视频地址去B站分享按钮下iframe里面的src属性值复制" scrolling ="no" border ="0" frameborder ="no" framespacing ="0" allowfullscreen ="true" > </iframe > </div >
2.9列表(body)
无序列表
1 2 3 4 5 <ul > <li > 中国移动</li > <li > 中国电信</li > <li > 中国联通</li > </ul >
有序列表
1 2 3 4 5 <ol > <li > 中国移动</li > <li > 中国电信</li > <li > 中国联通</li > </ol >
中国移动
中国电信
中国联通
2.10表格(body) 1 2 3 4 5 6 7 8 9 10 <table > <thead > <tr > <th > ID</th > <th > 姓名</th > <th > 年龄</th > </tr > //表头</thead > <tbody > <tr > <td > 1</td > <td > Alleyf</td > <td > 20</td > </tr > //表格内容<tr > <td > 1</td > <td > Alleyf</td > <td > 20</td > </tr > <tr > <td > 1</td > <td > Alleyf</td > <td > 20</td > </tr > </tbody > </table >
ID 姓名 年龄
1 Alleyf 20
2 ChuiYuGin 20
3 Alleyf 15
`案例`
1 2 3 4 5 6 7 8 9 10 11 12 13 14 15 16 17 18 19 20 21 22 23 24 25 26 27 28 29 30 31 32 33 34 35 36 37 38 39 40 41 42 43 44 45 46 47 48 49 50 51 52 53 54 55 56 57 58 59 60 61 62 63 64 <table border ="1" > <thead > <tr > <th > ID</th > <th > 头像</th > <th > 姓名</th > <th > 邮箱</th > <th > 更多信息</th > <th > 操作</th > </tr > </thead > <tbody > <tr > <td > 1</td > <td > <img src ="static/images/01.webp" alt ="" class ="hp" > </td > <td > alleyf</td > <td > alleyf@gmail.com</td > <td > <a href ="https://fcsy.fit" target ="_blank" > 更多信息</a > </td > <td > 编辑 删除</td > </tr > <tr > <td > 2</td > <td > <img src ="static/images/02.webp" alt ="" class ="hp" > </td > <td > chuiyugin</td > <td > chuiyugin@gmail.com</td > <td > <a href ="https://chuiyugin.github.io" target ="_blank" > 更多信息</a > </td > <td > 编辑 删除</td > </tr > <tr > <td > 2</td > <td > <img src ="static/images/03.webp" alt ="" class ="hp" > </td > <td > chuiyugin</td > <td > chuiyugin@gmail.com</td > <td > <a href ="https://chuiyugin.github.io" target ="_blank" > 更多信息</a > </td > <td > 编辑 删除</td > </tr > <tr > <td > 2</td > <td > <img src ="static/images/04.webp" alt ="" class ="hp" > </td > <td > chuiyugin</td > <td > chuiyugin@gmail.com</td > <td > <a href ="https://chuiyugin.github.io" target ="_blank" > 更多信息</a > </td > <td > 编辑 删除</td > </tr > </tbody > </table >
2.11表单(body)
input系列(7个)
1 2 3 4 5 6 7 8 <input type ="text" > <input type ="password" > <input type ="file" > </input > <input type ="radio" name ="gender" checked ="" > 男</input > <input type ="checkbox" > 篮球</input > <input type ="button" value ="登录" > <input type ="submit" value ="提交" >
下拉框系列(2个)
1 2 3 4 5 6 7 8 9 10 11 12 13 14 15 16 单选下拉框<select > <option > 金钱</option > <option > 美人</option > <option > 地位</option > <option > 名声</option > <option > 归隐</option > </select > <select multiple > <option > 金钱</option > <option > 美人</option > <option > 地位</option > <option > 名声</option > <option > 归隐</option > </select >
多行输入
1 <textarea cols ="10" rows ="5" > 默认输入</textarea >
实例
用户名:
密码:
性别:
爱好:
城市:
北京
上海
深圳
西安
武汉
广州
特长:
java
python
C++
Go
php
备注:
小结
划分
1 2 3 4 5 6 7 8 9 10 11 12 13 -块级标签<h1 > </h1 > <p > </p > <div > </div > <ul > </ul > <ol > </ol > <table > </table > <span > </span > <a href ="" > </a > <img src ="" /> <audio > </audio > <video > </video >
嵌套
1 2 3 4 5 6 -点击图片跳转网页<p align ="center" > <a href ="https://fcsy.fit target=" _blank "> <img src ="" /> </a > </p >
综合案例–登录注册
导入flask,创建app
1 2 3 4 5 6 7 8 9 10 11 12 13 14 15 16 17 18 19 20 21 22 23 24 25 26 27 28 29 30 31 32 33 34 35 36 37 38 39 40 41 42 43 44 45 46 47 48 ''' Author: Alleyf 3035581811@qq.com Github: https://github.com/Alleyf QQ: 3035581811 Signature: You know more,you know less Date: 2022-11-19 20:57:35 LastEditors: Alleyf 3035581811@qq.com LastEditTime: 2022-11-20 10:43:50 FilePath: \login_register\app.py Copyright (c) 2022 by Alleyf 3035581811@qq.com, All Rights Reserved. ''' from flask import Flask, render_template, request, jsonify@app.route('/register' , methods=["GET" , "POST" ] def register ():if request.method == "GET" :return render_template('register.html' )else :"username" )"password" )"gender" )"hobby" )"city" )"characters" )"notes" )print (user, pwd, gender, hobbies, city, characters, notes)"user" : user,"pwd" : pwd,"gender" : gender,"hobbies" : hobbies,"city" : city,"characters" : characters,"notes" : notesreturn render_template('login.html' )@app.route('/user/<username>' , methods=["GET" , "POST" ] def userdemo (username ):return f'Hello {username} !' if __name__ == '__main__' :
HTML实现注册
1 2 3 4 5 6 7 8 9 10 11 12 13 14 15 16 17 18 19 20 21 22 23 24 25 26 27 28 29 30 31 32 33 34 35 36 37 38 39 40 41 42 43 44 45 46 47 48 49 50 51 52 53 54 55 56 57 58 59 60 61 62 63 64 65 66 67 68 69 70 71 72 73 74 75 76 77 78 79 80 81 82 83 84 85 86 87 88 89 90 91 92 93 94 95 96 97 98 99 <!DOCTYPE html > <html lang ="en" > <head > <meta charset ="UTF-8" > <title > Register</title > <style > * { padding : 0 ; margin : 0 ; } html { height : 100% ; } body { background-image : linear-gradient (to bottom right, rgb (114 , 135 , 254 ), rgb (130 , 88 , 186 )); } </style > </head > <body > <center > <h1 > 用户注册</h1 > <form method ="post" action ="/register" > <div > <input type ="text" name ="username" > </div > <div > <input type ="password" name ="password" > </div > <div > <input type ="radio" name ="gender" value ="1" > 男<input type ="radio" name ="gender" value ="2" > 女</div > <div > <input type ="checkbox" name ="hobby" value ="10" > 篮球<input type ="checkbox" name ="hobby" value ="20" > 足球<input type ="checkbox" name ="hobby" value ="30" > 排球<input type ="checkbox" name ="hobby" value ="40" > 乒乓球</div > <div > <select name ="city" > <option value ="bj" > 北京</option > <option value ="sh" > 上海</option > <option value ="gz" > 广州</option > <option value ="xa" > 西安</option > </select > </div > <div > <select name ="characters" multiple > <option value ="100" > java</option > <option value ="101" > c++</option > <option value ="102" > python</option > <option value ="103" > Go</option > </select > </div > <div > <textarea name ="notes" cols ="50" rows ="5" > </textarea > </div > <div > <input type ="submit" value ="注册" > <input type ="button" value ="注册" > </div > </form > </center > <script type ="text/javascript" > window .onload = function ( let mycenter = document .createElement ('center' ); let myiframe = document .createElement ('iframe' ); myiframe.setAttribute ('src' ,'//music.163.com/outchain/player?type=2&id=475479888&auto=1&height=66' ); myiframe.setAttribute ('style' ,'frameborder:no; border:0; marginwidth:0; marginheight:0; width:400; height:86' ) mycenter.appendChild (myiframe); document .body .appendChild (mycenter); } </script > </body > </html >
提交数据到后台
1 <form method ="post" action ="/register" >
流程展示
form标签包裹要提交的数据的标签
提交方式:method="get"
提交地址:action="/xxx/xxx/xxx"
在form标签里面必须有一个submit标签
在form里面的一些标签:input/select/textarea
1 2 3 4 5 6 7 8 9 10 >from flask import jsonify'/json_return' )def json_return ():"name" :"北京图灵学院" ,"teacher" :"刘大拿" ,"Blog_address" :"http://www.mycode.wang" return jsonify(j)
接受post请求返回json字符串
3.CSS样式
css是美化html内容的层叠样式表
3.1快速了解 1 2 3 <img src ="```" style ="height:100px;width:200px" /> <div style ="color:blue;" > CSS</div >
3.2CSS引用方式 1.行内式 1 2 3 4 5 6 7 <body style ="background-color:black;" > <h1 style ="color:white;padding:30px;" > Hostinger Tutorials</h1 > <p style ="color:white;" > Something usefull here.</p > </body >
行内样式表(内联样式表)是在元素标签内部的style属性中设定CSS样式。适合于修改简单样式 .
style实就是标签的属性
在双引号中间,写法要符合CSS规范
可以控制当前的标签设置样式
2.内嵌式 1 2 3 4 5 6 7 8 9 10 11 12 13 <head > <style type ="text/css" > p {color :white; font-size : 10px ;} .center {display : block; margin : 0 auto;} #button-go , #button-back {border : solid 1px black;} </style > </head >
标签理论上可以放在HTML文档的任何地方,但一般会放在文档的标签中
通过此种方式,可以防便控制当前整个页面中的元素样式设置
代码结构清晰,但是并没有实现结构与样式完全分离
3.外联式 1 2 3 4 5 <head > <link rel ="stylesheet" type ="text/css" href ="style.css" /> </head >
3.3CSS选择器
作用: 选择标签设置格式属性
选择器分为基础选择器和复合选择器两个大类,我们这里先讲解一下基础选择器。
基础选择器是由单个选择器组成的
基础选择器包括:标签选择器、类选择器、id 选择器和通配符选择器
3.3.1标签选择器 标签选择器(元素选择器)是指用HTML标签名称 作为选择器,按标签名称分类,为页面中某一类标签指定统一的CSS样式。
语法:
1 2 3 4 5 标签名 {
3.3.2类选择器 如果想要差异化选择不同的标签,单独选一个或者某几个标签 ,可以使用类选择器;样式点定义,结构类调用,一个或多个,开发最常用
语法:
1 2 3 4 5 .类名 {<p class ="p1" > CSS</p >
多类名语法:
<div class="name1 name2 ···"></div>
在标签class属性中写多个类名,可以同时被调用
多个类名中间必须用空格分开 将相同样式放在一个公共样式里,便于调用,提高代码复用率
3.3.3ID选择器
id选择器可以为标有特定id的HTML元素指定特定的样式。
HTML元素以id属性来设置id选择器 , CSS中id选择器以“#” 来定义 。
id标签格式只能被调用一次,唯一性(常与js使用)
语法:
1 2 3 4 5 #ID名 {<p id ="p1" > CSS</p >
3.3.4通配符选择器
在CSS中,通配符选择器使用*定义,它表示选取页面中所有元素(标签)。
标签不需要主动调用,自动会给所有元素设置该格式
特殊情况才使用,后面讲解使用场景(以下是清除所有的元素标签的内外边距)
语法:
1 2 3 4 * {margin :0 ;padding :0 ;
3.3.5属性选择器
在CSS中给类选择器**添加属性修饰**以设置该属性的标签的样式
语法:
1 2 3 .类名[name="user" ] {color : pink;
3.3.6子代选择器
在CSS中给类选择器**添加子类**单独设置子类的样式
语法:
所有子代
1 2 3 .类名 子类名/子标签 {color : pink;
直接子代
1 2 3 .类名 > 子类名/子标签 {color : pink;
3.3.7多个和覆盖
不同样式则共同起作用,相同样式则后者覆盖前者,前后由CSS写的顺序决定。
重复的样式要想不被后者覆盖需要在样式后面加!important关键词
1 2 3 4 5 6 7 8 9 <style>.c1 {color : red !important ;border : 1px solid red;.c2 {font-size : 28px ;color : blue;
此时c2的颜色不会覆盖c1的颜色。
3.3.8常用选择器
类选择器,标签选择器,后代选择器
3.4样式 1.高度和宽度 1 2 3 4 .c1 {height : 300px ;width : 500px /50% ;
宽度支持百分比,因为一个网页总宽度是固定,但高度不固定。
行内标签:默认无效
块级标签:默认有效(霸道,右侧区域空白,不给占用)
2.块级和行内标签 让标签既具有行内标签的特点也具有块级标签的特点
1.CSS样式: 标签->display:inline-block;
1 2 3 .number {display : inline-block;
2.块级和行内转换:
块级转行内标签->display:inline;
行内转块级标签->display:block;
1 2 3 4 5 6 .number {display : inline;.pwd {display : block;
注意:块级+块级&行内用的多
3.字体设置
1 2 3 4 5 6 .number {color : #rgb/red;font-size : 28px ;font-weight : 600 ;font-family : Microsoft Yahei;
4.文字对齐方式 1 2 3 4 5 6 7 8 9 .slogan {display : inline-block;height : 59px ;width : 500px ;color : cornflowerblue;border : 1px solid blue;text-align : center;line-height : 59px ;
5.浮动
设置标签在一行中的不同位置
1 2 <span >上一页</span >span style="float : right;">下一页</span >
块级标签设置float属性后宽度高度可变
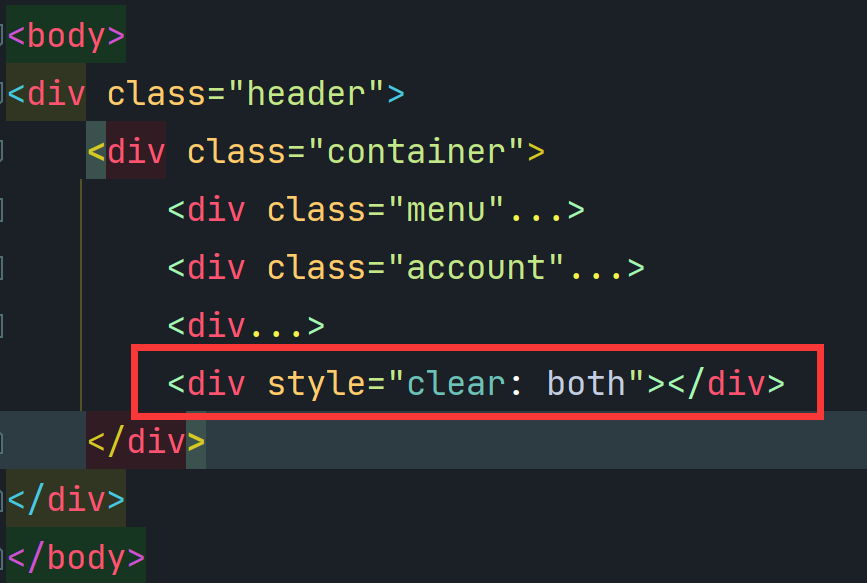
浮动的标签脱离了文档流(飘起来了),需要用style="clear:both;"恢复正常
1 2 3 4 5 6 7 <div style="background-color : aquamarine"> <div> <button class=" b" style=" float: left;">上一页</button >button class="b " style="float : right;">下一页</button >div style="clear : both"></div>/*如果没有这句父div将看不到背景颜色*/ </div> </div>
6.内边距
标签内部设置指定像素的距离
1 2 3 4 .note {padding : 20px ;
7.外边距
设置本标签与别的标签之间的距离(会增加原来的高度)
1 2 3 4 .note {margin : 20px ;
8.hover(伪类)
hover不但可以在鼠标悬浮在该标签上 时设置自己的样式 还可以设置它的子标签的样式 。
设置自己样式:
1 2 3 4 .slider .news .container img :hover {box-shadow : 0 16px 32px 0 rgba (48 , 55 , 66 , 0.15 ); transform : translate (0 , -10px );
设置子类样式:
1 2 3 4 5 6 7 8 9 10 11 12 13 14 15 16 17 18 19 .app {height : 100px ;width : 100px ;margin : 0 auto;.qcode {display : none;width : 50px ;margin : 0 auto;.app :hover .title {color : red;.app :hover .qcode {display : block;
9.after(伪类)
在标签内容尾部追加内容 。
1 2 3 .title :after {content : "nishizhu" ;
可以清除浮动样式 。
1 2 3 4 5 6 7 8 9 10 11 12 13 .clearfix .item {float : left;.clearfix :after {content : "" ;display : block;clear : both;div class="clearfix">div class="item">1 </div >div class="item">2 </div >div class="item">3 </div >div >
10.position
fixed:固定在窗口的某个位置。
1 2 3 4 5 6 7 8 9 10 .back {position : fixed;width : 70px ;height : 50px ;right : 15px ;bottom : 50px ;line-height : 50px ;text-align : center;
案例:对话框
1 2 3 4 5 6 7 8 9 10 11 12 13 14 15 16 17 18 19 20 21 22 23 24 .mask {position : fixed;background-color : black;top : 0 ;bottom : 0 ;right : 0 ;left : 0 ;opacity : 0.7 ;z-index : 999 ;.dialog {position : fixed;width : 500px ;height : 300px ;background-color : darkseagreen;left : 0 ;right : 0 ;top : 200px ;margin : 0 auto;z-index : 1000 ;
relative和absolute:设置相对和绝对位置,一般设置父类为relative ,子类为absolute ,对子类进行布局。
1 2 3 4 5 6 7 8 9 10 11 12 .parent {position : relative;width : 500px ;height : 300px ;.son {position : absolute;width : 100px ;height : 100px ;right : 0 ;top : 0 ;
案例:小米商城下载app
1 2 3 4 5 6 <a href ="#" class ="app" > 下载app<div class ="qcode" > <img src ="/static/imgs/公众号.jpg" style ="width: 100px;" alt ="" > </div > <div style ="clear: both" > </div > </a >
1 2 3 4 5 6 7 8 9 10 11 12 13 14 15 16 17 18 .app {width : 100px ;margin : 0 auto;position : relative;.qcode {display : none;width : 50px ;margin : 0 auto;position : absolute;right : 50% ;float : bottom;.app :hover .qcode {display : block;
11.border(边框) 1 2 3 4 5 6 7 8 9 10 .bor {border : 3px solid transparent;background-color : gold;width : 500px ;height : 500px ;margin : 0 auto;.bor :hover {border : 1px solid red;
12.背景色 设置标签背景色
1 2 3 .c1 {background-color : red/#fff /rgb (255 ,255 ,255 );
4.案例:小米商城 1 2 3 4 5 6 7 8 9 10 11 12 13 14 15 16 17 18 19 20 21 22 23 24 25 26 27 28 29 30 31 32 33 34 35 36 37 38 39 40 41 42 43 44 <!DOCTYPE html > <html lang ="en" > <head > <meta charset ="UTF-8" > <title > 小米商城</title > <link rel ="stylesheet" href ="/static/css/home.css" > </head > <body > <div class ="header" > <div class ="container" > <div class ="menu" > <a href ="#" > 小米官网</a > <a href ="#" > 小米商城</a > <a href ="#" > MIUI</a > <a href ="#" > IOT</a > <a href ="#" > 云服务</a > <a href ="#" > 天星数科</a > <a href ="#" > 有品</a > <a href ="#" > 小爱开放平台</a > <a href ="#" > 企业团购</a > <a href ="#" > 资质证照</a > <a href ="#" > 协议规则</a > <a href ="#" > 下载app</a > <a href ="#" > Select Location</a > </div > <div class ="account" > <a href ="#" > 登录</a > <a href ="#" > 注册</a > <a href ="#" > 消息通知</a > </div > <div > <a href ="#" > <em class ="iconfont-cart" > </em > <span class ="cart-mini-num J_cartNum" > (0)</span > </a > </div > <div style ="clear: both" > </div > </div > </div > </body > </html >
1 2 3 4 5 6 7 8 9 10 11 12 13 14 15 16 17 18 19 20 21 22 23 24 25 26 27 28 29 30 31 body {margin : 0 ;.header {position : relative;color : #b0b0b0 ;background : #333 ;.container {width : 1226px ;margin : 0 auto;.header a {color : #b0b0b0 ;line-height : 40px ;font-size : 12px ;display : inline-block;margin-right : 10px ;.container .menu {float : left;.container .account {float : right;
总结
4.Bootstrap 1.下载引用 1 2 3 4 5 {# 开发版未压缩#}<link rel ="stylesheet" href ="/static/plugins/bootstrap-5.2.3/css/bootstrap.css" > <link rel ="stylesheet" href ="/static/plugins/bootstrap-5.2.3/css/bootstrap.min.css" > #}<script src ="/static/plugins/bootstrap-5.2.3/js/bootstrap.js" > </script >
2.导航 1 2 3 4 5 6 7 8 9 10 11 12 13 14 15 16 17 18 19 <ul class ="nav nav-pills" > <li class ="nav-item" > <a class ="nav-link active" data-bs-toggle ="pill" href ="#home" > 首页</a > </li > <li class ="nav-item" > <a class ="nav-link" data-bs-toggle ="pill" href ="#about" > 关于</a > </li > <li class ="nav-item" > <a class ="nav-link" data-bs-toggle ="pill" href ="#links" > 链接</a > </li > </ul > <div class ="tab-content" > <div class ="tab-pane active container" id ="home" > 首页</div > <div class ="tab-pane container" id ="about" > 关于</div > <div class ="tab-pane container" id ="links" > 链接</div > </div >
3.栅格
把一行划分为12格
分类
响应式:根据页面宽度不同动态变化
1 2 3 .col-sm- 1170px 常用.col-md- 970px .col-lg- 750px
非响应式:不随页面大小变化,固定水平排列
1 2 3 4 5 6 7 8 9 .col-xs-<div class ="container" > <div class ="row" > <div class ="col-sm-6" style ="height: 40px;background: black" > <input type ="button" class ="btn btn-primary" value ="tijiao" > </div > <div class ="col-sm-6" style ="height: 40px;background: red" > </div > </div > </div >
列偏移
1 <div class ="col-sm-offset-2 col-sm-6" style ="height: 40px;background: gold" > </div > 列偏移两个栅格col
4.container
5.面板 默认不带标题和带标题的面板
默认示例:
1 2 3 4 5 6 7 8 9 10 11 12 13 14 15 16 不带标题<div class ="panel panel-default" > <div class ="panel-heading" > Panel heading without title</div > <div class ="panel-body" > </div > </div > <div class ="panel panel-default" > <div class ="panel-heading" > <h3 class ="panel-title" > Panel title</h3 > </div > <div class ="panel-body" > </div > </div >
不同风格的面板
风格设置:
1 2 3 4 5 <div class ="panel panel-primary" > ...</div > <div class ="panel panel-success" > ...</div > <div class ="panel panel-info" > ...</div > <div class ="panel panel-warning" > ...</div > <div class ="panel panel-danger" > ...</div >
面板示例:
1 2 3 4 5 6 7 8 <div class ="panel panel-success" > <div class ="panel-heading" style ="background: #d6e9c6" > <h3 class ="panel-title" > Panel title</h3 > </div > <div class ="panel-body" > </div > </div >
案例:登录 要点:
宽度+居中(区域)
内边距
表单
1 2 3 4 5 6 7 8 9 10 11 12 13 14 15 16 17 18 19 20 21 22 23 24 25 26 27 28 29 30 31 32 33 34 35 36 37 38 39 40 41 42 43 44 45 46 <!DOCTYPE html > <html lang ="en" > <head > <meta charset ="UTF-8" > <title > Login</title > <link rel ="stylesheet" href ="/static/plugins/bootstrap-3.4.1/css/bootstrap.css" > <link rel ="stylesheet" href ="/static/plugins/bootstrap-3.4.1/js/bootstrap.js" > <link rel ="stylesheet" href ="/static/css/login.css" > </head > <body > <div class ="container-fluid" > <div class ="login" > <h3 class ="h3 text-center" > 用户登录</h3 > <div class ="input-group" > <p > 用户名或手机号</p > <input type ="text" class ="form-control" placeholder ="Username" aria-describedby ="basic-addon1" > </div > <div class ="input-group" > <p > 密码</p > <input type ="password" class ="form-control" placeholder ="password" aria-describedby ="basic-addon2" > </div > <div class ="input-group" > <p > 图片验证码</p > <input type ="text" class ="form-control" placeholder ="verify code" aria-label ="Amount (to the nearest dollar)" > </div > <div class ="input-group" > <input type ="submit" class ="form-control btn btn-primary" id ="basic-url" aria-describedby ="basic-addon3" value ="登录" onclick ="" > </div > </div > </div > </body > </html >
1 2 3 4 5 6 7 8 9 10 11 12 13 14 15 16 17 18 19 20 21 22 23 24 25 26 27 28 29 30 31 32 33 34 35 36 37 38 39 40 41 42 43 44 .container-fluid {margin : 0 ;background : linear-gradient (#cdcee7 , lightcyan);.login {box-shadow : 4px 4px 20px #abc ;width : 350px ;margin : 80px auto;padding : 20px 40px ;position : relative;border : 1px solid transparent;border-radius : 5px ;.login :hover {background : linear-gradient (#b49fcc , #b0b0f3 );color : white;.login div {margin : 2px auto;.login .input-group {border-radius : 10px ;
6.表单 1 2 3 4 <div class="input -group">p >用户名或手机号</p >input type="text" class="form -control" placeholder="Username" aria-describedby="basic-addon1">div >
7.表格 1 2 3 4 5 6 7 8 9 10 11 12 13 14 15 16 17 18 19 20 21 22 23 24 25 26 27 28 29 30 31 32 33 34 35 36 37 38 39 40 41 42 43 44 45 46 47 48 49 50 51 <div class ="tablelist text-center" > <table class ="table table-hover table-bordered" > <thead > <tr > <th > #</th > <th > First Name</th > <th > Last Name</th > <th > Username</th > <th > Action</th > </tr > </thead > <tbody > <tr > <th scope ="row" > 1</th > <td > Mark</td > <td > Otto</td > <td > @mdo</td > <td > <a href ="" > <button class ="btn btn-primary btn-xs" > 编辑</button > <button class ="btn btn-danger btn-xs" > 删除</button > </a > </td > </tr > <tr > <th scope ="row" > 2</th > <td > Jacob</td > <td > Thornton</td > <td > @fat</td > <td > <a href ="" > <button class ="btn btn-primary btn-xs" > 编辑</button > <button class ="btn btn-danger btn-xs" > 删除</button > </a > </td > </tr > <tr > <th scope ="row" > 3</th > <td > Larry</td > <td > the Bird</td > <td > @twitter</td > <td > <a href ="" > <button class ="btn btn-primary btn-xs" > 编辑</button > <button class ="btn btn-danger btn-xs" > 删除</button > </a > </td > </tr > </tbody > </table > </div >
案例:后台管理 要求:
导航
新建,按钮
表格
1 2 3 4 5 6 7 8 9 10 11 12 13 14 15 16 17 18 19 20 21 22 23 24 25 26 27 28 29 30 31 32 33 34 35 36 37 38 39 40 41 42 43 44 45 46 47 48 49 50 51 52 53 54 55 56 57 58 59 60 61 62 63 64 65 66 67 68 69 70 71 72 73 74 75 76 77 78 79 80 81 82 83 84 85 86 87 88 89 90 91 92 93 94 95 96 97 98 99 100 101 102 103 104 105 106 107 108 109 110 111 112 113 114 115 116 117 118 119 120 121 122 123 124 125 126 127 128 129 130 131 132 133 134 135 136 137 138 139 140 141 142 143 144 145 146 147 148 149 150 151 152 153 154 155 156 157 158 159 160 161 <!DOCTYPE html > <html lang ="en" > <head > <meta charset ="UTF-8" > <meta name ="viewport" content ="width=device-width, initial-scale=1" > <title > Title</title > <link rel ="stylesheet" href ="/static/plugins/bootstrap-3.4.1/css/bootstrap.css" > <link rel ="stylesheet" href ="https://cdn.staticfile.org/twitter-bootstrap/3.3.7/css/bootstrap.min.css" > <link rel ="stylesheet" href ="/static/plugins/bootstrap-3.4.1/js/bootstrap.js" > <link rel ="stylesheet" href ="/static/css/adminsystem.css" > </head > <body > <nav class ="navbar navbar-default" > <div class ="container" > <div class ="navbar-header" > <button type ="button" class ="navbar-toggle collapsed" data-toggle ="collapse" data-target ="#bs-example-navbar-collapse-1" aria-expanded ="false" > <span class ="sr-only" > Toggle navigation</span > <span class ="icon-bar" > </span > <span class ="icon-bar" > </span > <span class ="icon-bar" > </span > </button > <a class ="navbar-brand" href ="#" > 医学文献管理系统</a > </div > <div class ="collapse navbar-collapse" id ="bs-example-navbar-collapse-1" > <ul class ="nav navbar-nav" > <li class ="active" > <a href ="#" > <span class ="glyphicon glyphicon-folder-open" aria-hidden ="true" > </span > 文档目录<span class ="sr-only" > (current)</span > </a > </li > <li > <a href ="#" > <span class ="glyphicon glyphicon-user" aria-hidden ="true" > </span > </a > </li > <li > <a href ="#" > <span class ="glyphicon glyphicon-cloud" aria-hidden ="true" > </span > 数据可视化</a > </li > </ul > <form class ="navbar-form navbar-left" > <div class ="form-group" > <input type ="text" class ="form-control" placeholder ="Search" > </div > <button type ="submit" class ="btn btn-default" > 搜索</button > </form > <ul class ="nav navbar-nav navbar-right" > <li > <a href ="#" > 登录</a > </li > <li > <a href ="#" > 注册</a > </li > </ul > </div > </div > </nav > <div class ="container" > <div class ="panel panel-default" > <div class ="panel-heading" > <span class ="glyphicon glyphicon-pencil" aria-hidden ="true" > </span > </div > <div class ="panel-body" > <form > <div class ="form-group" > <label for ="exampleInputEmail1" > 上传人</label > <input type ="email" class ="form-control" id ="exampleInputEmail1" placeholder ="submit-person" > </div > <div class ="form-group" > <label for ="exampleInputPassword1" > 重要指数</label > <input type ="text" class ="form-control" id ="exampleInputPassword1" placeholder ="importance-index" > <p class ="help-block" > 重要指数区间为(0.0, 1.0)</p > </div > <div class ="form-group" > <label for ="exampleInputFile" > File input</label > <input type ="file" class ="" id ="exampleInputFile" > <p class ="help-block" > 请选择您要导入的医学文献!</p > </div > <button type ="submit" class ="btn btn-success" > 提交</button > </form > </div > </div > </div > <div class ="container" > <div class ="btnlist" style ="margin-bottom: 20px" > <button type ="button" value ="" class ="btn btn-info" > 新建</button > <button type ="button" value ="" class ="btn btn-info" > 编辑</button > <button type ="button" value ="" class ="btn btn-info" > 删除</button > <button type ="button" value ="" class ="btn btn-info" > 导入</button > </div > <div class ="panel panel-default" > <div class ="panel-heading" > <h3 class ="panel-title" > <span class ="glyphicon glyphicon-th-list" > </span > 文献速览</h3 > </div > <div class ="panel-body" > </div > <div class ="tablelist text-center" > <table class ="table table-hover table-bordered" > <thead > <tr > <th > #</th > <th > First Name</th > <th > Last Name</th > <th > Username</th > <th > Action</th > </tr > </thead > <tbody > <tr > <th scope ="row" > 1</th > <td > Mark</td > <td > Otto</td > <td > @mdo</td > <td > <a href ="" > <button class ="btn btn-primary btn-xs" > 编辑</button > <button class ="btn btn-danger btn-xs" > 删除</button > </a > </td > </tr > <tr > <th scope ="row" > 2</th > <td > Jacob</td > <td > Thornton</td > <td > @fat</td > <td > <a href ="" > <button class ="btn btn-primary btn-xs" > 编辑</button > <button class ="btn btn-danger btn-xs" > 删除</button > </a > </td > </tr > <tr > <th scope ="row" > 3</th > <td > Larry</td > <td > the Bird</td > <td > @twitter</td > <td > <a href ="" > <button class ="btn btn-primary btn-xs" > 编辑</button > <button class ="btn btn-danger btn-xs" > 删除</button > </a > </td > </tr > </tbody > </table > </div > </div > <div class ="text-center" > <ul class ="pagination" > <li class ="disabled" > <a href ="#" aria-label ="Previous" > <span aria-hidden ="true" > «</span > </a > </li > <li class ="active" > <a href ="#" > 1 <span class ="sr-only" > (current)</span > </a > </li > <li > <a href ="#" > 2</a > </li > <li > <a href ="#" > 3</a > </li > <li > <a href ="#" aria-label ="Next" > <span aria-hidden ="true" > »</span > </a > </li > </ul > </div > </div > </body > </html >
1 2 3 4 5 6 7 8 body {margin : 0 ;.navbar {border-radius : 0 ;
8.图标 图标库:
Bootstrap自带的图标库(图标较少)
Font Awesome(图标较多)
引入方式
1 2 3 4 5 外链式
设置样式
1 <i class ="fa-solid fa-magnifying-glass" style ="color:red" > </i >
9.动态式响应(屏幕自适应) 1 2 head标签中设置<meta name ="viewport" content ="width=device-width, initial-scale=1.0" >
5.JavaScript ==for循环格式和c语言一致,object HTMLTableCellElement为DOM对象==
简介:
JavaScript是一门编程语言,浏览器是该语言的解释器。
DOM和BOM
相当于编程语言内置的模块。
例如:python中的re、random、time、json模块等。
Jquery
相当于编程语言的第三方模块
例如:request、OpenCV、openpyxl
意义:
让程序实现一些动态效果
示例:
1 2 3 4 5 6 7 8 9 10 11 12 13 14 15 16 17 18 19 20 21 22 23 24 25 26 27 28 29 30 <!DOCTYPE html > <html lang ="en" > <head > <meta charset ="UTF-8" > <title > Title</title > <style > .head { width : 200px ; border : 1px solid rebeccapurple; } .head .title { background : linear-gradient (rosybrown, lightblue); padding : 20px 10px ; } </style > </head > <body > <div class ="head" > <div class ="title" onclick ="myFunc()" > 退出</div > <div class ="content" > 123</div > <script type ="text/javascript" > function myFunc ( alert ("是否退出?" ) confirm ("是否退出?" ) } </script > </div > </body > </html >
1.代码位置 放在head标签里或</body>前
1 2 3 4 5 6 7 8 9 10 11 12 13 14 15 16 17 18 19 <!DOCTYPE html > <html lang ="en" > <head > <meta charset ="UTF-8" > <title > Title</title > <script type ="text/javascript" > function myFunc ( alert ("是否退出?" ) } </script > </head > <body > <script type ="text/javascript" > function myFunc ( confirm ("是否退出?" ) } </script > </body > </html >
2.存在形式 1.内嵌式 放在html里
1 2 3 4 5 6 7 8 9 10 11 12 13 14 15 16 17 18 19 20 <!DOCTYPE html > <html lang ="en" > <head > <meta charset ="UTF-8" > <title > Title</title > <script type ="text/javascript" > function myFunc ( alert ("是否退出?" ) } </script > </head > <body > <script type ="text/javascript" > function myFunc ( confirm ("是否退出?" ) } </script > </body > </html >
2.外联式 html里引用,Js文件独立放置
1 2 3 4 5 6 7 8 9 10 11 <!DOCTYPE html > <html lang ="en" > <head > <meta charset ="UTF-8" > <title > Title</title > <script src ="/static/js/adminsystem.js" > </script > </head > <body > <script src ="/static/js/adminsystem.js" > </script > </body > </html >
3.注释 1.html 2.css 3.js 4.变量 1 2 3 4 5 6 7 8 9 10 11 12 13 <!DOCTYPE html > <html lang ="en" > <head > <meta charset ="UTF-8" > <title > 变量</title > </head > <body > <script type ="text/javascript" > var name = "Alleyf" ; console .log (name); </script > </body > </html >
5.字符串类型 1.定义 1 2 3 var name = "Alleyf" ;var name = String ("Alleyf" );
2.常见功能 1 2 3 4 5 var name = "alleyf" ;var v1 = name.length ;var v2 = name[0 ];var v3 = name.trim ();var v4 = name.substring (0 ,2 );
案例:跑马灯 1 2 3 4 5 6 7 8 9 10 11 12 13 14 15 16 17 18 19 20 21 22 23 24 25 26 27 28 29 30 31 32 33 34 35 36 <!DOCTYPE html > <html lang ="en" > <head > <meta charset ="UTF-8" > <title > 变量</title > <style > .head { width : 250px ; margin : 5px auto; background : linear-gradient (rebeccapurple, blanchedalmond); text-align : center; } </style > </head > <body > <div class ="head" > <span id ="slogin" style ="text-align: center;color: red" > 欢迎使用拂安医学文献管理系统</span > </div > <script type ="text/javascript" > function show ( var tag = document .getElementById ("slogin" ); var dataString = tag.innerText ; console .log (dataString); var firstChar = dataString[0 ]; var otherString = dataString.substring (1 , dataString.length ); var newText = otherString + firstChar; tag.innerText = newText; } setInterval (show, 1000 ) </script > </body > </html >
6.数组 1 2 3 var v1 = [11 ,22 ,33 ,44 ];var v2 = Array ([11 ,22 ,33 ,44 ,55 ]);
1 2 3 4 5 6 7 8 9 10 11 var v1 = [11 ,22 ,33 ,44 ];1 ]0 ] = "Alleyf" ;push ("chuiyugin" );unshift ("联通" );splice (索引,0 ,元素);splice (1 ,0 ,"中国" ); pop () shift () splice (2 ,1 )
1 2 3 4 5 6 7 8 9 10 var v1 = [11 ,22 ,33 ,44 ];for (var idx in v1){console .log (data);for (var i; i<v1.length ;i++)
js也可以使用break 和continue 控制循环,用法和c语言一样。
案例:动态数据
1 2 3 4 5 6 7 8 9 10 11 12 13 14 15 16 17 18 19 20 21 22 23 24 25 <!DOCTYPE html > <html lang ="en" > <head > <meta charset ="UTF-8" > <title > Title</title > </head > <body > <ul id ="city" > </ul > <script type ="text/javascript" > var cities = ["北京" , "上海" , "深圳" , "武汉" ] for (var cityid in cities) { var citytext = cities[cityid]; var tag = document .createElement ("li" ); tag.innerText = citytext; var city = document .getElementById ("city" ); city.appendChild (tag); } </script > </body > </html >
7.对象(字典) 1 2 3 4 5 6 7 8 9 info = {"name" :"Alleyf" ,"age" :18 name :"Alleyf" ,age :18
1 2 3 4 5 6 7 8 9 age name ="chuiyugin" "age" ]"name" ]="chuiyugin" delete info["age" ]
1 2 3 4 5 6 7 8 9 name :"Alleyf" ,age :18 for (var key in info)console .log (info[key]);
案例:动态表格
1 2 3 4 5 6 7 8 9 10 11 12 13 14 15 16 17 18 19 20 21 22 23 24 25 26 27 28 29 30 31 32 33 34 35 36 37 38 39 40 41 <!DOCTYPE html > <html lang ="en" > <head > <meta charset ="UTF-8" > <title > Title</title > </head > <body > <table border ="1" > <thead > <tr > <th > ID</th > <th > 姓名</th > <th > 年龄</th > <th > 年级</th > </tr > </thead > <tbody id ="body" > </tbody > </table > <script type ="text/javascript" > var info = { id : 1 , name : "Alleyf" , age : 18 , grade : 3 } var bodytr = document .createElement ("tr" ); for (var key in info) { var bodytd = document .createElement ("td" ); bodytd.innerText = info[key]; console .log (info.key , bodytd); bodytr.appendChild (bodytd); } var by = document .getElementById ("body" ); by.appendChild (bodytr); </script > </body > </html >
8.条件语句 1 2 3 4 5 6 7 8 if () {else if () {else if () {else {
9.函数 1 2 3 4 function (func ()
6.DOM DOM,就是一个模块,模块可以对html页面中的标签进行操作。
1 2 3 4 5 6 7 8 9 10 11 12 13 14 15 16 17 var tag = document .getElementById ("id" );innerText ;innerText = "text" ;var tag = document .createElement ("div" );innerText = "哈哈哈" ;appendChild (childtag);
1.事件绑定 1 2 3 4 5 6 7 8 9 10 11 12 13 14 15 16 17 18 19 20 21 22 <!DOCTYPE html > <html lang ="en" > <head > <meta charset ="UTF-8" > <title > Title</title > </head > <body > <input type ="button" value ="添加" onclick ="add()" > //单击响应<input type ="button" value ="添加" onclick ="add()" > //双击响应<ol id ="info" class ="fa-list-ol" > </ol > <script type ="text/javascript" > function add (data ) { var newtag = document .createElement ("li" ) newtag.innerText = data; var tag = document .getElementById ("info" ); tag.appendChild (newtag); } </script > </body > </html >
1 2 3 4 5 6 7 8 9 10 11 12 13 14 15 16 17 18 19 20 21 22 23 24 25 26 27 28 29 30 31 32 33 34 35 36 37 <!DOCTYPE html > <html lang ="en" > <head > <meta charset ="UTF-8" > <title > Title</title > </head > <body > <input type ="text" placeholder ="请输入内容" id ="txtusr" class ="input-group" > <input type ="button" value ="添加" onclick ="add()" class ="input-group" > <ul id ="info" class ="fa-list-ol" > </ul > <script type ="text/javascript" > function add ( var txttag = document .getElementById ("txtusr" ); var txt = txttag.value ; if (txt) { txttag.value = null ; var newtag = document .createElement ("li" ) newtag.innerText = txt; var tag = document .getElementById ("info" ); tag.appendChild (newtag); } else { alert ("输入不能为空" ) } } </script > </body > </html >
注意:DOM中还有很多操作。
DOM可以实现很多功能,但是比较繁琐。
页面上的效果:jQuery来实现/vue.js/react.js 。
复习 1.编码
-ASCII编码,256种对应关系
-gb2312,gbk,中文和亚洲的一些国家【中文是两个字节】
-unicode,ucs2、ucs4,包括现在发现的所有文明
-utf-8编码,压缩的unicode编码【中文是3个字节】
python默认解释器编码: utf-8
2.字符串格式化 1 2 3 4 5 v1 = "我是{},今年{}" .format("牛牛" ,23 )v2 = "我是%s,今年%d岁" %("牛牛" ,18 )name = "牛牛" age = 18 v3 = f"我是{name},今年{age}岁"
3.数据类型 常见数据类型:
1 2 3 4 5 6 7 8 9 10 11 12 13 14 15 16 17 18 19 int /bool /str /list /tuple /list /dict /set /float /None bool 为False :空、None 、0 list 、set 、dict list 、set 、dict list 、set 、dict 不能做字典的建和集合元素)str str 本身不变,是生成新的字符串。len 、索引、切片、for 循环、判断是否包含list len 、索引、切片、for 循环、判断是否包含list 可变,功能很多都是对原数据操作dict len 、索引for 循环、、判断是否包含(判断键效率很高)
4.运算符 1 2 3 4 5 6 基本运算符:加减乘除···1 >2 and 3 >10 v1 = 99 and 88 or 10 '联通' or []
5.推导式(简化生成数据) 1 2 3 4 5 6 data = []for i in range(10 ):data .append(i )data = [i for in range(10)]data = [i for in range(10) if i<5] #[0,1,2,3,4]
6.函数编程 1 2 3 4 5 6 7 8 9 10 11 12 13 14 15 16 17 18 19 20 21 函数的基础知识:return 就立即返回,后续代码不再执行。None 。global 关键词,global 的作用?引用全局的那个变量(不是在局部创建)。bin /hex /odc/max /min /divmod /sorted (按照unicode码表排序)/open (文件操作)with
7.模块 1 2 3 4 5 6 7 8 9 10 11 12 13 14 15 16 17 18 19 20 模块的分类:import /from xx import xxtime /datetime/json /re/random/os···JSON 模块:JSON 本质是字符串,有一些自己格式的要求,例如:无元组、无单引号。json .dumps(功能是将字典类型转换为json 格式的字符串类型)序列化时,只能序列化Python常用数据类型。search /re.match/re.findall
8.面向对象 1 2 目标:不是为了用面向对象编程(推荐使用函数编程,面向对象要看得懂)。
9.前端开发 1 2 3 4 5 6 7 8 9 10 11 12 13 14 15 16 17 18 19 20 21 22 23 24 25 前端知识点三部分:HTML ,标签具有模式特点。HTML 标签div /span /a /img /input /form /table /ul /ol ```div span 默认谁是块级标签?div form 表单+input /select/textarea 数据框form 标签中有一个submitdiv +float (脱离文档流,clear :both;clearfix)
7.JQuery jquery是一个javascript第三方模块(第三方库)。
基于Jquery,自己开发一个功能。
现成的工具依赖JQuery,例如:BootStrap动态效果。
1.快速上手 1 2 3 4 5 6 7 8 9 10 11 12 13 14 15 16 17 <!DOCTYPE html > <html lang ="en" > <head > <meta charset ="UTF-8" > <title > Title</title > </head > <body > <h1 id ="txt" > 中国联通</h1 > <script src ="/static/plugins/jquery-3.6.1.min.js" > </script > <script type ="text/javascript" > let txt = $("#txt" ) txt.text ("中国移动" ) </script > </body > </html >
2.寻找标签(直接寻找)
ID
样式(类)选择器
1 <h1 class ="c1" > 中国联通</h1 >
标签选择器
层级选择器
1 2 3 4 5 <div class ="c1" > <span class ="c2" > <a href ="#" > </a > </span > </div >
多选择器
1 2 3 4 5 6 7 8 <div class ="c1" > <span class ="c2" > </span > <a href ="#" > </a > </div > <ul id ="u1" > <li > </li > </ul > <p class ="p1" > </p >
属性选择器
1 2 <input type ="text" name ="n1" > <input type ="text" name ="n2" >
3.间接寻找
找到上一个兄弟
1 2 3 4 5 6 <div > <div > 北京</div > <div id ="c1" > 上海</div > <div > 广州</div > <div > 深圳</div > </div >
1 2 3 4 5 $("#c1" ).prev () "#c1" )"#c1" ).next () "#c1" ).next ().next () "#c1" ).siblings ()
找父子
1 2 3 4 5 6 7 8 9 10 <div > <div > <div id ="c1" > 上海</div > </div > </div > <div id ="c2" > <div > 老大</div > <div class ="d2" > 老二</div > </div >
1 2 3 4 5 6 $("#c1" ).parent () "#c1" ).parent ().parent () "#c2" ).children () "#c2" ).children (".d2" ) "#c2" ).find (".d2" ) "#c2" ).find ("div" )
案例:菜单的切换 1 2 3 4 5 6 7 8 9 10 11 12 13 14 15 16 17 18 19 20 21 22 23 24 25 26 27 28 29 30 31 32 33 34 35 36 37 38 39 40 41 42 43 44 45 46 47 48 49 50 51 52 53 54 55 56 57 58 59 60 61 62 63 64 65 66 67 68 69 70 71 72 73 <!DOCTYPE html > <html lang ="en" > <head > <meta charset ="UTF-8" > <title > Title</title > <style > .menu { width : 200px ; height : 800px ; border : 1px solid red; } .menu .header { cursor : pointer; padding : 10px 5px ; border-bottom : 1px dotted #ddd ; background : linear-gradient (gold, lightblue); } .item a { display : block; text-decoration : none; padding : 5px 5px ; border-bottom : 1px dotted #ddd ; } .hide { display : none; } </style > </head > <body > <div class ="menu" > <div class ="item" > <div class ="header" onclick ="clickme(this)" > 北京</div > <div class ="content hide" > <a href ="" > 海淀区</a > <a href ="" > 朝阳区</a > <a href ="" > 大兴区</a > <a href ="" > 昌平区</a > </div > <div class ="header" onclick ="clickme(this)" > 上海</div > <div class ="content hide" > <a href ="" > 宝山区</a > <a href ="" > 普陀区</a > <a href ="" > 浦东新区</a > <a href ="" > 青浦区</a > </div > </div > </div > <script src ="/static/plugins/jquery-3.6.1.min.js" > </script > <script > function clickme (self ) { var hasHide = $(self).next ().hasClass ("hide" ) if (hasHide) { $(self).next ().removeClass ("hide" ); } else { $(self).next ().addClass ("hide" ); } } </script > </body > </html >
1 2 3 4 5 6 7 8 9 10 11 12 13 14 15 16 17 18 19 20 21 22 23 24 25 26 27 28 29 30 31 32 33 34 35 36 37 38 39 40 41 42 43 44 45 46 47 48 49 50 51 52 53 54 55 56 57 58 59 60 61 62 63 64 65 66 67 68 69 70 71 72 73 74 75 76 77 78 79 //只展示单个菜单<!DOCTYPE html > <html lang ="en" > <head > <meta charset ="UTF-8" > <title > Title</title > <style > .menu { width : 200px ; height : 800px ; border : 1px solid red; } .menu .header { cursor : pointer; padding : 10px 5px ; border-bottom : 1px dotted #ddd ; background : linear-gradient (#a7e3c9 , lightblue); } .item a { display : block; text-decoration : none; padding : 5px 5px ; border-bottom : 1px dotted #ddd ; } .hide { display : none; } </style > </head > <body > <div class ="menu" > <div class ="item" > <div class ="header" onclick ="clickme(this)" > 北京</div > <div class ="content hide" > <a href ="" > 海淀区</a > <a href ="" > 朝阳区</a > <a href ="" > 大兴区</a > <a href ="" > 昌平区</a > </div > </div > <div class =item > <div class ="header" onclick ="clickme(this)" > 上海</div > <div class ="content hide" > <a href ="" > 宝山区</a > <a href ="" > 普陀区</a > <a href ="" > 浦东新区</a > <a href ="" > 青浦区</a > </div > </div > <div class ="item" > <div class ="header" onclick ="clickme(this)" > 武汉</div > <div class ="content hide" > <a href ="" > 洪山区</a > <a href ="" > 江汉区</a > <a href ="" > 武昌区</a > <a href ="" > 青山区</a > </div > </div > </div > <script src ="/static/plugins/jquery-3.6.1.min.js" > </script > <script > function clickme (self ) { var hasHide = $(self).next ().hasClass ("hide" ) if (hasHide) { $(self).next ().removeClass ("hide" ); $(self).parent ().siblings ().find (".content" ).addClass ("hide" ) } else { $(self).next ().addClass ("hide" ); } } </script > </body > </html >
4.操作样式
addClass
removeClass
hasClass
5.值的操作 1 2 $("#c1" ).text () "#c1" ).text ("测试" )
1 <input type ="text" id ="c2" >
1 2 $("c2" ).val () "c2" ).val ("txt" )
案例:输入内容 1 2 3 4 5 6 7 8 9 10 11 12 13 14 15 16 17 18 19 20 21 22 23 24 25 26 27 28 <!DOCTYPE html>
6.事件 绑定事件直接用$("")获取到标签直接定义事件即可
1 2 3 4 $(".item" ).children ().click (function (this ).text ("hello python" )this ).remove ()
案例:设置内容和删除 1 2 3 4 5 6 7 8 9 10 11 12 13 14 15 16 17 18 19 20 21 22 23 24 25 26 27 28 29 30 <!DOCTYPE html > <html lang ="en" > <head > <meta charset ="UTF-8" > <title > Title</title > <style > .item a { display : block; text-decoration : none; } </style > </head > <body > <div class ="item" > <p href ="" > 1</p > <p href ="" > 2</p > <p href ="" > 3</p > </div > <script src ="/static/plugins/jquery-3.6.1.min.js" > </script > <script > let a = $(".item" ).children () $(a).click (function ( $(this ).text ("hello python" ) $(this ).remove () }) </script > </body > </html >
当页面框架加载完成之后执行代码(封装在$function之内):
1 2 3 4 5 6 7 <script>function (".item" ).children ().click (function (this ).text ("hello python" );
案例:表格操作 1 2 3 4 5 6 7 8 9 10 11 12 13 14 15 16 17 18 19 20 21 22 23 24 25 26 27 28 29 30 31 32 33 34 35 36 37 38 39 40 41 42 43 44 45 46 47 48 49 50 51 <!DOCTYPE html>
8.前端整合
HTML
CSS
JavaScript、jQuery
Bootstrap(动态效果依赖jQuery)
案例:添加数据页面
人员信息录入功能,需要提供用户信息:
用户名、年龄、薪资、部门、入职时间(*)
时间的选择:不能输入;选择:(插件)datetimepicker
1 2 3 4 5 6 7 8 9 10 11 12 13 14 15 16 17 18 19 20 21 22 23 24 25 26 27 28 29 30 31 32 33 34 35 36 37 38 39 40 41 42 43 44 45 46 47 48 49 50 51 52 53 54 55 56 57 58 59 60 61 62 63 64 65 66 67 68 69 70 71 72 73 74 75 76 77 78 79 80 81 82 83 84 85 86 87 88 89 90 91 92 93 94 95 96 97 98 99 100 101 102 103 104 105 106 <!DOCTYPE html > <html lang ="en" > <head > <meta charset ="UTF-8" > <title > Title</title > <link rel ="stylesheet" href ="" > <link rel ="stylesheet" href ="/static/plugins/bootstrap-datetimepicker-master/css/bootstrap-datetimepicker.css" > <link rel ="stylesheet" href ="/static/plugins/bootstrap-3.4.1/css/bootstrap.css" > <link rel ="stylesheet" href ="/static/plugins/fontawesome-free-6.2.1-web/css/fontawesome.css" > </head > <body > <div class ="container" style ="margin-top: 20px" > <form class ="form-horizontal" > <div class ="row clearfix" > <div class ="col-sm-6" > <div class ="form-group" > <label for ="inputEmail3" class ="col-sm-2 control-label" > 姓名</label > <div class ="col-sm-10" > <input type ="text" class ="form-control" id ="inputEmail3" placeholder ="姓名" > </div > </div > </div > <div class ="col-sm-6" > <div class ="form-group" > <label for ="inputPassword3" class ="col-sm-2 control-label" > 年龄</label > <div class ="col-sm-10" > <input type ="text" class ="form-control" id ="inputPassword3" placeholder ="年龄" > </div > </div > </div > </div > <div class ="row clearfix" > <div class ="col-sm-6" > <div class ="form-group" > <label for ="inputsalary" class ="col-sm-2 control-label" > 薪资</label > <div class ="col-sm-10" > <input type ="text" class ="form-control" id ="inputsalary" placeholder ="薪资" > </div > </div > </div > <div class ="col-sm-6" > <div class ="form-group" > <label for ="inputbranch" class ="col-sm-2 control-label" > 部门</label > <div class ="col-sm-10" > <select class ="form-control" name ="brabch" id ="inputbranch" > <option value ="" > IT部门</option > <option value ="" > 销售部门</option > <option value ="" > 人事资源管理部门</option > <option value ="" > 售后部门</option > <option value ="" > 运营部门</option > </select > </div > </div > </div > </div > <div class ="row clearfix" > <div class ="col-sm-6" > <div class ="form-group" > <label for ="dt" class ="col-sm-2 control-label" > 入职日期</label > <div class ="col-sm-10" > <input type ="text" id ="dt" class ="form-control" placeholder ="入职日期" > </div > </div > </div > <div class ="col-sm-6" > <div class ="form-group" > <div class ="col-sm-offset-2 col-sm-10" > <div class ="checkbox" > <label > <input type ="checkbox" > 一切信息属实</label > </div > </div > </div > </div > </div > <div class ="row clearfix" > <div class ="col-sm-6" > <div class ="form-group " > <div class ="col-sm-offset-2 col-sm-10" > <button type ="submit" class ="btn btn-primary" > 提交</button > </div > </div > </div > </div > </form > </div > <script src ="https://kit.fontawesome.com/2503dce09a.js" crossorigin ="anonymous" > </script > <script src ="/static/js/jquery-3.6.1.min.js" > </script > <script src ="/static/plugins/bootstrap-3.4.1/js/bootstrap.js" > </script > <script src ="/static/plugins/bootstrap-datetimepicker-master/js/bootstrap-datetimepicker.js" > </script > <script src ="/static/plugins/bootstrap-datetimepicker-master/js/locales/bootstrap-datetimepicker.zh-CN.js" > </script > <script > $(function ( $('#dt' ).datetimepicker ({ fomat : 'yyyy-mm-dd' , startDate : '0' , language : 'zh-CN' , autoclose : true }); }) </script > </body > </html >
9.MySQL 重装 CentOS 是一种非常流行的 Linux 发行版,它具有强大的性能和稳定性,被广泛应用于各种互联网服务。其中,MySQL 是一种常用的关系型数据库管理系统,用于存储和管理各种类型的数。但是在使用 CentOS 系统的过程中,有时候需要重装 MySQL,本文将介绍如何在 CentOS 系统中进行 MySQL 的重装。
步骤如下:
卸载已安装的MySQL
1 2 sudo systemctl stop mysqld
清除遗留文件
1 2 sudo rm -rf /var/lib/mysql
下载并安装新版 MySQL
1 2 3 sudo wget -i -c http://dev.mysql.com/get/mysql57-community-release-el7-10.noarch.rpm
启动 MySQL 服务
1 2 sudo systemctl start mysqld
初始化 MySQL
1 sudo mysql_secure_installation
以上就是在CentOS系统中重装MySQL的步骤,需要注意的是,重装MySQL会清除所有数据,因此在操作之前需要备份好数据。如果不是必须要重装MySQL的情况下,建议先尝试修复已有的MySQL。
1.种类 MySQL、Oracle、SQLServer、DB2、Access···
2.基本操作 2.1查看已有数据库(文件夹) 2.2退出 2.3设置数据库密码 关闭MYSQL服务
1 set password = password('123456' );
3.数据类型
类型
用途
tinyint
短整形(),相当于java的short,有符号(默认),取值范围:-128~127;无符号(用关键词unsigned指定),取值范围:0~255
int 整形,相当于java的int
bigint
长整形,相当于java的long
float
单精度浮点型
double 双精度浮点型
decimal
准确的小数值,eg:wage decimal(m,n) –总共m位数(负号不算),其中小数点后有n位,mmax=65,nmax=30.
datatime 日期类型,YYYY-MM-DD HH:MM:SS(2022-12-09 21:03:00),dt转为字符串类型显示(dt.strftime(“%Y-%m-%d %H:%M:%S”))
data
日期类型(无时分秒)YYYY-MM-DD
timestamp
日期类型(可存储时间戳)
char 定长字符,固定字符长度,最大255个字符,速度快,常存储:手机号,邮箱,加密后的密码等
varchar 不定长字符,有多少存多少,最大65535个字节,节省空间
text
大文字,用于存储很长的字符内容,可存储65535个字符,例如:文章,新闻等。
mediumtext
中等文本,最多存储16777215(2^24^-1)个字符
longtext
长文本,最多存储4294967295(4GB)(2^32^-1)个字符
blob
字节数据类型,存储图片、音频等文件
4.MYSQL指令 4.1数据库管理
查看当前已有数据库
创建数据库
1 2 create database 数据库名;create database 数据库名 DEFAULT CHARSET utf8 COLLATE utf8_general_ci;
删除数据库
进入数据库
查看当前数据库下的所有数据表
4.2数据表管理
创建表
1 2 3 4 5 6 create table 表名(default charset= utf8;
1 2 3 4 5 6 7 create table 表名(not null auto_increment primary key, not null ,default 1 ,null default charset= utf8;
==主键一般用于表示当前行的编号==(类似于身份证)。
示例
1 2 3 4 5 create table medocsys(int not null auto_increment primary key,varchar (20 ) not null ,varchar (15 ) not null default charset= utf8;
查看创建的表信息
插入数据
1 2 3 4 单条插入insert into 表名(字段名1 ,字段名2 ,···,字段名) values (数据1 ,数据2 ,···,数据);insert into 表名(字段名1 ,字段名2 ,···,字段名) values (数据1 ,数据2 ,···,数据),(数据1 ,数据2 ,···,数据),···(数据1 ,数据2 ,···,数据);
4.5数据行操作 1.新增数据 1 2 3 4 单条插入insert into 表名(字段名1 ,字段名2 ,···,字段名) values (数据1 ,数据2 ,···,数据);insert into 表名(字段名1 ,字段名2 ,···,字段名) values (数据1 ,数据2 ,···,数据),(数据1 ,数据2 ,···,数据),···(数据1 ,数据2 ,···,数据);
2.删除数据 1 2 delete from 表名;delete from 表名 where 条件;
delete from tb1 where id>=10 or name=”alleyf”;
3.修改数据 1 2 3 4 update 表名 set 字段名= 值;update 表名 set 字段名1 = 值,字段名2 = 值;update 表名 set 字段名= 值 where 条件;update medocsys set name= "alley", pwd= pwd+ "10";
4.查询数据 1 2 3 4 5 6 查询表所有数据select * from 表名;select 字段名1 ,字段名2 from 表名;select * from 表名 where id > 3 ;
小结 一般开发:
==提前用工具创建好==
==用程序实现==
==mysql命令可以先用占位符%s填充,在execute中添加列表来代替占位符==
1 cursor.execute("select * from user where id > %s" , [2 ,])
在进行增删改的时候需要执行commit,不然数据库没有数据
1 2 cursor.execute("```" )
在进行查询的时候不需要执行commit,但是要执行fetchall/fetchone获取到返回的数据
1 2 3 4 5 cursor.execute(sql)return cursor.fetchall()
案例:用户管理
表结构创建
1 2 3 4 5 6 7 create table user (int not null auto_increment primary key,varchar (20 ) not null ,char (12 ) not null ,char (11 ) not null ,char (20 ) not null default charset= utf8;
python操作数据库
1 2 3 4 5 6 7 8 9 10 11 12 13 14 15 16 17 18 19 20 21 22 23 24 25 26 27 28 29 30 31 32 33 34 35 36 37 38 39 40 41 42 43 44 45 46 47 48 49 50 51 52 53 54 55 56 57 58 59 60 61 62 63 64 65 66 67 68 69 70 71 72 73 74 75 76 77 78 79 80 81 82 83 84 85 86 87 88 89 90 91 92 93 94 95 96 97 98 99 100 101 102 103 104 105 import pymysqldef cnetsql (host, port, user, passwd, db, charset="utf8" ):return tempcnet, tempcursor"127.0.0.1" , port=3306 , user="root" , passwd="123456" , db="medocsys" )def idsort ():"ALTER TABLE user DROP id" "ALTER TABLE user ADD id int NOT NULL FIRST" "ALTER TABLE user MODIFY COLUMN id int NOT NULL AUTO_INCREMENT,ADD PRIMARY KEY(id)" for sql in sqls:def insert (tablename, fieldnames, fieldvalues ):"insert into " "values" "(" ")" " " len (fieldnames)',' .join(fieldnames)if not (tablename or fieldnames or fieldvalues):print ("添加失败" )return False else :None print (length)for i in range (length):'%s' )',' .join(fieldvaluesls)print (fieldvaluessign)print (sql)print ("添加成功" )return True def querydata (tablename, fieldnames=None , condition='' ):if fieldnames is None :'*' ]',' .join(fieldnames)"select " + fieldnames + ' ' + "from " + tablename + ' ' + conditionprint (sql)return cursor.fetchall()def delalldata (tablename, condition=None ):if condition is None :'' "delete from " + tablename + ' ' + conditiondef closesql ():def main ():'user' )'user' , fieldnames=['name' , 'pwd' , 'phonenumber' , 'email' ],'alleyf' , '123456' , '13669156253' , 'alleyf@qq.com' ])'user' )for user in info:print (user)
综合案例:用户注册
1 2 3 4 5 6 7 8 9 10 11 12 13 14 15 16 17 18 19 20 21 22 23 24 25 26 27 28 29 30 31 32 33 34 35 36 37 38 39 40 41 42 43 44 45 46 47 48 49 50 51 52 53 54 55 56 57 58 59 60 61 62 63 64 65 66 67 68 69 70 71 72 73 74 75 76 77 78 79 80 81 82 83 84 85 86 87 88 89 90 91 92 93 94 95 96 97 98 99 100 101 102 103 104 105 106 107 108 109 110 111 112 113 114 115 116 117 118 119 120 121 122 123 124 125 126 127 <!DOCTYPE html > <html lang ="en" > <head > <meta charset ="UTF-8" > <title > 用户注册</title > <meta name ="viewport" content ="width=device-width, initial-scale=1.0" > <link rel ="stylesheet" href ="/static/plugins/bootstrap-3.4.1/css/bootstrap.css" > <link rel ="stylesheet" href ="/static/plugins/fontawesome-free-6.2.1-web/css/fontawesome.css" > <link rel ="stylesheet" href ="/static/css/register.css" > <style > body { margin : 0 ; padding : 0 ; } html , body { width : 100% ; height : 100% ; } .size { width : 100% ; height : 100% ; } #vcode { height : 35px ; width : 50% ; display : inline-block; } #code { color : #ffffff ; background : linear-gradient (plum, powderblue); height : 35px ; width : 150px ; float : right; text-align : center; font-size : 18pt ; padding : 5px 35px 10px 35px ; margin-left : 5% ; cursor : pointer; } </style > </head > <body > <div class ="container size" > <div class ="login-wrapper" > <form action ="/register" method ="post" onsubmit ="return check()" > <div class ="header" > Register</div > <div class ="form-wrapper clearfix" > <input type ="text" id ="name" name ="name" placeholder ="username" class ="input-item" > <input type ="password" id ="pwd" name ="pwd" placeholder ="password" class ="input-item" > <input type ="text" id ="number" name ="phonenumber" placeholder ="phonenumber" class ="input-item" > <input type ="email" id ="email" name ="email" placeholder ="email" class ="input-item" > <input type ="text" id ="vcode" placeholder ="verification code" class ="input-item" /> <span id ="code" > </span > <input class ="sub" type ="submit" value ="Login" > </input > </div > <div class ="msg" > <a href ="#" > Login in</a > </div > </form > </div > </div > <script type ="text/javascript" > var code; changeImg (); document .getElementById ("code" ).onclick = changeImg; function changeImg ( var arrays = ['1' , '2' , '3' , '4' , '5' , '6' , '7' , '8' , '9' , '0' , 'a' , 'b' , 'c' , 'd' , 'e' , 'f' , 'g' , 'h' , 'i' , 'j' , 'k' , 'l' , 'm' , 'n' , 'o' , 'p' , 'q' , 'r' , 's' , 't' , 'u' , 'v' , 'w' , 'x' , 'y' , 'z' , 'A' , 'B' , 'C' , 'D' , 'E' , 'F' , 'G' , 'H' , 'I' , 'J' , 'K' , 'L' , 'M' , 'N' , 'O' , 'P' , 'Q' , 'R' , 'S' , 'T' , 'U' , 'V' , 'W' , 'X' , 'Y' , 'Z' ]; code = '' ; for (var i = 0 ; i < 4 ; i++) { var r = parseInt (Math .random () * arrays.length ); code += arrays[r]; } document .getElementById ('code' ).innerHTML = code; } function check ( var input_code = document .getElementById ('vcode' ).value ; let username = $("#name" ).val (); let pwd = $("#pwd" ).val (); let number = $("#number" ).val (); let email = $("#email" ).val (); console .log (username, pwd, number, email); if (!(username && pwd && number && email)) { alert ("输入信息不完整,请继续输入" ); return false ; } if (input_code.toLowerCase () === code.toLowerCase ()) { return true ; } else { alert ("请输入正确的验证码!" ); return false ; } } </script > <script src ="https://kit.fontawesome.com/2503dce09a.js" crossorigin ="anonymous" > </script > <script src ="/static/js/jquery-3.6.1.min.js" > </script > <script src ="/static/plugins/bootstrap-3.4.1/js/bootstrap.js" > </script > </body > </html >
==Flask后端==
1 2 3 4 5 6 7 8 9 10 11 12 13 14 15 16 17 18 19 20 21 22 23 24 25 26 27 28 29 30 31 32 33 34 35 36 37 38 39 from flask import Flask, render_template, requestfrom model.cnetmysql import delalldatafrom model.cnetmysql import insertfrom model.cnetmysql import querydata@app.route("/register" , methods=["GET" , "POST" ] def register ():if request.method == "GET" :return render_template("register.html" )elif request.method == "POST" :'name' )'pwd' )'phonenumber' )'email' )print (request.form)'user' , fieldnames=['name' , 'pwd' , 'phonenumber' , 'email' ],'user' , condition='where id = 1' )0 ]return render_template("demo.html" , adminer=adminer)@app.route("/demo" , methods=["GET" , "POST" ] def demo ():if request.method == 'GET' :'user' , condition='where id = 1' )0 ]return render_template('demo.html' , adminer=adminer)if __name__ == '__main__' :
10.Django 0运行目录 ==django项目运行的目录为工程下的根目录(manage.py或app文件夹同级目录)==
1创建项目
==基于命令行创建==
打开终端
进入某个目录(希望项目存放的目录)
1 E: \PythonProjects\Django\Django1>
执行命令创建项目
1 django-admin startproject Django1
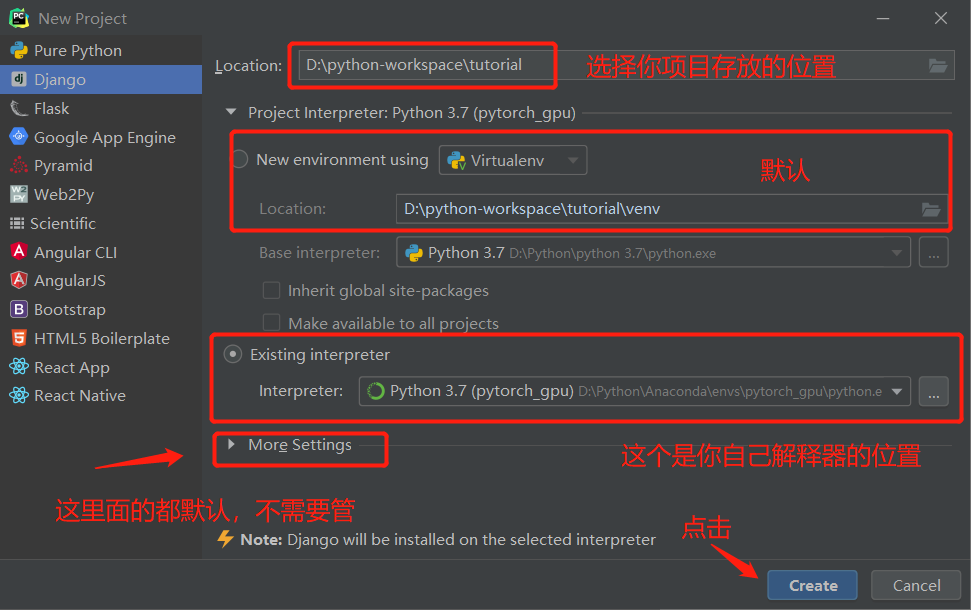
==基于Pycharm创建==
==默认文件介绍==
1 2 3 4 5 6 7 8 9 10 11 12 13 14 15 16 17 18 19 20 21 22 23 24 25 │ manage.py 【项目的管理,启动项目,创建app,数据管理】【不能动】【常常用】.idea .gitignore .xml .xml .iml .xml .xml .py 【项目配置文件】【常修改】.py 【URL和函数的对应关系】【常修改】.py 【接收网络请求】【不能动】.py 【接收网络请求】【不能动】.py .cpython-310 .pyc .cpython-310 .pyc .cpython-310 .pyc
2.APP 1 2 3 4 5 6 7 -项目HTML 模板、CSS等独立】HTML 模板、CSS等独立】HTML 模板、CSS等独立】HTML 模板、CSS等独立】HTML 模板、CSS等独立】
1 2 3 4 5 6 7 8 9 10 ├─app1py 【固定,不用动】django默认提供了admin后台管理py 【固定,不用动】app启动类py 【重要,模型层】对数据库操作py 【固定,不用动】单元测试py 【重要,视图层】前后端交互处理请求返回结果的函数py py
3.快速上手
确保app已注册【setting.py】
1 2 3 4 5 6 7 8 INSTALLED_APPS = ["django.contrib.admin" ,"django.contrib.auth" ,"django.contrib.contenttypes" ,"django.contrib.sessions" ,"django.contrib.messages" ,"django.contrib.staticfiles" ,"app1.apps.App1Config"
编写URL和视图函数对应关系【urls.py】
1 2 3 4 5 6 7 8 from django.contrib import adminfrom django.urls import pathfrom app1 import views"index/" , views.index),
编写视图函数【view.py】
1 2 3 4 5 6 from django.shortcuts import render, HttpResponsedef index (request ):return HttpResponse("欢迎访问拂安博客" )
启动Django项目
1 2 3 4 1.命令行启动
3.1在写一个页面 1 2 3 def register (request ):return render(request, "register.html" )
3.2templates模板
3.3静态文件 一般开发过程中:
都会当做静态文件处理
3.3.1static目录 在app目录下新建static文件夹
3.3.2引用路径静态文件
4.模板语法 本质上:在html中写一些占位符,由数据对这些占位符进行替换和处理 。
注意:取单独值的时候用.进行索引
1 2 3 4 5 6 7 8 9 10 视图层(view.py)def index (request ):if request.method == 'GET' :'alleyf' 'name' : name}'java' , 'python' , 'C++' , 'Go' ]'name' : 'alleyf' , 'age' : 20 , 'gender' : 'boy' }return render(request, 'demo.html' , dit)
1 2 3 4 5 6 7 8 9 10 11 12 13 14 15 16 17 前端(template中的html文件)<a href ="#" class ="dropdown-toggle" data-toggle ="dropdown" role ="button" aria-haspopup ="true" aria-expanded ="false" > {{ name }} <span class ="caret" > </span > </a > <li > <a href ="#" > {{ hobby.0 }}</a > </li > <li > <a href ="#" > {{ hobby.1 }}</a > </li > <li > <a href ="#" > {{ hobby.2 }}</a > </li > <ol > <li > {{ userinfo }}</li > <li > {{ userinfo.name }}</li > <li > {{ userinfo.age }}</li > <li > {{ userinfo.gender }}</li > </ol > <li > {{ datalist.0.name }}</li > <li > {{ datalist.0.hobby }}</li >
==循环语句==
l是列表
1 2 3 {% for item in l %}<span > {{ item }}</span >
d是字典
1 2 3 4 5 6 7 8 9 10 11 12 -取字典中键<li > {{ key }}</li > <li > {{ value }}</li > <li > {{ k }}={{ v }}</li >
列表套字典datalist为列表,info为字典
1 2 3 {% for info in datalist %}<li > {{ info.name }}--{{ info.hobby }}</li >
==条件语句==
1 2 3 4 5 6 7 {% if hobby.0 == 'java' %}<h1 > {{ hobby.0 }}==java</h1 > <h1 > {{ hobby.0 }}==python</h1 > <h1 > {{ hobby.0 }}==其他</h1 >
案例:热搜展示 view.py
1 2 3 4 5 6 7 8 def news (request ):"http://api.54dh.cn/API/search/rs/?type=weibo" 'user-agent' : 'Mozilla/5.0' }'info' : r.json()}return render(request, "news.html" , info)
news.html
1 2 3 4 5 6 7 8 9 10 11 12 13 14 15 16 17 18 19 20 21 22 23 24 25 26 27 28 29 30 31 32 33 34 35 36 {% load static %}<!DOCTYPE html > <html lang ="en" > <head > <meta charset ="UTF-8" > <title > 每日一言</title > <meta name ="viewport" content ="width=device-width, initial-scale=1.0" > <link rel ="stylesheet" href ="{% static 'plugins/bootstrap-3.4.1/css/bootstrap.css' %}" > <link rel ="stylesheet" href ="{% static 'plugins/fontawesome-free-6.2.1-web/css/fontawesome.css' %}" > <link rel ="stylesheet" href ="{% static 'css/register.css' %}" > #}<style > * { padding : 0 ; margin : 0 ; font-family : 微软雅黑, serif; letter-spacing : .05em ; } .container { margin : 5px auto; background-image : linear-gradient (to right, #fbc2eb , #a6c1ee ); } </style > </head > <body > <div class ="container text-center" > <a href ="{{ item.link }}" > {{ item.title }}--{{ item.heat }}</a > <br > </div > <script src ="https://kit.fontawesome.com/2503dce09a.js" crossorigin ="anonymous" > </script > <script src ="{% static 'js/jquery-3.6.1.min.js' %}" > </script > <script src ="{% static 'plugins/bootstrap-3.4.1/js/bootstrap.js' %}" > </script > </body > </html >
5.请求和响应
通过此方式可以获取到get请求中的参数和post请求中的数据
1 2 3 4 5 6 7 8 9 def something (request ):if request.method == "GET" :print (parameters)print (data)return HttpResponse(parameters['name' ])
重定向:返回重定向的网址给浏览器,浏览器去请求该网址
1 2 3 4 5 6 def register (request ):if request.method == "GET" :return render(request, "register.html" )elif request.method == "POST" :return redirect(request, 'login.html' )
案例:用户登录 post请求后的错误
解决办法
在html表单(form)中加上{% csrf_token %}
6.数据库操作
Django使用ORM框架实现对数据库的操作,安装mysqlclient第三方库辅助操作
1.ORM
ORM可以帮助我们完成两件事:
创建、修改、删除数据库中的表(不用写SQL语句)【无法创建数据库】
操作表中的数据
1 2 3 4 insert into ```update delete select
2.配置setting.py文件 1 2 3 4 5 6 7 8 9 10 DATABASES = {'default' : {'ENGINE' : 'django.db.backends.mysql' , 'NAME' : 'medocsys' , 'USER' : 'root' , 'PASSWORD' : '123456' , 'HOST' : '127.0.0.1' , 'PORT' : 3306 ,
3.Django操作表 1.创建表 在models.py中创建表类
1 2 3 4 5 6 7 class Userinfo (models.Model):32 )64 )11 )32 )
在终端执行命令创建该表
注意:1.终端路径在项目名目录下。2.app需要已经注册。
1 2 python manage.py makemigrations
2.删除表 直接将models.py里面的类注释掉即可
1 2 3 4 5 6 7 8 class Userinfo (models.Model):
3.修改表
删除字段(直接注释掉)
1 2 3 4 5 6 7 8 9 class Userinfo (models.Model):32 )64 )11 )32 )64 , default="" )
修改字段
1 2 128 , default="" )
添加字段
在表中新建字段(列)时,由于已存在的字段可能已有数据,所以新增列必须要指定新增列对应的数据:
手动输入一个值(全部行都为输入的值)
设置默认值
1 docpath = models.CharField(default="" )
允许为空
1 imgpath = models.CharField(null=True , blank=True )
4.操作表数据 1.添加数据 1 2 3 4 5 6 7 8 9 10 11 12 13 def register (request ):if request.method == "GET" :return render(request, "register.html" )elif request.method == "POST" :print (request.POST)"name" )"pwd" )"phonenumber" )"email" )return redirect(reverse("login" ))
2.更新数据 1 2 3 4 filter (id =2 ).update(password='a123456' )all ().update(mobile='13125018525' )
3.删除数据 1 2 3 4 filter (id =2 ).delete()all ().delete()
4.查询数据 1 2 3 4 5 6 7 8 filter (id =1 ) filter (id =1 ).first()all ()
1 2 3 4 5 6 7 8 9 def user_list (request ):all ()for info in userinfo:'id' : info.id , 'name' : info.name, 'password' : info.password, 'mobile' : info.mobile,'email' : info.email}print (userlist)return render(request, "user_list.html" , {'userlist' : userlist})
案例:用户管理 要求:
展示用户列表
url路由
view函数
获取用户信息
HTML渲染
添加用户
修改用户
删除用户
a标签传递用户id参数get请求
筛选删除指定用户
1 2 3 4 5 6 7 8 9 10 11 12 13 14 15 16 17 18 19 20 21 22 23 24 25 26 27 28 29 30 31 32 33 34 def user (request ):if request.method == 'GET' :'nid' )filter (id =nid).delete() all ()for info in userinfo:'id' : info.id , 'name' : info.name, 'password' : info.password, 'mobile' : info.mobile,'email' : info.email}return render(request, "user.html" , {'userlist' : userlist})else :if request.POST['action' ] == 'add' :"name" )"pwd" )"phonenumber" )"email" )all ()elif request.POST["action" ][:6 ] == "delete" : "action" ][6 :]filter (id =userid).delete()elif request.POST["action" ][:4 ] == "edit" :"action" ][4 :]"name" )"pwd" )"phonenumber" )"email" )filter (id =userid).update(name=username, password=password, mobile=mobile, email=email)return redirect(reverse('user' ))
11.Django开发 1.主题一:员工管理系统 1.新建项目
预处理:
[()
2.创建app 方式1终端输入以下命令:
1 python manage.py startapp app名字
方式2打开manage.py任务输入以下命令:
注册app
3.设置表结构 1 2 3 4 5 6 7 8 9 10 11 12 13 14 15 16 17 18 19 20 21 22 23 24 25 26 27 28 29 30 31 32 33 34 from django.db import modelsclass Department (models.Model):"""部门表""" "标题" , max_length=32 )class UserInfo (models.Model):"""员工表""" "姓名" , max_length=16 )"密码" , max_length=16 )"年龄" )"账户余额" , max_digits=10 , decimal_places=2 , default=0 )"入职时间" )1 , '男' ),2 , '女' ),'性别' , choices=gender_choices)'Department' , to_field='id' , on_delete=models.CASCADE)
4.在MySQL中生成表
工具连接MYSQL创建数据库
1 create database staffsystem DEFAULT CHARSET utf8 COLLATE utf8_general_ci;
修改配置文件,连接MySQL
1 2 3 4 5 6 7 8 9 10 DATABASES = {'default' : {'ENGINE' : 'django.db.backends.mysql' ,'NAME' : 'staffsystem' , 'USER' : 'root' , 'PASSWORD' : '123456' , 'HOST' : '127.0.0.1' , 'PORT' : 3306 ,
执行django命令生成数据表
1 2 3 在manage.py的task 中执行:
5.创建静态文件和模板文件目录 6.部门管理
体验最原始方法来做。
Django中提供Form和ModelForm组件(方便)。
1.部门列表 重要知识点
==url中传递动态参数==
1 2 "depart/<int:nid>/edit/" , views.depart_edit),
1 2 3 4 5 6 7 8 9 10 11 def depart_edit (request, nid ):"""修改部门""" if request.method == "GET" :filter (id =nid).first()return render(request, "depart_edit.html" , {'departobj' : departobj})filter (id =nid).update(title=departdic.get('title' ), leader=departdic.get('leader' ),'number' ))return redirect('/depart/list/' )
2.新建部门 1 2 3 4 5 6 7 8 def depart_add (request ):"""添加部门""" if request.method == "GET" :return render(request, "depart_add.html" )'title' ], leader=departinfo['leader' ],'number' ])return redirect("/depart/list/" )
3.修改部门 1 2 3 4 5 6 7 8 9 10 def depart_edit (request, nid ):"""修改部门""" if request.method == "GET" :filter (id =nid).first()return render(request, "depart_edit.html" , {'departobj' : departobj})filter (id =nid).update(title=departdic.get('title' ), leader=departdic.get('leader' ),'number' ))return redirect('/depart/list/' )
4.删除部门 1 2 3 4 5 def depart_delete (request ):"""删除部门""" "nid" )filter (id =nid).delete()return redirect("/depart/list/" )
7.用户管理 1.用户列表 重要知识点
==用choice约束的字段,获取约束对应值的方法==
1 2 3 4 5 6 1 , '男' ),2 , '女' ),'性别' , choices=gender_choices)
1 userinfo.get_gender_display()
==外键字段获取外联表中对应的数据==
1 depart = models.ForeignKey(to='Department' , to_field='id' , on_delete=models.CASCADE)
1 userinfo.depart.title(depart返回的是对象)
==datetime时间转字符串形式==
1 2 "%Y-%m-%d %H:%M:%S" )
1 2
2.新建用户 1 2 3 4 5 6 7 8 9 10 11 12 13 14 15 16 17 18 def user_add (request ):"""添加用户""" if request.method == 'GET' :'gender_choices' : models.UserInfo.gender_choices,'departs' : models.Department.objects.all ()return render(request, 'user_add.html' , context)'name' )'pwd' )'age' )'account' )'ctime' )'gender' )'depart' )return redirect('/user/list/' )
3.编辑用户
点击编辑,跳转到编辑页面(将编辑行的ID携带过去)。
编辑页面(默认数据,根据ID获取并设置到页面中)
提交:
1 2 3 4 5 6 7 8 9 10 11 12 13 14 15 16 17 def user_edit (request, nid ):"""编辑用户""" filter (id =nid).first()if request.method == "GET" :return render(request, 'user_edit.html' , {'form' : form})if form.is_valid():return redirect('/user/list/' )else :return render(request, 'user_edit.html' , {'form' : form})
4.删除用户 1 2 3 def user_delete (request, nid ):filter (id =nid).first().delete()return redirect('/user/list/' )
7.模板继承
模板继承可以使父模板的内容复用,子模版直接继承父模板的全部内容并可以覆盖父模板中相应的块。
语法—父模板中:
1.定义父模板中的块block标签
2.标识出哪些在子模版中是允许被修改的
3.block标签:在父模板中定义,可以在子模版中覆盖
1 2 3 {% block block_name %}
语法—子模版中:
1.继承模板extends标签(写在模板文件的第一行 )
1 {% entends 'base.html' %}
2.子模版 重写父模板中的内容快
1 2 3 {% block block_name %}
实例:
1 2 3 4 5 6 7 8 9 10 11 12 13 14 15 16 17 18 19 20 21 22 23 24 25 26 27 28 29 30 31 32 33 34 35 36 37 38 39 40 41 42 43 44 45 46 47 48 49 50 51 52 53 54 55 56 57 58 59 60 61 62 63 64 65 66 67 68 69 70 71 72 73 74 75 76 {% load static %}<!DOCTYPE html > <html lang ="en" > <head > <meta charset ="UTF-8" > <title > 标题</title > <meta name ="viewport" content ="width=device-width, initial-scale=1.0" > <link rel ="stylesheet" href ="{% static 'css/user.css' %}" > #}<link rel ="stylesheet" href ="{% static 'plugins/bootstrap-3.4.1/css/bootstrap.min.css' %}" > <link rel ="stylesheet" href ="{% static 'plugins/fontawesome-free-6.2.1-web/css/fontawesome.min.css' %}" > <style > * { padding : 0 ; margin : 0 ; font-family : 微软雅黑, serif; letter-spacing : .05em ; } th { text-align : center; } .navbar { border-radius : 0 ; } </style > </head > <body > <nav class ="navbar navbar-default" > <div class ="container" > <div class ="navbar-header" > <button type ="button" class ="navbar-toggle collapsed" data-toggle ="collapse" data-target ="#bs-example-navbar-collapse-1" aria-expanded ="false" > <span class ="sr-only" > Toggle navigation</span > <span class ="icon-bar" > </span > <span class ="icon-bar" > </span > <span class ="icon-bar" > </span > </button > <a class ="navbar-brand" href ="#" > 联通用户管理系统</a > </div > <div class ="collapse navbar-collapse" id ="bs-example-navbar-collapse-1" > <ul class ="nav navbar-nav" > <li class ="active" > <a href ="/depart/list/" > 部门管理<span class ="sr-only" > (current)</span > </a > </li > <li class ="" > <a href ="/userinfo/list/" > 用户管理</a > </li > </ul > <ul class ="nav navbar-nav navbar-right" > <li > <a href ="#" > 登录</a > </li > <li class ="dropdown" > <a href ="#" class ="dropdown-toggle" data-toggle ="dropdown" role ="button" aria-haspopup ="true" aria-expanded ="false" > Alleyf <span class ="caret" > </span > </a > <ul class ="dropdown-menu" > <li > <a href ="#" > 个人资料</a > </li > <li > <a href ="#" > 我的信息</a > </li > <li role ="separator" class ="divider" > </li > <li > <a href ="#" > 注销</a > </li > </ul > </li > </ul > </div > </div > </nav > <div > </div > <script src ="https://kit.fontawesome.com/2503dce09a.js" crossorigin ="anonymous" > </script > <script src ="{% static 'js/jquery-3.6.1.min.js' %}" > </script > <script src ="{% static 'plugins/bootstrap-3.4.1/js/bootstrap.min.js' %}" > </script > </body >
1 2 3 4 5 6 7 8 9 10 11 12 13 14 15 16 17 18 19 20 21 22 23 24 25 26 27 28 29 30 31 32 33 34 35 36 37 38 39 40 41 42 43 44 {% extends 'layout.html' %}<title > 部门列表</title > <style > </style > <div class ="container" > <div style ="margin-bottom: 10px" > <a href ="/depart/add/" class ="btn btn-primary" > <i class ="fa fa-plus" > </i > 新建部门</a > </div > <div class ="panel panel-info" > <div class ="panel-heading" > <i class ="fa fa-list" > </i > 部门列表</div > <table class ="table table-hover table-condensed table-bordered" > <thead > <tr > <th > 部门ID</th > <th > 部门名称</th > <th > 部门负责人</th > <th > 部门人数</th > <th > 操作</th > </tr > </thead > <tbody class ="text-center" > <tr > <th scope ="row" > {{ department.id }}</th > <td > {{ department.title }}</td > <td > {{ department.leader }}</td > <td > {{ department.number }}</td > <td > <a href ="/depart/{{ department.id }}/edit/" class ="btn btn-info btn-xs" style ="margin-right: 20px" > 编辑</a > <a href ="/depart/delete/?nid={{ department.id }}" class ="btn btn-danger btn-xs" > 删除</a > </td > </tr > </tbody > </table > </div > </div >
原始方式:不会采用(本质)【麻烦】
1 2 3 4 -没有数据校验 -错误,应该有提示 -页面上,每个字段都需要我们重新写一遍,数据冗余 -关联的数据,需要手动获取并循环展示在页面中
Django组件
Form组件(较简便)
ModelForm组件(最简便)
1.views.py 1 2 3 4 5 6 7 8 9 10 11 12 13 14 15 class UserForm (forms.Form):def user_add (request ):"""添加用户""" if request.method == 'GET' :return render(request,'user_add.html' ,{'userform' :userform})
2.user_add.html 1 2 3 4 5 6 7 8 9 10 11 12 13 14 15 16 -循环法<form method ='post' > </form > <form method ='post' > </form >
1.models.py 1 2 3 4 5 6 7 8 9 10 11 12 13 14 from django import formsclass UserInfo (models.Model):"""员工表""" "姓名" , max_length=16 )"密码" , max_length=16 )"年龄" )"账户余额" , max_digits=10 , decimal_places=2 , default=0 )"入职时间" )1 , '男' ),2 , '女' ),'性别' , choices=gender_choices)'Department' , to_field='id' , on_delete=models.CASCADE)
2.views.py 1 2 3 4 5 6 7 8 9 10 11 12 13 14 15 class UserForm (forms.ModelForm):class Meta :"name" , "password" , "age" , "gender" , "depart" , "xxx" ]def user_add (request ):"""添加用户""" if request.method == 'GET' :return render(request,'user_add.html' ,{'userform' :userform})
3.user_add.html 1 2 3 4 5 6 7 8 9 10 11 12 13 14 15 16 -循环法<form method ='post' > </form > <form method ='post' > </form >
示例:
views.py
1 2 3 4 5 6 7 8 9 10 11 12 13 14 15 16 17 18 19 20 21 22 23 24 25 26 27 28 29 30 31 32 33 34 35 36 37 38 39 class UserModelForm (forms.ModelForm):"用户名" , min_length=1 )class Meta :"name" , "password" , "age" , "account" , "create_time" , "gender" , "depart" ]"name" : forms.TextInput(attrs={"class" : "form-control input" }),"create_time" : forms.DateTimeInput(attrs={"class" : " form-control input" , "type" : "datetime-local" }),def __init__ (self, *args, **kwargs ):super ().__init__(*args, **kwargs)for name, field in self.fields.items():"class" : "input form-control" , "placeholder" : field.label}def user_modelform_add (request ):"""添加用户modelform版""" if request.method == 'GET' :return render(request, 'user_modelform_add.html' , {'form' : form})if form.is_valid():return redirect('/user/list/' )else :return render(request, 'user_modelform_add.html' , {'form' : form})
user_modelform_add.html
1 2 3 4 5 6 7 8 9 10 11 12 13 14 15 16 17 18 19 20 21 22 23 24 25 26 27 28 29 30 31 32 33 34 35 36 37 38 39 40 41 42 43 44 45 46 47 48 49 50 51 52 53 54 55 56 57 58 59 60 61 62 63 64 65 66 67 68 69 70 71 {% extends 'user_list.html' %} # 继承父模块的标识<title > 新建用户</title > <style > .input { display : inline-block; margin : 10px auto; min-height : 50px ; width : 300px ; padding : 0 1rem ; color : #1e2732 ; font-size : 15px ; border : 1px solid #5e4dcd ; border-radius : 6px ; background-color : transparent; } .button--submit { display : block; margin : 10px auto; min-height : 50px ; padding : .5em 1em ; border : none; border-radius : 6px ; background-color : #5e4dcd ; color : #fff ; font-size : 15px ; cursor : pointer; transition : background-color .3s ease-in-out; } .button--submit :hover { background-color : #5e5dcd ; } .input :focus , .input :focus -visible { border-color : #3898EC ; outline : none; } </style > <div > <div class ="container" > <div class ="panel panel-info" > <div class ="panel-heading" > 新建用户</div > <div class ="panel-body" > <form class ="input-group" method ="post" novalidate > <div class ="form-group col-md-6" > <label > {{ item.label }}</label > <span style ="color: #c12c1f" > <strong > {{ item.errors.0 }}</strong > </span > </div > <div class ="form-group col-md-6" > <input class ="button--submit " value ="Subscribe" type ="submit" > </div > </form > </div > </div > </div > </div >
在配置文件中可以设置语言种类
1 2 "zh-hans" 中文
2.主题二:靓号管理(数据校验) 1.表结构设计
id
mobile
price
lever(choices)
status(1未注册/2已注册)
1
xxx
xxx
xxx
xxx
2
xxx
xxx
xxx
xxx
1 2 3 4 5 6 7 8 9 10 11 12 13 14 15 16 17 class PrettyNum (models.Model):"""靓号表""" '手机号' , max_length=11 ) '价格' )1 , "一级" ),2 , "二级" ),3 , "三级" ),4 , "四级" ),5 , "五级" ),"星级" , choices=level_choices, default=1 )1 , '已注册' ),2 , '未注册' )'状态' , choices=status_choices, default=2 )
2.靓号列表
1 2 3 4 def phone_list (request ):all ().order_by('-level' )return render(request, 'phone_list.html' , {'phonenum' : phonenum})
1 2 3 4 5 6 7 8 9 10 11 12 13 14 15 16 17 18 19 20 21 22 23 24 25 26 27 28 29 30 31 32 33 34 35 36 37 38 39 40 41 42 43 {% extends 'layout.html' %}<title > 靓号列表</title > <div class ="container" > <div style ="margin-bottom: 10px" > <a href ="/phone/add/" class ="btn btn-primary" > <i class ="fa fa-plus" > </i > 新建靓号</a > </div > <div class ="panel panel-info" > <div class ="panel-heading" > <i class ="fa fa-list" > </i > 靓号列表</div > <table class ="table table-hover table-condensed table-bordered" > <thead > <tr > <th > ID</th > <th > 号码</th > <th > 价格</th > <th > 星级</th > <th > 状态</th > <th > 操作</th > </tr > </thead > <tbody class ="text-center" > <tr > <th scope ="row" > {{ pninfo.id }}</th > <td > {{ pninfo.moblie }}</td > <td > {{ pninfo.price }}</td > <td > {{ pninfo.get_level_display }}</td > <td > {{ pninfo.get_status_display }}</td > <td > <a href ="/phone/{{ pninfo.id }}/edit/" class ="btn btn-info btn-xs" > 编辑</a > <a href ="/phone/{{ pninfo.id }}/delete/" class ="btn btn-danger btn-xs" > 删除</a > </td > </tr > </tbody > </table > </div > </div >
3.新建靓号
列表点击跳转:/phone/add/
url
ModelForm类
函数
实例化类对象
通过render将对象传入html中
模板循环展示所有字段
处理提交数据,数据验证
数据保存
重定向回数据展示页面
1 2 3 4 5 6 7 8 9 10 11 12 13 14 15 16 17 18 19 20 21 22 23 24 25 26 27 28 29 30 31 32 33 34 35 36 37 38 39 class PhoneModelForm (forms.ModelForm):class Meta :"moblie" , "price" , "level" , "status" ]def __init__ (self, *args, **kwargs ):super ().__init__(*args, **kwargs)for name, field in self.fields.items():"class" : "input form-control" , "placeholder" : field.label}def clean_moblie (self ):"moblie" ]if len (txt_mobile) != 11 :raise ValidationError("格式错误" )return txt_mobiledef phone_add (request ):if request.method == 'GET' :return render(request, 'phone_add.html' , {'form' : form})if form.is_valid():return redirect('/phone/list/' )return render(request, 'phone_add.html' , {'form' : form})
==字段验证==
不允许手机号重复
1 2 3 4 5 6 7 8 9 10 def clean_moblie (self ):"moblie" ]filter (moblie=txt_mobile).exists()if exist:raise ValidationError("手机号已存在" )elif len (txt_mobile) != 11 :raise ValidationError("格式错误" )return txt_mobile
1 2 3 4 5 6 7 8 9 10 11 exclude(self.instance.pk)排出自己以外,其他的数据是否和提交的手机号重复def clean_moblie (self ):"moblie" ]filter (moblie=txt_mobile).exclude(id =self.instance.pk).exists()if exist:raise ValidationError("手机号已存在" )elif len (txt_mobile) != 11 :raise ValidationError("格式错误" )return txt_mobile
4.编辑靓号
列表页面:/phone/数字/edit/
url中传递参数<int:nid>
函数
根据ID获取当前编辑的对象
ModelForm配合,默认显示数据
提交修改
1 2 3 4 5 6 7 8 9 10 11 def phone_edit (request, nid ):"""编辑靓号""" filter (id =nid).first()if request.method == 'GET' :return render(request, 'phone_edit.html' , {'form' : form})if form.is_valid():return redirect('/phone/list/' )return render(request, 'phone_edit.html' , {'form' : form})
5.删除靓号 1 2 3 4 def phone_delete (request, nid ):"""删除靓号""" filter (id =nid).first().delete()return redirect('/phone/list/' )
6.搜索靓号 1 2 3 4 models.PhoneNum.objects.filter (mobile="13771966523" ,id =2 )"mobile" :"13771966523" ,"id" :2 }filter (**search_dict)
查询条件
1 2 3 4 5 6 7 8 9 10 filter (id =2 ) filter (id__gt=2 ) filter (id__gt=2 ) filter (id__gte=2 )filter (id__lt=2 ) filter (id__lte=2 )"id__gt" :2 }filter (**search_dict)
1 2 3 4 5 6 7 8 filter (mobile="137" ) filter (mobile__startswith="137" ) filter (mobile__endswith="137" ) filter (mobile__contains="137" ) "mobile__startswith" :"137" }filter (**search_dict)
示例:
1 2 3 4 5 6 7 8 9 def phone_list (request ):"""靓号列表""" 'mobile__contains' : "" }"m" , default='' )if res:'mobile__contains' ] = resfilter (**search_dict).order_by('-level' )return render(request, 'phone_list.html' , {'phonenum' : phonenum, 'res' : res})
1 2 3 4 5 6 7 8 9 10 11 12 13 <div style ="margin-bottom: 10px" class ="clearfix" > <a href ="/phone/add/" class ="btn btn-primary" > <i class ="fa fa-plus" > </i > 新建靓号</a > <div style ="float: right;width: 300px" > <form method ="get" > <div class ="input-group" > <input type ="text" name ="m" placeholder ="Search for ···" class ="form-control" value ={{ res }}> <span class ="input-group-btn" > <button class ="btn btn-default" > <i class ="fa fa-search" > </i > </button > </span > </div > </form > </div > </div >
7.分页 1 queryset = models.PhoneNum .objects .all ()[:10] #取搜索到的前十条数据
1 2 3 4 5 6 7 8 9 10 11 12 13 14 15 16 17 18 19 20 21 22 23 24 25 26 27 28 29 30 31 32 33 34 35 """-------------------------------------view.py-------------------------------------""" def phone_list (request ):""" 靓号列表 """ "m" , default='' )if search_data:'mobile__contains' ] = search_data10 5 filter (**search_dict).order_by('-level' )'page_queryset' : page_queryset,'search_data' : search_data,'page_str' : page_strreturn render(request, 'phone_list.html' , context)
1 2 3 4 5 6 7 8 9 10 11 12 13 14 15 16 17 18 19 20 21 22 23 24 25 26 27 28 29 30 31 32 33 34 35 36 37 38 39 40 """-------------------------------------前端页面-------------------------------------"""<div class ="text-center" > <ul class ="pagination pagination-xs" > <li > #}<a href ="?page={{ pageinfo.lpage }}&&m={{ search_data }}" > <i class ="fa fa-less-than" > </i > </a > #}</li > #}<li > #}<a href ="?page={{ page }}&&m={{ search_data }}" > {{ page }}</a > #}</li > #}<li class ="active" > #}<a href ="?page={{ page }}&&m={{ search_data }}" > {{ page }}</a > #}</li > #}<li > #}<a href ="?page={{ pageinfo.npage }}&&m={{ search_data }}" > <i class ="fa fa-greater-than" > </i > </a > #}</li > #}<li style ="width: 150px;float: right" > #}<form method ="get" > #}<div class ="input-group" > #}<input type ="text" name ="page" #} {# placeholder ="Search for ···" #} {# class ="form-control" #} {# value ={{ pageinfo.nowpage }}> #}<span class ="input-group-btn" > #}<button class ="btn btn-default" > <i class =" fa-brands fa-airbnb" > </i > </button > #}</span > #}</div > #}</form > #}</li > #}</ul > </div >
3.个人自定义组件 3.1分页组件 1 2 3 4 5 6 7 8 9 10 11 12 13 14 15 16 17 18 19 20 21 22 23 24 25 26 27 28 29 30 31 32 33 34 35 36 37 38 39 40 41 42 43 44 45 46 47 48 49 50 51 52 53 54 55 56 57 58 59 60 61 62 63 64 65 66 67 68 69 70 71 72 73 74 75 76 77 78 79 80 81 82 83 84 85 86 87 88 89 90 91 92 93 94 95 96 97 98 99 100 101 102 103 104 105 106 107 108 109 110 111 112 113 114 115 116 117 118 119 120 121 122 123 124 125 126 127 128 129 130 131 132 133 134 135 136 137 138 139 140 141 142 143 144 145 146 147 148 149 150 151 152 153 154 155 156 157 158 159 160 161 162 163 164 165 166 167 168 169 170 171 172 173 174 175 176 177 178 179 180 181 182 183 184 185 186 187 188 189 190 191 192 193 194 195 196 197 198 199 200 201 202 203 204 205 206 207 208 209 210 211 212 213 214 215 216 217 218 219 220 221 222 223 224 225 226 227 228 229 230 231 232 233 234 235 236 237 """--------------------------------------自定义分页组件类------------------------------------""" """-----------------------------------------信息栏------------------------------------------""" """datetime: 2022-12-15 1:13""" """author: Alleyf""" """email: alleyf@qq.com""" """-------------------------------------view.py使用教程-------------------------------------""" """ def phone_list(request): # 1.搜索参数初始化 search_dict = {} # 获取号码搜索参数 search_data = request.GET.get(key="m", default='') if search_data: search_dict['mobile__contains'] = search_data # 2.页码参数初始化 pagesize = 10 pageplus = 5 # 3.筛选符合条件的数据 queryset = models.PrettyNum.objects.filter(**search_dict).order_by('-level') # 4.实例化页面对象 page_obj = pagination.Pagination(request, query_set=queryset, page_size=pagesize, page_plus=pageplus) # 5.获取页面数据 page_queryset = page_obj.page_queryset # 6.获取分页展示所需的信息 # 6.1方法一:获取django模板信息 # pagels, pageinfo = page_obj.djangotemplateinfo() # context = { # 页面数据信息 # 'page_queryset': page_queryset, # 搜索参数 # 'search_data': search_data, # 页码标号 # 'pagels': pagels, # 当前及前后页信息 # 'pageinfo': pageinfo # } # return render(request, 'phone_list.html',context) # 6.2方法二:获取html字符串 page_str = page_obj.htmlstr() context = { # 页面数据信息 'page_queryset': page_queryset, # 搜索参数 'search_data': search_data, # 分页html字符串组件 'page_str': page_str } return render(request, 'phone_list.html', context) """ """-------------------------------------前端页面使用教程-------------------------------------""" """ <div class="text-center"> <ul class="pagination pagination-xs"> {# 方法二对应的分页展示方法#} {{ page_str }} {# 方法一对应的分页展示方法#} {# <li>#} {# <a href="?page={{ pageinfo.lpage }}&&m={{ search_data }}"><i class="fa fa-less-than"></i></a>#} {# </li>#} {# {% for page in pagels %}#} {# {% if page != pageinfo.nowpage %}#} {# <li>#} {# <a href="?page={{ page }}&&m={{ search_data }}">{{ page }}</a>#} {# </li>#} {# {% else %}#} {# <li class="active">#} {# <a href="?page={{ page }}&&m={{ search_data }}">{{ page }}</a>#} {# </li>#} {# {% endif %}#} {# {% endfor %}#} {# <li>#} {# <a href="?page={{ pageinfo.npage }}&&m={{ search_data }}"><i class="fa fa-greater-than"></i></a>#} {# </li>#} {# <li style="width: 150px;float: right">#} {# <form method="get">#} {# <div class="input-group">#} {# <input type="text" name="page"#} {# placeholder="Search for ···"#} {# class="form-control"#} {# value={{ pageinfo.nowpage }}>#} {# <span class="input-group-btn">#} {# <button class="btn btn-default"><i class=" fa-brands fa-airbnb"></i> </button>#} {# </span>#} {# </div>#} {# </form>#} {# </li>#} </ul> </div> """ """----------------------------------------分页类定义---------------------------------------""" from django.utils.safestring import mark_safe import copy class Pagination (object ):"""构造函数""" def __init__ (self, request, query_set, page_size=10 , page_param='page' , page_plus=2 ):""" :param request: 请求的对象 :param query_set: 符合条件的查询的数据 :param page_size: 每页展示的数据量 :param page_param: 在url中获取分页参数 eg:/phone/list/?page=10 :param page_plus: 显示当前页的前后几页(页码) """ "1" )if page.isdecimal():int (page)else :1 True 1 ) * page_sizedivmod (self.total_cnt, page_size)if remainder:1 """方法1:Django模板法""" def djangotemplateinfo (self ):if self.total_page_cnt < 5 :1 else :if self.page <= self.page_plus:1 2 * self.page_plus + 1 elif pageend > self.total_page_cnt:else :for i in range (pagestart, pageend + 1 ):'nowpage' : self.page, 'lpage' : 1 if self.page <= 2 else self.page - 1 ,'npage' : pageend if self.page + 1 > pageend else self.page + 1 , 'total_page' : self.total_page_cnt}return pagels, pageinfo"""方法2:HTML字符串法""" def htmlstr (self ):if self.total_page_cnt < 5 :1 else :if self.page <= self.page_plus:1 2 * self.page_plus + 1 elif self.end > self.total_page_cnt:else :1 ])'<li><a href="?{}">首页</a></li>' .format (self.query_dict.urlencode()))1 ])if self.page > 1 :'<li><a href="?{}"><i class="fa fa-less-than"></i></a></li>' .format (self.query_dict.urlencode())else :1 ])'<li><a href="?{}"><i class="fa fa-less-than"></i></a></li>' .format (self.query_dict.urlencode())for i in range (self.start, self.end + 1 ):if i == self.page:'<li class="active"><a href="?{}">{}</a></li>' .format (self.query_dict.urlencode(), i)else :'<li><a href="?{}">{}</a></li>' .format (self.query_dict.urlencode(), i)1 ])if self.page < self.total_page_cnt:'<li><a href="?{}"><i class="fa fa-greater-than"></i></a></li>' .format (self.query_dict.urlencode())else :'<li><a href="?{}"><i class="fa fa-greater-than"></i></a></li>' .format (self.query_dict.urlencode())'<li><a href="?{}">尾页</a></li>' .format (self.query_dict.urlencode()))""" <li style="width: 150px;float: right"> <form method="get"> <div class="input-group"> <input type="text" name="page" placeholder="Page" class="form-control" value={}> <span class="input-group-btn"> <button class="btn btn-default"><i class=" fa-brands fa-airbnb"></i> </button> </span> </div> </form> </li> """ .format (self.page)"" .join(page_str_ls))return page_str"""----------------------------------------分割结束符---------------------------------------"""
3.2时间插件
前端引入js和css
1 2 3 4 <link rel ="stylesheet" href ="{% static 'plugins/bootstrap-datetimepicker-master/css/bootstrap-datetimepicker.min.css' %}" > <script src ="{% static 'plugins/bootstrap-datetimepicker-master/js/bootstrap-datetimepicker.min.js' %}" > </script >
ModelForm表单类
1 2 3 4 5 6 7 8 9 10 11 12 13 14 15 16 17 class InfoModelForm (forms.ModelForm):class Meta :"create_time" ]"create_time" : forms.DateTimeInput(attrs={"class" : " form-control input" , "type" : "datetime-local" }),def __init__ (self, *args, **kwargs ):super ().__init__(*args, **kwargs)for name, field in self.fields.items():"class" : "input form-control" , "placeholder" : field.label}
ModelForm可以帮助我们生成html标签
1 2 3 4 5 6 7 8 9 10 11 12 13 14 15 16 17 18 19 20 21 22 23 24 25 26 27 28 29 30 31 32 33 34 35 36 37 38 39 40 41 42 43 class PhoneModelForm (forms.ModelForm):class Meta :"mobile" , "price" , "level" , "status" ]"mobile" : forms.TextInput(attrs={"class" : " form-control input" , "id" : "IDmobile" }),def __init__ (self, *args, **kwargs ):super ().__init__(*args, **kwargs)for name, field in self.fields.items():if field.widget.attrs:"class" ] = "form-control" "placeholder" ] = field.labelelse :"class" : "input form-control" , "placeholder" : field.label}def clean_mobile (self ):"mobile" ]filter (mobile=txt_mobile).exists()if exist:raise ValidationError("手机号已存在" )elif len (txt_mobile) != 11 :raise ValidationError("格式错误" )return txt_mobile
1 2 3 4 {{form.mobile }} {{form.price }} {{form.level }} {{form.status }}
1.自定义表单标签类 ==日期必须重设样式==
1 2 3 4 5 6 7 8 9 10 11 12 13 14 15 16 from django import formsclass BootStrapModelForm (forms.ModelForm):def __init__ (self, *args, **kwargs ):super ().__init__(*args, **kwargs)for name, field in self.fields.items():if field.widget.attrs:"class" ] = "input form-control" "placeholder" ] = field.labelelse :"class" : "input form-control" , "placeholder" : field.label}
1 2 3 4 5 6 7 8 9 10 11 12 13 14 15 16 17 18 19 20 21 22 23 24 25 26 27 28 29 class PhoneModelForm (BootStrapModelForm ):class Meta :"mobile" , "price" , "level" , "status" ]"mobile" : forms.TextInput(attrs={"class" : " form-control input" , "id" : "IDmobile" }),"create_time" : forms.DateTimeInput(attrs={"class" : " form-control input" , "type" : "datetime-local" })def clean_mobile (self ):"mobile" ]filter (mobile=txt_mobile).exists()if exist:raise ValidationError("手机号已存在" )elif len (txt_mobile) != 11 :raise ValidationError("格式错误" )return txt_mobile
5.管理员操作 1.管理员列表 1 2 3 4 5 6 7 8 9 10 11 12 13 14 15 16 17 18 19 20 21 22 23 24 25 26 27 28 29 30 31 32 33 34 35 36 37 class AdminModelForm (bootstrapmodelform.BootStrapModelForm):"确认密码" ,64 ,True ),r'^[\w]{6,16}$' , '6~16位,包含大小写字母和数字的组合' )],class Meta :"username" , "password" , "confirm_password" ]"password" : forms.PasswordInput(attrs={"class" : "form-control input" }, render_value=True )}def clean_username (self ):"username" ]filter (username=username).exists()if exist:raise ValidationError("用户名已存在" )return usernamedef clean_password (self ):"password" ]return md5(pwd)def clean_confirm_password (self ):"password" ]"confirm_password" ])if confirm != password:raise ValidationError("密码不一致" )return confirm
1 2 3 4 5 6 7 8 9 10 11 12 13 14 15 16 17 18 19 20 21 22 23 24 25 26 27 28 from django.shortcuts import render, redirectfrom staffsys import modelsfrom staffsys.utils import paginationfrom staffsys.utils.form import AdminModelForm, RstModelFormdef admin_list (request ):"""管理员列表""" "u" , default='' )if search_data:'username__contains' ] = search_datafilter (**search_dict).order_by('id' )"queryset" : page_queryset,'search_data' : search_data,"page_str" : page_strreturn render(request, "admin_list.html" , context)
1 2 3 4 5 6 7 8 9 10 11 12 13 14 15 16 17 18 19 20 21 22 23 24 25 26 27 28 29 30 31 32 33 34 35 36 37 38 39 40 41 42 43 44 45 46 47 48 49 50 51 52 53 54 55 56 57 58 admin_list.html<title > 管理员列表</title > <div class ="container" > <div style ="margin-bottom: 10px" class ="clearfix" > <a href ="/admin/add/" class ="btn btn-primary" > <i class ="fa fa-plus" > </i > 新建管理员</a > <div style ="float: right;width: 300px" > <form method ="get" > <div class ="input-group" > <input type ="text" name ="u" placeholder ="Search for username" class ="form-control" value ={{ search_data }}> <span class ="input-group-btn" > <button class ="btn btn-default" > <i class ="fa fa-search" > </i > </button > </span > </div > </form > </div > </div > <div class ="panel panel-info" > <div class ="panel-heading" > <i class ="fa fa-list" > </i > 管理员列表</div > <table class ="table table-hover table-condensed table-bordered" > <thead > <tr > <th > ID</th > <th > 用户名</th > <th > 密码</th > <th > 重置密码</th > <th > 操作</th > </tr > </thead > <tbody class ="text-center" > <tr > <th scope ="row" > {{ admin.id }}</th > <td > {{ admin.username }}</td > <td > {{ admin.password }}</td > <td > <a href ="/admin/{{ admin.id }}/reset/" > 重置密码</a > </td > <td > <a href ="/admin/{{ admin.id }}/edit/" class ="btn btn-info btn-xs" > 编辑</a > <a href ="/admin/{{ admin.id }}/delete/" class ="btn btn-danger btn-xs" > 删除</a > </td > </tr > </tbody > </table > </div > <div class ="text-center" > <ul class ="pagination pagination-xs" > </ul > </div > </div >
2.添加管理员 1 2 3 4 5 6 7 8 9 10 11 12 13 14 15 16 17 18 19 20 21 def admin_add (request ):"新建管理员" if request.method == "GET" :'title' : title,'form' : formreturn render(request, "change.html" , context)'title' : title,'form' : formif form.is_valid():return redirect('/admin/list/' )else :return render(request, "change.html" , context)
1 2 3 4 5 6 7 8 9 10 11 12 13 14 15 16 17 18 19 20 21 22 23 24 25 26 27 28 29 30 31 32 33 34 35 36 37 38 39 40 41 42 43 44 45 46 47 48 49 50 51 52 53 54 55 56 57 58 59 60 61 62 63 64 65 66 67 68 69 70 71 72 change.html<title > {{ title }}</title > <style > .input { display : inline-block; margin : 10px auto; min-height : 50px ; width : 300px ; padding : 0 1rem ; color : #1e2732 ; font-size : 15px ; border : 1px solid #5e4dcd ; border-radius : 6px ; background-color : transparent; } .button--submit { display : block; margin : 10px auto; min-height : 50px ; padding : .5em 1em ; border : none; border-radius : 6px ; background-color : #5e4dcd ; color : #fff ; font-size : 15px ; cursor : pointer; transition : background-color .3s ease-in-out; } .button--submit :hover { background-color : #5e5dcd ; } .input :focus , .input :focus -visible { border-color : #3898EC ; outline : none; } </style > <div > <div class ="container" > <div class ="panel panel-info" > <div class ="panel-heading" > {{ title }}</div > <div class ="panel-body" > <form class ="input-group col-md-12" method ="post" novalidate > <div class ="form-group col-md-6" > <label > {{ item.label }}</label > <span style ="color: #c12c1f" > <strong > {{ item.errors.0 }}</strong > </span > </div > <div class ="form-group col-md-6" > <input class ="button--submit " value ="Subscribe" type ="submit" > </div > </form > </div > </div > </div > </div >
3.编辑管理员 1 2 3 4 5 6 7 8 9 10 11 12 13 14 15 16 17 18 19 20 21 22 23 24 25 def admin_edit (request, nid ):"""编辑管理员""" "编辑管理员" filter (id =nid).first()if request.method == "GET" :if rowobj:"title" : title,"form" : formreturn render(request, "change.html" , context)else :return redirect("/admin/list/" )"title" : title,"form" : formif form.is_valid():return redirect("/admin/list/" )else :return render(request, "change.html" , context)
==change.html同上==
4.删除管理员 1 2 3 4 5 6 def admin_delete (request, nid ):"""删除管理员""" filter (id =nid).first().delete()return redirect("/admin/list/" )
5.重置密码 1 2 3 4 5 6 7 8 9 10 11 12 13 14 15 16 17 18 19 20 21 22 23 24 25 def admin_reset (request, nid ):"""重置密码""" filter (id =nid).first()"重置密码-{}" .format (rowobj.username)if rowobj:if request.method == "GET" :"title" : title,"form" : formreturn render(request, "change.html" , context)"title" : title,"form" : formif form.is_valid():return redirect("/admin/list/" )return render(request, "change.html" , context)else :return redirect("/admin/list/" )
6.用户登录 什么事cookie和session?
用户发起请求时浏览器会产生一个cookie(sessionid)(随机字符串) 里面包含用户的信息,该cookie会存储在用户浏览器 中,而服务端 也会存储该cookie(session_key) ,并且存储该用户的session信息 ,以此来区别不同用户并且实现有状态 和长连接 。
https://fcsy.fit
http://fcsy.fit
1 2 3 4 5 6 7 8 9 10 11 12 13 14 15 16 17 18 19 20 21 22 23 24 25 26 27 28 29 30 31 32 33 34 35 36 37 class LoginForm (forms.Form):"""登录表单""" "用户名" ,32 ,True ,"密码" ,64 ,True ),True ,def __init__ (self, *args, **kwargs ):super ().__init__(*args, **kwargs)for name, field in self.fields.items():if field.widget.attrs:"class" ] = "input-item" "placeholder" ] = field.labelelse :"class" : "input-item" , "placeholder" : field.label}def clean_password (self ):"password" )return md5(pwd)
==cookie和session==
实现对用户信息的保存
1 2 3 4 5 6 7 8 9 10 11 12 13 14 15 16 17 18 19 20 21 from django.shortcuts import render, redirectfrom staffsys.utils.form import LoginFormfrom staffsys.models import Admindef login (request ):if request.method == "GET" :return render(request, "login.html" , {'form' : form})if form.is_valid():filter (**form.cleaned_data).first()if usrobj:"info" ] = {"id" : usrobj.id , "name" : usrobj.username}return redirect("/admin/list/" )"username" , "用户名或密码错误" )return render(request, "login.html" , {'form' : form})return render(request, "login.html" , {'form' : form})
login.html 1 2 3 4 5 6 7 8 9 10 11 12 13 14 15 16 17 18 19 20 21 22 23 24 25 26 27 28 29 30 31 32 33 34 35 36 37 38 39 40 41 42 43 44 45 46 47 48 49 50 51 52 53 54 55 56 57 58 59 60 61 62 63 64 65 66 67 68 69 70 71 72 73 74 75 76 77 78 79 80 81 82 83 84 85 86 87 88 89 90 91 92 93 94 95 96 97 98 99 100 101 102 103 104 105 106 107 108 109 110 111 112 113 114 115 116 117 118 119 120 121 122 123 124 125 126 127 128 129 130 131 132 133 134 135 {% load static %}<!DOCTYPE html > <html lang ="en" > <head > <meta charset ="UTF-8" > <title > 用户登录</title > <meta name ="viewport" content ="width=device-width, initial-scale=1.0" > <link rel ="stylesheet" href ="{% static 'plugins/bootstrap-3.4.1/css/bootstrap.min.css' %}" > <link rel ="stylesheet" href ="{% static 'plugins/fontawesome-free-6.2.1-web/css/fontawesome.min.css' %}" > <link rel ="stylesheet" href ="{% static 'css/login.css' %}" > <style > body { margin : 0 ; padding : 0 ; } html , body { width : 100% ; height : 100% ; } .size { width : 100% ; height : 100% ; } #vcode { height : 35px ; width : 50% ; display : inline-block; } #code { color : #ffffff ; background : linear-gradient (plum, powderblue); height : 35px ; width : 150px ; float : right; text-align : center; font-size : 18pt ; padding : 5px 35px 10px 35px ; margin-left : 5% ; cursor : pointer; } </style > </head > <body > <div class ="container size" > <div class ="login-wrapper" style ="height: 600px;" > <form method ="post" onsubmit ="return check()" novalidate > <div class ="header" > Login</div > <div class ="form-wrapper clearfix" > <span > {{ form.username.errors }}</span > <span > {{ form.password.errors }}</span > <input type ="text" autocomplete ="false" id ="vcode" required ="required" placeholder ="验证码" class ="input-item" /> <span id ="code" > </span > <input class ="sub" type ="submit" value ="Login" > </input > </div > <div class ="msg" > <a href ="/register" > sign up</a > </div > </form > </div > </div > <script type ="text/javascript" > </script > <script src ="https://kit.fontawesome.com/2503dce09a.js" crossorigin ="anonymous" > </script > <script src ="{% static 'js/jquery-3.6.1.min.js' %}" > </script > <script src ="{% static 'plugins/bootstrap-3.4.1/js/bootstrap.min.js' %}" > </script > </body > </html >
7.中间件处理 1.定义中间件 ==进入中间件请求时(process_request)若无返回值则继续向前,否则执行process_reponse直接返回。==
1 2 3 4 5 6 7 8 9 10 11 12 13 14 15 16 17 18 19 20 21 22 23 24 from django.utils.deprecation import MiddlewareMixinclass M1 (MiddlewareMixin ):"""中间件1""" def process_request (self, request ):print ("M1.进来了" )def process_reponse (self, request, response ):print ("M1.走了" )return responseclass M2 (MiddlewareMixin ):"""中间件2""" def process_request (self, request ):print ("M2.进来了" )def process_reponse (self, request, response ):print ("M2.走了" )return response
2.应用中间件(setting.py) 1 2 3 4 5 6 7 8 9 10 11 12 MIDDLEWARE = ["django.middleware.security.SecurityMiddleware" ,"django.contrib.sessions.middleware.SessionMiddleware" ,"django.middleware.common.CommonMiddleware" ,"django.middleware.csrf.CsrfViewMiddleware" ,"django.contrib.auth.middleware.AuthenticationMiddleware" ,"django.contrib.messages.middleware.MessageMiddleware" ,"django.middleware.clickjacking.XFrameOptionsMiddleware" ,"staffsys.middleware.auth.M1" ,"staffsys.middleware.auth.M2" ,
3.中间件方法 8.中间件实现登录校验
实现对用户信息的保存。
1 2 3 4 5 6 7 8 9 10 11 12 13 14 15 16 17 18 19 20 21 22 from django.utils.deprecation import MiddlewareMixinfrom django.shortcuts import redirectclass LoginAuth (MiddlewareMixin ):"""中间件1""" def process_request (self, request ):if request.path_info == "/login/" :return "info" )if info_dict:return return redirect("/login/" )def process_response (self, request, response ):print ("LoginAuth.走了" )return response
9.用户注销 1 2 3 4 def logout (request ):"""注销""" return redirect("/login/" )
10.图片验证码 ==python生成图片验证码的函数==
1 2 3 4 5 6 7 8 9 10 11 12 13 14 15 16 17 18 19 20 21 22 23 24 25 26 27 28 29 30 31 32 33 34 35 36 37 38 39 40 41 42 43 44 45 46 47 48 49 50 51 52 53 54 55 56 57 58 59 60 61 62 63 64 65 66 67 68 69 70 71 72 73 74 75 76 77 78 79 80 import randomfrom PIL import ImageFilter, ImageFont, Image, ImageDrawdef check_code (width=150 , height=35 , char_length=4 , font_file='Monaco.ttf' , font_size=28 ):'RGB' , size=(width, height), color=(255 , 255 , 255 ))'RGB' )def rndChar ():""" 生成随机字母 :return: """ return chr (random.randint(65 , 90 ))def rndColor ():""" 生成随机颜色 :return: """ return (random.randint(0 , 255 ), random.randint(10 , 255 ), random.randint(64 , 255 ))for i in range (char_length):0 , 4 )for i in range (40 ):0 , width), random.randint(0 , height)], fill=rndColor())for i in range (40 ):0 , width), random.randint(0 , height)], fill=rndColor())0 , width)0 , height)4 , y + 4 ), 0 , 90 , fill=rndColor())for i in range (5 ):0 , width)0 , height)0 , width)0 , height)filter (ImageFilter.EDGE_ENHANCE_MORE)return img, '' .join(code)pass
==登录表单==
1 2 3 4 5 6 7 8 9 10 11 12 13 14 15 16 17 18 19 20 21 22 23 class LoginForm (bootstrapmodelform.BootStrapForm):"""登录表单""" "用户名" ,32 ,True ,"密码" ,64 ,True ),True ,"验证码" ,True def clean_password (self ):"password" )return md5(pwd)
==登录视图==
1 2 3 4 5 6 7 8 9 10 11 12 13 14 15 16 17 18 19 20 21 22 23 24 25 26 27 def login (request ):"""登录""" if request.method == "GET" :return render(request, "login.html" , {'form' : form})if form.is_valid():'code' )'checkcode' , '' )if checkcode.lower() != usr_input_code.lower():'code' , '验证码错误' )return render(request, 'login.html' , {'form' : form})filter (**form.cleaned_data).first()if usrobj:"info" ] = {"id" : usrobj.id , "name" : usrobj.username}60 * 60 * 24 * 7 )return redirect("/admin/list/" )"username" , "用户名或密码错误" )return render(request, "login.html" , {'form' : form})return render(request, "login.html" , {'form' : form})
==图片验证码视图==
1 2 3 4 5 6 7 8 9 10 11 12 def checkcode (request ):"""图片验证码""" 'checkcode' ] = code60 )'png' )return HttpResponse(stream.getvalue())
==前端login.html==
1 2 3 4 5 6 7 8 9 10 11 12 13 14 15 16 17 18 19 20 21 22 23 24 25 26 27 28 29 30 31 32 33 34 35 36 37 38 39 40 41 42 43 44 45 46 47 48 49 50 51 52 53 54 55 56 57 58 59 60 61 62 63 64 65 66 67 68 69 70 71 72 73 74 75 76 77 78 79 80 81 82 83 84 85 86 87 88 89 90 91 92 93 94 95 96 97 98 99 100 101 102 103 104 105 106 107 108 109 110 111 112 113 114 115 116 117 118 119 120 121 122 123 124 125 126 127 128 129 130 131 132 133 134 135 136 137 138 139 140 141 142 143 144 145 146 147 148 149 150 151 152 {% load static %}<!DOCTYPE html > <html lang ="en" > <head > <meta charset ="UTF-8" > <title > 用户登录</title > <meta name ="viewport" content ="width=device-width, initial-scale=1.0" > <link rel ="stylesheet" href ="{% static 'plugins/bootstrap-3.4.1/css/bootstrap.min.css' %}" > <link rel ="stylesheet" href ="{% static 'plugins/fontawesome-free-6.2.1-web/css/fontawesome.min.css' %}" > <link rel ="stylesheet" href ="{% static 'css/login.css' %}" > <style > body { margin : 0 ; padding : 0 ; } html , body { width : 100% ; height : 100% ; } .size { width : 100% ; height : 100% ; } #vcode { height : 35px ; width : 50% ; display : inline-block; } #code { color : #ffffff ; background : linear-gradient (plum, powderblue); height : 35px ; width : 150px ; float : right; text-align : center; font-size : 18pt ; padding : 5px 35px 10px 35px ; margin-left : 5% ; cursor : pointer; } </style > </head > <body > <div class ="container size" > <div class ="login-wrapper" style ="height: 620px;" > <form method ="post" onsubmit ="return check()" novalidate > <div class ="header" > Login</div > <div class ="form-wrapper clearfix" > <span style ="color: red;" > {{ form.username.errors }}</span > <span style ="color: red" > {{ form.password.errors }}</span > <input type ="text" autocomplete ="false" id ="vcode" required ="required" placeholder ="验证码" #} {# class ="input-item col-xs-7" #} {# /> <span id ="code" class ="col-xs-5" > </span > #}<div class ="row clearfix" > <div class ="col-xs-7" > <span style ="color: red" > {{ form.code.errors }}</span > </div > <div class ="col-xs-5" > <a href ="/checkcode/" > <img src ="/checkcode/" alt ="图片加载失败" > </a > </div > </div > <input class ="sub" type ="submit" value ="Login" > </div > </form > <div class ="msg" > <a href ="/register" > sign up</a > </div > </div > </div > <script type ="text/javascript" > </script > <script src ="https://kit.fontawesome.com/2503dce09a.js" crossorigin ="anonymous" > </script > <script src ="{% static 'js/jquery-3.6.1.min.js' %}" > </script > <script src ="{% static 'plugins/bootstrap-3.4.1/js/bootstrap.min.js' %}" > </script > </body > </html >
11.Ajax请求
前后端数据交互出了表单方式(页面会刷新)外,还有ajax异步请求(页面不刷新)。
依赖Jquery
编写Ajax代码
1 2 3 4 5 6 7 8 9 10 11 12 13 14 15 16 17 18 <script type="text/javascript" >function (ajax ({url : "https://v1.hitokoto.cn/" ,type : 'get' ,data : {c : 'i' success : function (res ) {let poem = res["hitokoto" ];let source = res["from" ];let word = poem + "---" + source;"#w1" ).text (word)console .log (res["from" ])
1.get请求 1 2 3 4 5 6 7 8 9 10 11 12 13 14 15 16 17 18 <script type="text/javascript" >function (ajax ({url : "https://v1.hitokoto.cn/" ,type : 'get' ,data : {c : 'i' success : function (res ) {let poem = res["hitokoto" ];let source = res["from" ];let word = poem + "---" + source;"#w1" ).text (word)console .log (res["from" ])
2.post请求 ==视图函数必须加入这个去除csrf校验,因为ajax表单请求时未包含csrf信息,from django.views.decorators.csrf import csrf_exempt @csrf_exempt==
前端
1 2 3 4 5 6 7 8 9 10 11 12 13 14 15 16 17 18 <script type="text/javascript" >function (ajax ({url : "/task/ajax" ,type : 'post' ,data : {c : 'i' success : function (res ) {let poem = res["hitokoto" ];let source = res["from" ];let word = poem + "---" + source;"#w1" ).text (word)console .log (res["from" ])
后端
1 2 3 4 5 6 7 8 from django.shortcuts import render ,HttpResponsefrom django.views.decorators.csrf import csrf_exempt@csrf_exempt def task_ajax (request ):print (request.GET)print (request.POST)return HttpResponse("成功了" )
3.绑定事件 1 2 3 4 5 6 7 8 9 10 11 12 13 14 15 16 17 18 19 20 21 22 23 24 25 {% block myscript %}"text/javascript" >function (bindw1span ();function bindw1span (ajax ({url : "https://v1.hitokoto.cn/" ,type : 'get' ,data : {c : 'i' success : function (res ) {let poem = res["hitokoto" ];let source = res["from" ];let word = poem + "---" + source;"#w1" ).text (word)console .log (res["from" ])
4.ajax请求的返回值 ==django项目运行的目录为工程下的根目录(manage.py或app文件夹同级目录)==
一般都会返回json格式。
后端
1 2 3 4 5 6 7 8 9 10 11 12 13 14 15 16 17 18 19 20 21 @csrf_exempt def task_ocr (request ):"""ajax请求""" "imgpath" )for item in res["TextDetections" ]:"DetectedText" : item["DetectedText" ],"Confidence" : item["Confidence" ]"status" : True ,'results' : resultsreturn JsonResponse(data_dict)
前端
1 2 3 4 5 6 7 8 9 10 11 12 13 14 15 16 17 18 19 20 21 22 23 24 25 26 27 28 29 30 31 32 33 34 35 36 37 38 {% block myscript %}"text/javascript" >function (bindw1span ();ocr ();function bindw1span (ajax ({url : "https://v1.hitokoto.cn/" ,type : 'get' ,data : {c : 'i' success : function (res ) {let poem = res["hitokoto" ];let source = res["from" ];let word = poem + "---" + source;"#w1" ).text (word)console .log (res["from" ])function ocr (ajax ({url : "/task/ocr/" ,type : 'get' ,data : {imgpath : "./staffsys/static/img/1.png" success : function (res ) {console .log (res)
5.实例:TODO_List 1.数据表结构 1 2 3 4 5 6 7 8 9 10 11 12 13 14 15 16 17 18 19 20 class Admin (models.Model):"""管理员""" "用户名" , max_length=32 )"密码" , max_length=64 )def __str__ (self ):return self.usernameclass Task (models.Model):"""任务""" 1 , '紧急' ),2 , '重要' ),3 , '临时' )'标题' , max_length=64 )'内容' )'级别' , choices=level_choices, default=3 )'负责人' , to=Admin, on_delete=models.CASCADE)
2.表单模型 1 2 3 4 5 6 7 8 9 10 11 12 13 14 15 16 17 18 19 20 21 22 23 24 25 26 27 28 29 30 31 32 33 34 35 36 37 38 39 40 41 42 43 44 45 46 47 48 49 50 51 52 53 54 55 56 57 from django import forms"""----------1简约型(class=input form-control)--------------2酷炫型(class=input-item)---------""" class BootStrap1 :def __init__ (self, *args, **kwargs ):super ().__init__(*args, **kwargs)for name, field in self.fields.items():if field.widget.attrs:"class" ] = "input form-control" "placeholder" ] = field.labelelse :"class" : "input form-control" , "placeholder" : field.label}class BootStrap2 :def __init__ (self, *args, **kwargs ):super ().__init__(*args, **kwargs)for name, field in self.fields.items():if field.widget.attrs:"class" ] = "input-item" "placeholder" ] = field.labelelse :"class" : "input-item" , "placeholder" : field.label}class BootStrapModelForm1 (BootStrap1, forms.ModelForm):pass class BootStrapModelForm2 (BootStrap2, forms.ModelForm):pass class BootStrapForm (BootStrap2, forms.Form):pass class TaskModelForm (bootstrapmodelform.BootStrapModelForm1):class Meta :"__all__" "details" : forms.TextInput()
3.视图函数 1 2 3 4 5 6 7 8 9 10 11 12 13 14 15 16 17 18 19 20 21 22 23 24 25 26 27 28 29 30 31 32 33 34 35 36 37 38 39 40 41 42 43 44 45 46 47 48 49 50 51 52 53 54 55 56 57 58 59 60 61 62 63 64 65 66 67 68 69 70 71 72 73 74 75 76 77 78 79 80 81 82 83 84 85 86 87 88 89 90 91 import jsonfrom random import randintfrom django.http import JsonResponsefrom django.shortcuts import render, redirectfrom django.views.decorators.csrf import csrf_exemptfrom staffsys import modelsfrom staffsys.utils import paginationfrom staffsys.utils.form import TaskModelFormfrom staffsys.utils.ocr import ocr_geberaltextdef todo_list (request ):"""任务列表""" for i in range (3 ):0 , 100 ))if request.method == "GET" :"t" , default='' )if search_data:'details__contains' ] = search_data10 2 filter (**search_dict).order_by('id' )print (page_queryset)'ran_pic_seed' : rps,'form' : form,'page_queryset' : page_queryset,'search_data' : search_data,'page_str' : page_strreturn render(request, "ToDo_List.html" , context)@csrf_exempt def task_ocr (request ):"""ajax请求ocr识别""" "imgpath" )print (request.POST)"status" : True ,'results' : resultsreturn JsonResponse(data_dict)@csrf_exempt def todo_add (request ):"""添加任务接口""" if form.is_valid():'status' : True return JsonResponse(resinfo)'status' : False ,'err' : form.errorsreturn JsonResponse(resinfo)
4.前端页面 ==layout.html==
1 2 3 4 5 6 7 8 9 10 11 12 13 14 15 16 17 18 19 20 21 22 23 24 25 26 27 28 29 30 31 32 33 34 35 36 37 38 39 40 41 42 43 44 45 46 47 48 49 50 51 52 53 54 55 56 57 58 59 60 61 62 63 64 65 66 67 68 69 70 71 72 73 74 75 76 77 78 79 80 81 82 83 84 85 86 87 88 89 90 91 92 93 {% load static %}<!DOCTYPE html > <html lang ="en" > <head > <meta charset ="UTF-8" > <title > 标题</title > <meta name ="viewport" content ="width=device-width, initial-scale=1.0" > <link rel ="stylesheet" href ="{% static 'plugins/bootstrap-datetimepicker-master/css/bootstrap-datetimepicker.min.css' %}" > <link rel ="stylesheet" href ="{% static 'plugins/bootstrap-3.4.1/css/bootstrap.min.css' %}" > <link rel ="stylesheet" href ="{% static 'plugins/fontawesome-free-6.2.1-web/css/fontawesome.min.css' %}" > <style > * { padding : 0 ; margin : 0 ; font-family : 微软雅黑, serif; letter-spacing : .05em ; } th { text-align : center; } .navbar { border-radius : 0 ; } .navbar ul a { line-height : 30px ; } .lh30 { line-height : 30px ; } </style > </head > <body > <nav class ="navbar navbar-default" > <div class ="container" > <div class ="navbar-header" > <button type ="button" class ="navbar-toggle collapsed" data-toggle ="collapse" data-target ="#bs-example-navbar-collapse-1" aria-expanded ="false" > <span class ="sr-only" > Toggle navigation</span > <span class ="icon-bar" > </span > <span class ="icon-bar" > </span > <span class ="icon-bar" > </span > </button > <a class ="navbar-brand lh30" href ="#" > 联通用户管理系统</a > </div > <div class ="collapse navbar-collapse" id ="bs-example-navbar-collapse-1" > <ul class ="nav navbar-nav" > <li class ="" > <a href ="/depart/list/" > 部门管理<span class ="sr-only" > (current)</span > </a > </li > <li class ="" > <a href ="/user/list/" > 用户管理</a > </li > <li class ="" > <a href ="/phone/list/" > 靓号管理</a > </li > <li class ="" > <a href ="/task/list/" > 今日清单</a > </li > <li class ="" > <a href ="/admin/list/" > 管理员账户</a > </li > </ul > <ul class ="nav navbar-nav navbar-right" > <li > <a href ="#" style ="padding: 5px;" > <img alt ="50x50" src ="{% static 'img/03.webp' %}" width ="50px" height ="50px" class ="img-circle" /> </a > </li > <li class ="dropdown" > <a href =" #" class ="dropdown-toggle" data-toggle ="dropdown" role ="button" aria-haspopup ="true" aria-expanded ="false" > {{ request.session.info.name }} <span class ="caret" > </span > </a > <ul class ="dropdown-menu" > <li > <a href ="#" > 个人资料</a > </li > <li > <a href ="#" > 我的信息</a > </li > <li role ="separator" class ="divider" > </li > <li > <a href ="/logout" > 注销</a > </li > </ul > </li > </ul > </div > </div > </nav > <div > </div > <script src ="https://kit.fontawesome.com/2503dce09a.js" crossorigin ="anonymous" > </script > <script src ="{% static 'js/jquery-3.6.1.min.js' %}" > </script > <script src ="{% static 'plugins/bootstrap-3.4.1/js/bootstrap.min.js' %}" > </script > <script src ="{% static 'plugins/bootstrap-datetimepicker-master/js/bootstrap-datetimepicker.min.js' %}" > </script > </body >
==ToDo_List.html==
1 2 3 4 5 6 7 8 9 10 11 12 13 14 15 16 17 18 19 20 21 22 23 24 25 26 27 28 29 30 31 32 33 34 35 36 37 38 39 40 41 42 43 44 45 46 47 48 49 50 51 52 53 54 55 56 57 58 59 60 61 62 63 64 65 66 67 68 69 70 71 72 73 74 75 76 77 78 79 80 81 82 83 84 85 86 87 88 89 90 91 92 93 94 95 96 97 98 99 100 101 102 103 104 105 106 107 108 109 110 111 112 113 114 115 116 117 118 119 120 121 122 123 124 125 126 127 128 129 130 131 132 133 134 135 136 137 138 139 140 141 142 143 144 145 146 147 148 149 150 151 152 153 154 155 156 157 158 159 160 161 162 163 164 165 166 167 168 169 170 171 172 173 174 {% extends 'layout.html' %}<title > 今日清单</title > <style > .input { display : inline-block; margin : 10px auto; min-height : 50px ; width : 300px ; padding : 0 1rem ; color : #1e2732 ; font-size : 15px ; border : 1px solid #5e4dcd ; border-radius : 6px ; background-color : transparent; } .button--submit { display : block; margin : 10px auto; min-height : 50px ; padding : .5em 1em ; border : none; border-radius : 6px ; background-color : #5e4dcd ; color : #fff ; font-size : 15px ; cursor : pointer; transition : background-color .3s ease-in-out; } .button--submit :hover { background-color : #5e5dcd ; } .input :focus , .input :focus -visible { border-color : #3898EC ; outline : none; } </style > <div class ="container" > <div style ="margin-bottom: 10px" class ="clearfix" > <a href ="/admin/add/" class ="btn btn-primary" > <i class ="fa fa-plus" > </i > 新建清单</a > <span id ="w1" style ="color: #5b65f1;font-size: 24px" > </span > <div style ="float: right;width: 300px" > <form method ="get" > <div class ="input-group" > <input type ="text" name ="t" placeholder ="Search for task" class ="form-control" value ={{ search_data }}> <span class ="input-group-btn" > <button class ="btn btn-default" > <i class ="fa fa-search" > </i > </button > </span > </div > </form > </div > </div > <div class ="panel panel-info" > <div class ="panel-heading" > <i class ="fa fa-list" > </i > 任务列表</div > <div class ="panel-body" > <div class ="row" > <form class ="input-group col-md-12" id ="addtaskinfoform" novalidate > <div class ="form-group col-md-6" > <label > {{ item.label }}</label > <span class ="err_msg" style ="color: #c12c1f" > </span > </div > <div class ="col-md-12" > <button type ="button" class ="button--submit" id ="addtask" > 提交</button > </div > </form > </div > <div class ="row" > <div class ="col-md-4" > <div class ="thumbnail" > <img alt ="300x200" src ="https://picsum.photos/id/{{ ran_pic_seed.0 }}/600/300" /> <div class ="caption text-center" > <h3 style ="color: #757cbb" > </h3 > <p > </p > <p > <a class ="btn btn-info" href ="#" > 开始</a > <a class ="btn btn-success" href ="#" > 结束</a > </p > </div > </div > </div > </div > </div > </div > <div class ="text-center" > <ul class ="pagination pagination-xs" > </ul > </div > </div > <script type ="text/javascript" > </script >
12.文献管理 1.表结构
id
文献名称
作者
来源
命中率
得分
1
2016IJC-导管组织接触对于模型的影响PentarRay FAM
陈明龙
本地数据库
85%
88
2
FOCUS超声刀开放性甲状腺切除术的临床疗效评价
薛家鹏
网页爬虫
92%
94
2.路由 1 2 3 4 5 6 7 8 "doc/list/" , doc.doc_list),"doc/add/" , doc.doc_add),"doc/del/" , doc.doc_del),"doc/edit/" , doc.doc_edit)
3.视图层 1 2 3 4 5 6 7 8 9 10 11 12 13 14 15 16 17 18 19 20 21 22 23 24 25 26 27 28 29 30 31 32 33 34 35 36 37 38 39 40 41 42 43 44 45 46 47 48 49 50 51 52 53 54 55 56 57 58 59 60 61 62 63 64 65 66 67 68 69 70 71 72 73 74 75 76 77 78 79 80 81 82 83 84 85 86 87 88 89 90 91 92 93 94 95 96 97 98 99 100 101 102 103 104 105 106 107 108 109 110 111 112 113 114 115 116 117 118 119 120 121 122 123 124 125 126 127 128 129 130 131 132 133 134 135 136 137 138 139 140 141 from django.http import JsonResponsefrom django.shortcuts import renderfrom django.views.decorators.csrf import csrf_exemptfrom datetime import datetimefrom staffsys import modelsfrom staffsys.utils import paginationfrom staffsys.utils.form import DocModelFormdef doc_list (request ):"n" , default='' )if search_data:'name__contains' ] = search_data10 2 filter (**search_dict).order_by('-allscore' )'form' : form,'page_queryset' : page_queryset,'search_data' : search_data,'page_str' : page_strprint (datetime.now().strftime('%Y%m%d%H%M%S' ))return render(request, "doc_list.html" , context)@csrf_exempt def doc_add (request ):"""添加文档""" if form.is_valid():1 'info' ].get("id" )'status' : True ,return JsonResponse(context)'status' : False ,'err' : form.errorsreturn JsonResponse(context)def doc_del (request ):'uid' )filter (id =uid).exists()if exist:filter (id =uid).first().delete()'status' : True ,return JsonResponse(res)'status' : False ,'err' : 'ID为' + uid + '的文件不存在,删除失败' return JsonResponse(res)@csrf_exempt def doc_edit (request ):"""编辑文献""" 'uid' )filter (id =uid).first()if not rowobj:'status' : False ,'tips' : 'ID为' + uid + '的文件不存在,请刷新重试' return JsonResponse(res)if form.is_valid():'status' : True return JsonResponse(res)'status' : False ,'err' : form.errorsreturn JsonResponse(context)def doc_details (request ):'uid' )filter (id =uid).values('name' , 'author' , 'source' ).first()if not rowdic:'status' : False ,'err' : 'ID为' + uid + '的文件不存在,打开失败' return JsonResponse(res)'status' : True ,'data' : rowdicreturn JsonResponse(res)
4.模板层 ==doc_list.html==
1 2 3 4 5 6 7 8 9 10 11 12 13 14 15 16 17 18 19 20 21 22 23 24 25 26 27 28 29 30 31 32 33 34 35 36 37 38 39 40 41 42 43 44 45 46 47 48 49 50 51 52 53 54 55 56 57 58 59 60 61 62 63 64 65 66 67 68 69 70 71 72 73 74 75 76 77 78 79 80 81 82 83 84 85 86 87 88 89 90 91 92 93 94 95 96 97 98 99 100 101 102 103 104 105 106 107 108 109 110 111 112 113 114 115 116 117 118 119 120 121 122 123 124 125 126 127 128 129 130 131 132 133 134 135 136 137 138 139 140 141 142 143 144 145 146 147 148 149 150 151 152 153 154 155 156 157 158 159 160 161 162 163 164 165 166 167 168 169 170 171 172 173 174 175 176 177 178 179 180 181 182 183 184 185 186 187 188 189 190 191 192 193 194 195 196 197 198 199 200 201 202 203 204 205 206 207 208 209 210 211 212 213 214 215 216 217 218 219 220 221 222 223 224 225 226 227 228 229 230 231 232 233 234 235 236 237 238 239 240 241 242 243 244 245 246 247 248 249 250 251 252 253 254 255 256 257 258 259 260 261 262 263 264 265 266 267 268 269 270 271 272 273 274 275 276 277 278 279 280 281 282 283 284 285 286 287 288 289 290 291 292 293 294 295 296 297 298 299 300 301 302 303 304 305 306 307 {% extends 'layout.html' %}<title > 医学文献-易管理</title > <style > .input { display : inline-block; margin : 10px auto; min-height : 50px ; width : 300px ; padding : 0 1rem ; color : #1e2732 ; font-size : 15px ; border : 1px solid #5e4dcd ; border-radius : 6px ; background-color : transparent; } .button--submit { display : block; margin : 10px auto; min-height : 50px ; padding : .5em 1em ; border : none; border-radius : 6px ; background-color : #5e4dcd ; color : #fff ; font-size : 15px ; cursor : pointer; transition : background-color .3s ease-in-out; } .button--submit :hover { background-color : #5e5dcd ; } .input :focus , .input :focus -visible { border-color : #3898EC ; outline : none; } </style > <div class ="modal fade" id ="addModal" tabindex ="-1" role ="dialog" aria-labelledby ="myModalLabel" > <div class ="modal-dialog" role ="document" > <div class ="modal-content" > <div class ="modal-header" > <button type ="button" class ="close" data-dismiss ="modal" aria-label ="Close" > <span aria-hidden ="true" > × </span > </button > <h4 class ="modal-title" id ="myModalLabel" > 添加</h4 > </div > <div class ="modal-body" > <form class ="input-group col-md-12" id ="formadd" novalidate > <div class ="form-group col-md-12" > <label > {{ item.label }}</label > <span class ="err_msg" style ="color: #c12c1f" > </span > </div > </form > </div > <div class ="modal-footer" > <button type ="button" class ="btn btn-default" data-dismiss ="modal" > 关闭</button > <button type ="button" class ="btn btn-info" id ="submitbtn" > 提交</button > </div > </div > </div > </div > <div class ="modal fade" id ="delModal" tabindex ="-1" role ="dialog" aria-labelledby ="myModalLabel" > <div class ="modal-dialog" role ="document" > <div class ="alert alert-danger alert-dismissible fade in" role ="alert" > <h4 > <strong > 是否确定删除?</strong > </h4 > <p style ="margin: 10px 0;" > 一旦删除,所有关联的相关数据都会被删除!</p > <p style ="text-align: right" > <button type ="button" class ="btn btn-danger btn_del_yes" > 确 定</button > <button type ="button" class ="btn btn-default" data-dismiss ="modal" > 取 消</button > </p > </div > </div > </div > <div class ="container" > <div style ="margin-bottom: 10px" class ="clearfix" > <button type ="button" id ="adddoc" class ="btn btn-primary" > <i class ="fa fa-plus" > </i > </button > <div style ="float: right;width: 300px" > <form method ="get" > <div class ="input-group" > <input type ="text" name ="n" placeholder ="Search for docname" class ="form-control" value ={{ search_data }}> <span class ="input-group-btn" > <button class ="btn btn-default" > <i class ="fa fa-search" > </i > </button > </span > </div > </form > </div > </div > <div class ="panel panel-info" > <div class ="panel-heading" > <i class ="fa fa-list" > </i > 文献列表</div > <table class ="table table-hover table-condensed " > <thead > <tr > <th > ID</th > <th > 文献名</th > <th > 作者</th > <th > 点击量得分</th > <th > 用户反馈得分</th > <th > 归档</th > <th > 来源</th > <th > 管理员</th > <th > 操作</th > </tr > </thead > <tbody class ="text-center" > <tr uid ="{{ pninfo.id }}" > <th scope ="row" > {{ pninfo.id }}</th > <td > {{ pninfo.name }}</td > <td > {{ pninfo.author }}</td > <td > {{ pninfo.clkscore }}</td > <td > {{ pninfo.fedbakscore }}</td > <td > {{ pninfo.get_status_display }}</td > <td > {{ pninfo.get_source_display }}</td > <td > {{ pninfo.user.username }}</td > <td > <input uid ="{{ pninfo.id }}" type ="button" class ="btn btn-default btn-xs btn_edit" value ="编辑" > <input uid ="{{ pninfo.id }}" type ="button" class ="btn btn-primary btn-xs btn_view" value ="查看" > <input uid ="{{ pninfo.id }}" type ="button" class ="btn btn-danger btn-xs btn_del" value ="删除" > </td > </tr > </tbody > </table > </div > <div class ="text-center" > <ul class ="pagination pagination-xs" > </ul > </div > </div > <script type ="text/javascript" > </script >
想要去数据库获取数据时:对象/字典/queryset(列表包含对象)/queryset(列表包含字典)/queryset(列表包含元组)
1 2 3 4 5 6 7 8 9 10 11 12 13 14 15 16 17 18 19 20
1 2 3 4 5 6 7 8 9 10 11 12 13 filter (id =uid).values('name' , 'author' , 'source' ).first()if not rowdic:'status' : False ,'err' : 'ID为' + uid + '的文件不存在,打开失败' return JsonResponse(res)'status' : True ,'data' : rowdicreturn JsonResponse(res)
1 2 all ()
1 2 all ().values("id" ,"name" )
1 2 all ().values_list("id" ,"name" )
12.数据可视化
1.视图层 1 2 3 4 5 6 7 8 9 10 11 12 13 14 15 16 17 18 19 20 21 22 23 24 25 26 27 28 29 30 31 32 33 34 35 36 37 38 39 40 41 42 43 44 45 46 47 48 49 50 51 52 53 54 55 56 57 58 59 60 61 62 63 64 65 66 67 68 69 70 71 72 73 74 75 76 77 78 79 80 from django.http import JsonResponsefrom django.shortcuts import render, redirectdef chart_list (request ):"""数据可视化页面""" return render(request, "chart_list.html" )def chart_bar (request ):"""柱状图数据接口""" '文献数量' , '浏览量' ]"name" : '文献数量' ,'type' : 'bar' ,'data' : [1005 , 2300 , 1856 , 2479 , 3420 , 5870 ]'name' : '浏览量' ,'type' : 'bar' ,'data' : [1200 , 1625 , 860 , 1520 , 2376 , 1464 ]'医学' , '工学' , '理学' , '农学' , '法学' , '人文社科' ]'status' : True ,'data' : {'legend' : legend,'series_list' : series_list,'x_axis' : x_axisreturn JsonResponse(res)def chart_pie (request ):"""饼状图数据接口""" "value" : 1048 , "name" : '研发部' },"value" : 735 , "name" : '后勤部' },"value" : 580 , "name" : '运营部' },"value" : 484 , "name" : '销售部' },"value" : 300 , "name" : '售后部' }'status' : True ,'data' : data_listreturn JsonResponse(res)def chart_line (request ):"""折线图数据接口""" 'alleyf' , 'chuiyugin' ]"name" : legend[0 ],"type" : 'line' ,"stack" : 'Total' ,"data" : [3 , 5 , 4 , 8 , 6 , 10 , 5 ],"smooth" : True "name" : legend[1 ],"type" : 'line' ,"stack" : 'Total' ,"data" : [2 , 5 , 9 , 3 , 8 , 12 , 6 ],"smooth" : True 'status' : True ,'data' : {'legend' : legend,'series_list' : series_listreturn JsonResponse(res)
2.模板层 1 2 3 4 5 6 7 8 9 10 11 12 13 14 15 16 17 18 19 20 21 22 23 24 25 26 27 28 29 30 31 32 33 34 35 36 37 38 39 40 41 42 43 44 45 46 47 48 49 50 51 52 53 54 55 56 57 58 59 60 61 62 63 64 65 66 67 68 69 70 71 72 73 74 75 76 77 78 79 80 81 82 83 84 85 86 87 88 89 90 91 92 93 94 95 96 97 98 99 100 101 102 103 104 105 106 107 108 109 110 111 112 113 114 115 116 117 118 119 120 121 122 123 124 125 126 127 128 129 130 131 132 133 134 135 136 137 138 139 140 141 142 143 144 145 146 147 148 149 150 151 152 153 154 155 156 157 158 159 160 161 162 163 164 165 166 167 168 169 170 171 172 173 174 175 176 177 178 179 180 181 182 183 184 185 186 187 188 189 190 191 192 193 194 195 196 197 198 199 200 201 202 203 204 205 206 207 208 209 210 211 212 213 214 215 216 217 218 219 220 221 222 223 224 225 226 227 228 229 230 231 232 {% extends 'layout.html' %}<title > 数据分析-可视化</title > <div class ="container" > <div class ="panel panel-primary" > <div class ="panel-heading" > 折线图</div > <div class ="panel-body" > <div id ="m1" style ="width: 100%;height: 400px" > </div > <div id ="m4" style ="width: 100%;height: 400px" > </div > </div > </div > <div class ="row" > <div class ="col-sm-6" > <div class ="panel panel-info" > <div class ="panel-heading" > 柱状图</div > <div class ="panel-body" > <div id ="m2" style ="width: 100%;height: 400px" > </div > </div > </div > </div > <div class ="col-sm-6" > <div class ="panel panel-success" > <div class ="panel-heading" > 饼图</div > <div class ="panel-body" > <div id ="m3" style ="width: 100%;height: 400px" > </div > </div > </div > </div > </div > </div > <script src ="{% static 'js/echarts.min.js' %}" > </script > <script type ="text/javascript" > </script > <script src ="http://cdn.highcharts.com.cn/highcharts/highcharts.js" > </script >
13.文件上传 1.基础上传 1.视图层 1 2 3 4 5 6 7 8 9 def doc_upload (request ):"avatars" )"./staffsys/static/img/" + file_obj.name'status' : statusreturn JsonResponse(res)
2.utils 1 2 3 4 5 6 7 8 def upload (path, file_obj ):open (path, mode='wb' )for chunk in file_obj.chunks():return True
3.模板层 1 2 3 4 5 <form method ="post" enctype ="multipart/form-data" action ="/chart/upload/" > <input type ="file" name ="avatar" > <input type ="submit" value ="上传" > </form >
2.案例1:批量上传数据(基于Excel) 1.视图层 1 2 3 4 5 6 7 8 9 10 11 12 13 14 15 16 17 18 19 20 21 22 23 24 25 26 27 28 29 30 31 32 33 34 35 36 37 38 39 40 41 42 43 44 45 46 47 48 49 50 51 52 53 54 55 56 def depart_upload (request ):"""批量上传文件""" 'exc' )"""------------------------------------上传文件到本地静态文件目录------------------------------------""" 0 ]1 , 3 )print (cell)1 for col in sheet.iter_cols(min_row=2 , min_col=1 ):for data in col:if col_num == 1 :elif col_num == 2 :else :1 'name' : depart_name,'leader' : depart_leader,'num' : depart_numTrue len (data.get('name' ))for i in range (row_num):filter (title=data.get('name' )[i]).exists()if not exist:'name' )[i], leader=data.get('leader' )[i],'num' )[i])else :False 'status' : status,'data' : data,return redirect('/depart/list/' )"""------------------------------------上传文件到本地静态文件目录------------------------------------"""
2.模板层 1 2 3 4 5 6 7 8 9 10 11 12 13 14 15 16 17 18 19 20 21 22 23 24 25 26 27 28 29 30 31 32 33 34 35 36 37 38 39 40 41 42 43 44 45 46 47 48 49 50 51 52 53 54 55 56 57 58 59 60 61 62 63 64 65 66 {% extends 'layout.html' %}<title > 部门列表</title > <div class ="container" > <div class ="panel panel-default" > <div class ="panel-heading" > <i class ="fa fa-list" > </i > 批量上传</div > <div class ="panel-body" > <form class ="form-horizontal" method ="post" action ="/depart/upload/" enctype ="multipart/form-data" > <div class ="col-sm-12 form-group has-success has-feedback" style ="width: 100%;margin: 0 auto;" > <div class ="col-sm-6 text-center" style ="margin: 0 auto;float: none" > <input type ="file" multiple ="" name ="exc" class ="form-control" id ="batch_data" aria-describedby ="batch_dataStatus" > <span class ="glyphicon glyphicon-upload form-control-feedback" aria-hidden ="true" > </span > <span id ="batch_dataStatus" class ="sr-only" > (success)</span > <input class ="btn btn-success" style ="margin: 10px auto" type ="submit" id ="upload" value ="上传" > </div > </div > </form > </div > </div > <div style ="margin-bottom: 10px" > <a href ="/depart/add/" class ="btn btn-primary" > <i class ="fa fa-plus" > </i > 新建部门</a > </div > <div class ="panel panel-info" > <div class ="panel-heading" > <i class ="fa fa-list" > </i > 部门列表</div > <table class ="table table-hover table-condensed table-bordered" > <thead > <tr > <th > 部门ID</th > <th > 部门名称</th > <th > 部门负责人</th > <th > 部门人数</th > <th > 操作</th > </tr > </thead > <tbody class ="text-center" > <tr > <th scope ="row" > {{ department.id }}</th > <td > {{ department.title }}</td > <td > {{ department.leader }}</td > <td > {{ department.number }}</td > <td > <a href ="/depart/{{ department.id }}/edit/" class ="btn btn-info btn-xs" > 编辑</a > <a href ="/depart/delete/?nid={{ department.id }}" class ="btn btn-danger btn-xs" > 删除</a > </td > </tr > </tbody > </table > </div > <div class ="text-center" > <ul class ="pagination pagination-xs" > </ul > </div > </div >
提交页面时:用户输入数据+文件(输入不能为空,报错)
1 2 3 4 5 class FormUpload (bootstrapmodelform.BootStrapForm1):'avatar' ]"用户名" )"密码" , max_length=32 )"头像" )
2.视图层 1 2 3 4 5 6 7 8 9 10 11 def form_upload (request ):if request.method == 'GET' :"Form表单上传" return render(request, "form_upload.html" , {'form' : form, 'title' : title})if form.is_valid():print (form.cleaned_data)return JsonResponse({'status' : True })return render(request, "form_upload.html" , {'form' : form})
3.模板层 1 2 3 4 5 6 7 8 9 10 11 12 13 14 15 16 17 18 19 20 21 22 23 24 25 26 27 28 29 30 31 32 33 34 35 36 37 38 39 40 41 42 43 44 45 46 47 48 49 50 51 52 53 54 55 56 57 58 59 60 61 62 63 64 65 66 67 68 69 70 71 {% extends 'layout.html' %} # 继承父模块的标识<title > {{ title }}</title > <style > .input { display : inline-block; margin : 10px auto; min-height : 50px ; width : 300px ; padding : 0 1rem ; color : #1e2732 ; font-size : 15px ; border : 1px solid #5e4dcd ; border-radius : 6px ; background-color : transparent; } .button--submit { display : block; margin : 10px auto; min-height : 50px ; padding : .5em 1em ; border : none; border-radius : 6px ; background-color : #5e4dcd ; color : #fff ; font-size : 15px ; cursor : pointer; transition : background-color .3s ease-in-out; } .button--submit :hover { background-color : #5e5dcd ; } .input :focus , .input :focus -visible { border-color : #3898EC ; outline : none; } </style > <div > <div class ="container" > <div class ="panel panel-info" > <div class ="panel-heading" > {{ title }}</div > <div class ="panel-body" > <form class ="input-group col-md-12" enctype ="multipart/form-data" method ="post" novalidate > <div class ="form-group col-md-6" > <label > {{ item.label }}</label > <span style ="color: #c12c1f" > <strong > {{ item.errors.0 }}</strong > </span > </div > <div class ="form-group col-md-12" > <input class ="button--submit " value ="Subscribe" type ="submit" > </div > </form > </div > </div > </div > </div >
4.上传目录
在Django开发过程中有两个特殊的文件夹:
static:存放静态文件的路径,包括:CSS,JS,项目图片,项目插件等。
media:存放用户上传的数据的目录。
配置urls.py
1 2 3 4 5 6 7 from django.urls import path, re_pathfrom django.views.static import servefrom django.conf import settingsr'^media/(?P<path>.*)$' , serve, {'document_root' : settings.MEDIA_ROOT}, name='media' ),
配置setting.py
1 2 3 4 import os"media" )"/media/"
==路径位置==
==浏览器访问media路径文件==
1.模型层 1 2 3 4 5 6 class City (models.Model):"""城市""" "名称" , max_length=32 )"人口" )"LOGO" , max_length=128 , upload_to="city/" )
2.表单层 1 2 3 4 5 6 class ModelFormUpload (bootstrapmodelform.BootStrapModelForm1):'img' ]class Meta :"__all__"
3.视图层 1 2 3 4 5 6 7 8 9 10 11 12 13 def modelform_upload (request ):"""modelform上传""" "ModelForm上传" if request.method == 'GET' :return render(request, 'modelform_upload.html' , {"form" : form, "title" : title})if form.is_valid():print (form.cleaned_data)return JsonResponse({"status" : True })return render(request, 'modelform_upload.html' , {"form" : form, "title" : title})
4.模板层 1 2 3 4 5 6 7 8 9 10 11 12 13 14 15 16 17 18 19 20 21 22 23 24 25 26 27 28 29 30 31 32 33 34 35 36 37 38 39 40 41 42 43 44 45 46 47 48 49 50 51 52 53 54 55 56 57 58 59 60 61 62 63 64 65 66 67 68 69 70 71 {% extends 'layout.html' %} # 继承父模块的标识<title > {{ title }}</title > <style > .input { display : inline-block; margin : 10px auto; min-height : 50px ; width : 300px ; padding : 0 1rem ; color : #1e2732 ; font-size : 15px ; border : 1px solid #5e4dcd ; border-radius : 6px ; background-color : transparent; } .button--submit { display : block; margin : 10px auto; min-height : 50px ; padding : .5em 1em ; border : none; border-radius : 6px ; background-color : #5e4dcd ; color : #fff ; font-size : 15px ; cursor : pointer; transition : background-color .3s ease-in-out; } .button--submit :hover { background-color : #5e5dcd ; } .input :focus , .input :focus -visible { border-color : #3898EC ; outline : none; } </style > <div > <div class ="container" > <div class ="panel panel-info" > <div class ="panel-heading" > {{ title }}</div > <div class ="panel-body" > <form class ="input-group col-md-12" enctype ="multipart/form-data" method ="post" novalidate > <div class ="form-group col-md-6" > <label > {{ item.label }}</label > <span style ="color: #c12c1f" > <strong > {{ item.errors.0 }}</strong > </span > </div > <div class ="form-group col-md-12" > <input class ="button--submit " value ="Subscribe" type ="submit" > </div > </form > </div > </div > </div > </div >
6.小结
自己动手写
1 2 file_obj = request.FILES.get("filename" )
Form组件(表单验证)
1 2 3 4 request.POST"filename" )
ModelForm组件(表单验证+自动保存)
1 2 3 4 -media文件夹"LOGO" , max_length=128 , upload_to="city/" )
14.Vue Vue中文网
1.模板语法
Vue.js 使用了基于 HTML 的模板语法,允许开发者声明式地将 DOM 绑定至底层组件实例的数据。所有 Vue.js 的模板都是合法的 HTML,所以能被遵循规范的浏览器和 HTML 解析器解析。
在底层的实现上,Vue 将模板编译成虚拟 DOM 渲染函数。结合响应性系统,Vue 能够智能地计算出最少需要重新渲染多少组件,并把 DOM 操作次数减到最少。
如果你熟悉虚拟 DOM 并且偏爱 JavaScript 的原始力量,你也可以不用模板,直接写渲染 (render) 函数 ,使用可选的 JSX 语法。
1.1插值 文本 数据绑定最常见的形式就是使用“Mustache”语法 (双大括号) 的文本插值:
1 <span > Message: {{ msg }}</span >
Mustache 标签将会被替代为对应组件实例中 msg property 的值。无论何时,绑定的组件实例上 msg property 发生了改变,插值处的内容都会更新。
通过使用 v-once 指令 ,你也能执行一次性地插值,当数据改变时,插值处的内容不会更新。但请留心这会影响到该节点上的其它数据绑定:
1 <span v-once > 这个将不会改变: {{ msg }}</span >
注:绑定一个纯文本
原始 HTML 双大括号会将数据解释为普通文本 ,而非 HTML 代码 。为了输出真正的 HTML,你需要使用v-html 指令
1 2 <p > Using mustaches: {{ rawHtml }}</p > <p > Using v-html directive: <span v-html ="rawHtml" > </span > </p >
注:绑定一个动态的html标签
Attribute Mustache 语法不能在 HTML attribute 中使用,然而,可以使用 v-bind 指令
1 2 <div v-bind:id ="dynamicId" > </div > <div :id ="dynamicId" > </div >
如果绑定的值是 null 或 undefined,那么该 attribute 将不会被包含在渲染的元素上。
对于布尔 attribute (它们只要存在就意味着值为 true),v-bind 工作起来略有不同,在这个例子中:
1 <button v-bind:disabled ="isButtonDisabled" > 按钮</button >
如果 isButtonDisabled 的值是 truthy[1] ,那么 disabled attribute 将被包含在内。如果该值是一个空字符串,它也会被包括在内,与 <button disabled=""> 保持一致。对于其他错误的值,该 attribute 将被省略。
注:绑定一个动态的属性
使用 JavaScript 表达式 迄今为止,在我们的模板中,我们一直都只绑定简单的 property 键值。但实际上,对于所有的数据绑定,Vue.js 都提供了完全的 JavaScript 表达式支持。
1 2 3 4 5 6 7 8 9 {{ number + 1 }}<div v-bind:id ="'list-' + id" > </div >
这些表达式会在当前活动实例的数据作用域下作为 JavaScript 被解析。有个限制就是,每个绑定都只能包含单个表达式 ,所以下面的例子都不会 生效。
1 2 3 4 5
1.2指令 指令 (Directives) 是带有 v- 前缀的特殊 attribute。指令 attribute 的值预期是单个 JavaScript 表达式 (v-for 和 v-on 是例外情况,稍后我们再讨论)。指令的职责是,当表达式的值改变时,将其产生的连带影响,响应式地作用于 DOM。回顾我们在介绍中看到的例子:
1 2 3 <p v-if ="flag" > 我是真悟空</p > <p v-else > 我是假猴子</p > <p v-show: "flag "> 我是真猴子</p >
这里,v-if 指令(条件显示必定显示一个)将根据表达式 flag 的值的真假来插入/移除 <p> 元素;flag为假时v-else标签将显示。v-show根据条件只显示或不显示(等价于没有v-else时的v-if)。
一些指令能够接收一个“参数”,在指令名称之后以冒号表示。例如,v-bind 指令可以用于响应式地更新 HTML attribute:
1 <a v-bind:href ="url" > ... </a >
在这里 href 是参数,告知 v-bind 指令将该元素的 href attribute 与表达式 url 的值绑定。
另一个例子是 v-on 指令,它用于监听 DOM 事件:
1 <a v-on:click ="doSomething" > ... </a >
在这里参数是监听的事件名。我们也会更详细地讨论事件处理。
# 动态参数也可以在指令参数中使用 JavaScript 表达式,方法是用方括号括起来:
1 2 3 4 <a v-bind: [attributeName ]="url" > ... </a >
这里的 attributeName 会被作为一个 JavaScript 表达式进行动态求值,求得的值将会作为最终的参数来使用。例如,如果你的组件实例有一个 data property attributeName,其值为 "href",那么这个绑定将等价于 v-bind:href。
同样地,你可以使用动态参数为一个动态的事件名绑定处理函数:
1 <a v-on: [eventName ]="doSomething" > ... </a >
在这个示例中,当 eventName 的值为 "focus" 时,v-on:[eventName] 将等价于 v-on:focus
# 修饰符修饰符 (modifier) 是以半角句号 . 指明的特殊后缀,用于指出一个指令应该以特殊方式绑定。例如,.prevent 修饰符告诉 v-on 指令对于触发的事件调用 event.preventDefault():
1 <form v-on:submit.prevent ="onSubmit" > ...</form >
在接下来对 v-onv-for
v-on与v-show区别与联系
v-bind:是用来绑定属性的,v-bind使用的时候一般写在data里面。
1.3条件渲染 1 v-ifv-if 指令用于条件性地渲染一块内容。这块内容只会在指令的表达式返回 truthy 值的时候被渲染。
1 <h1 v-if ="awesome" > Vue is awesome!</h1 >
也可以用 v-else 添加一个“else 块”:
1 2 <h1 v-if ="awesome" > Vue is awesome!</h1 > <h1 v-else > Oh no 😢</h1 >
2 在 <template> 元素上使用 v-if 条件渲染分组因为 v-if 是一个指令,所以必须将它添加到一个元素上。但是如果想切换多个元素呢?此时可以把一个 <template> 元素当做不可见的包裹元素,并在上面使用 v-if。最终的渲染结果将不包含 <template> 元素。
1 2 3 4 5 <template v-if ="ok" > <h1 > Title</h1 > <p > Paragraph 1</p > <p > Paragraph 2</p > </template >
3 v-else你可以使用 v-else 指令来表示 v-if 的“else 块”:
1 2 3 4 5 6 <div v-if ="Math.random() > 0.5" > </div > <div v-else > </div >
v-else 元素必须紧跟在带 v-if 或者 v-else-if 的元素的后面,否则它将不会被识别。
4 v-else-ifv-else-if,顾名思义,充当 v-if 的“else-if 块”,并且可以连续使用:
1 2 3 4 5 6 7 8 9 10 11 12 <div v-if ="type === 'A'" > </div > <div v-else-if ="type === 'B'" > </div > <div v-else-if ="type === 'C'" > </div > <div v-else > </div >
与 v-else 的用法类似,v-else-if 也必须紧跟在带 v-if 或者 v-else-if 的元素之后。
5 v-show另一个用于条件性展示元素的选项是 v-show 指令。用法大致一样:
1 <h1 v-show ="ok" > Hello!</h1 >
不同的是带有 v-show 的元素始终会被渲染并保留在 DOM 中。v-show 只是简单地切换元素的 CSS property display。
注意,v-show 不支持 <template> 元素,也不支持 v-else。
6 v-if vs v-showv-if 是“真正”的条件渲染,因为它会确保在切换过程中,条件块内的事件监听器和子组件适当地被销毁和重建。
v-if 也是惰性的 :如果在初始渲染时条件为假,则什么也不做——直到条件第一次变为真时,才会开始渲染条件块。
相比之下,v-show 就简单得多——不管初始条件是什么,元素总是会被渲染,并且只是简单地基于 CSS 进行切换。
一般来说,v-if 有更高的切换开销,而 v-show 有更高的初始渲染开销。因此,如果需要非常频繁地切换,则使用 v-show 较好;如果在运行时条件很少改变,则使用 v-if 较好。
7 v-if 与 v-for 一起使用不推荐 同时使用 v-if 和 v-for。请查阅风格指南 以获取更多信息。
当 v-if 与 v-for 一起使用时,v-if 具有比 v-for 更高的优先级。请查阅列表渲染指南 以获取详细信息。
1.4列表渲染 1.用 v-for 把一个数组对应为一组元素 我们可以用 v-for 指令基于一个数组来渲染一个列表。v-for 指令需要使用 item in items 形式的特殊语法,其中 items 是源数据数组,而 item 则是被迭代的数组元素的别名 。
1 2 3 4 5 <ul id ="array-rendering" > <li v-for ="item in items" > </li > </ul >
1 2 3 4 5 6 7 Vue .createApp ({data (return {items : [{ message : 'Foo' }, { message : 'Bar' }]mount ('#array-rendering' )
在 v-for 块中,我们可以访问所有父作用域的 property。v-for 还支持一个可选的第二个参数,即当前项的索引。
1 2 3 4 5 <ul id ="array-with-index" > <li v-for ="(item, index) in items" > </li > </ul >
1 2 3 4 5 6 7 8 Vue .createApp ({data (return {parentMessage : 'Parent' ,items : [{ message : 'Foo' }, { message : 'Bar' }]mount ('#array-with-index' )
你也可以用 of 替代 in 作为分隔符,因为它更接近 JavaScript 迭代器的语法:
1 <div v-for ="item of items" > </div >
2. 在-v-for-里使用对象在 v-for 里使用对象你也可以用 v-for 来遍历一个对象的 property。
1 2 3 4 5 <ul id ="v-for-object" class ="demo" > <li v-for ="value in myObject" > </li > </ul >
1 2 3 4 5 6 7 8 9 10 11 Vue .createApp ({data (return {myObject : {title : 'How to do lists in Vue' ,author : 'Jane Doe' ,publishedAt : '2016-04-10' mount ('#v-for-object' )
你也可以提供第二个的参数为 property 名称 (也就是键名 key):
1 2 3 <li v-for ="(value, name) in myObject" > </li >
还可以用第三个参数作为索引:
1 2 3 <li v-for ="(value, name, index) in myObject" > </li >
在遍历对象时,会按 Object.keys() 的结果遍历,但是不能保证它在不同 JavaScript 引擎下的结果都一致。
当 Vue 正在更新使用 v-for 渲染的元素列表时,它默认使用“就地更新”的策略。如果数据项的顺序被改变,Vue 将不会移动 DOM 元素来匹配数据项的顺序,而是就地更新每个元素,并且确保它们在每个索引位置正确渲染。
这个默认的模式是高效的,但是只适用于不依赖子组件状态或临时 DOM 状态 (例如:表单输入值) 的列表渲染输出 。
为了给 Vue 一个提示,以便它能跟踪每个节点的身份,从而重用和重新排序现有元素,你需要为每项提供一个唯一 key attribute:
1 2 3 <div v-for ="item in items" :key ="item.id" > </div >
建议尽可能在使用 v-for 时提供 key attribute,除非遍历输出的 DOM 内容非常简单,或者是刻意依赖默认行为以获取性能上的提升。
因为它是 Vue 识别节点的一个通用机制,key 并不仅与 v-for 特别关联。后面我们将在指南中看到,它还具有其它用途。
1.5事件处理 我们可以使用 v-on 指令 (通常缩写为 @ 符号) 来监听 DOM 事件,并在触发事件时执行一些 JavaScript。用法为 v-on:click="methodName" 或使用快捷方式 @click="methodName"
例如:
1 2 3 4 <div id ="basic-event" > <button @click ="counter += 1" > Add 1</button > <p > The button above has been clicked {{ counter }} times.</p > </div >
1 2 3 4 5 6 7 Vue .createApp ({data (return {counter : 0 mount ('#basic-event' )
2.内联处理器中的方法 除了直接绑定到一个方法,也可以在内联 JavaScript 语句中调用方法:
1 2 3 4 5 6 7 8 9 10 <div id ="inline-handler" > <button @click ="say('hi')" > Say hi</button > <button @click ="say('what')" > Say what</button > <ul > <li > 列表渲染</li > <li @click ="send(item.title)" v-for ="(item, index) in items" :key ="item.id" > </li > </ul > </div >
1 2 3 4 5 6 7 8 9 10 Vue .createApp ({methods : {say (message ) {alert (message)console .log (data);mount ('#inline-handler' )
有时也需要在内联语句处理器中访问原始的 DOM 事件。可以用特殊变量 $event 把它传入方法:
1 2 3 <button @click ="warn('Form cannot be submitted yet.', $event)" > </button >
1 2 3 4 5 6 7 8 9 10 methods : {warn (message, event ) {if (event) {preventDefault ()alert (message)
3. 多事件处理器事件处理程序中可以有多个方法,这些方法由逗号运算符分隔:
1 2 3 4 <button @click ="one($event), two($event)" > </button >
1 2 3 4 5 6 7 8 9 methods : {one (event ) {two (event ) {
1.6表单输入绑定 你可以用 v-model 指令在表单 <input>、<textarea> 及 <select> 元素上创建双向数据绑定。它会根据控件类型自动选取正确的方法来更新元素。尽管有些神奇,但 v-model 本质上不过是语法糖。它负责监听用户的输入事件来更新数据,并在某种极端场景下进行一些特殊处理。
提示
v-model 会忽略所有表单元素的 value、checked、selected attribute 的初始值而总是将当前活动实例的数据作为数据来源。你应该通过 JavaScript 在组件的 data 选项中声明初始值。
v-model 在内部为不同的输入元素使用不同的 property 并抛出不同的事件:
text 和 textarea 元素使用 value property 和 input 事件;
checkbox 和 radio 使用 checked property 和 change 事件;
select 字段将 value 作为 prop 并将 change 作为事件。
提示
对于需要使用输入法 (如中文、日文、韩文等) 的语言,你会发现 v-model 不会在输入法组织文字过程中得到更新。如果你也想响应这些更新,请使用 input 事件监听器和 value 绑定,而不是使用 v-model。
2. 文本 (Text)1 2 <input v-model ="message" placeholder ="edit me" /> <p > Message is: {{ message }}</p >
3.多行文本 (Textarea) 1 2 3 4 <span > Multiline message is:</span > <p style ="white-space: pre-line;" > {{ message }}</p > <br /> <textarea v-model ="message" placeholder ="add multiple lines" > </textarea >
1 2 3 4 5 <textarea > {{ text }}</textarea > <textarea v-model ="text" > </textarea >
4.复选框 (Checkbox) 单个复选框,绑定到布尔值:
1 2 <input type ="checkbox" id ="checkbox" v-model ="checked" /> <label for ="checkbox" > {{ checked }}</label >
多个复选框,绑定到同一个数组:
1 2 3 4 5 6 7 8 9 10 <div id ="v-model-multiple-checkboxes" > <input type ="checkbox" id ="jack" value ="Jack" v-model ="checkedNames" /> <label for ="jack" > Jack</label > <input type ="checkbox" id ="john" value ="John" v-model ="checkedNames" /> <label for ="john" > John</label > <input type ="checkbox" id ="mike" value ="Mike" v-model ="checkedNames" /> <label for ="mike" > Mike</label > <br /> <span > Checked names: {{ checkedNames }}</span > </div >
1 2 3 4 5 6 7 Vue .createApp ({data (return {checkedNames : []mount ('#v-model-multiple-checkboxes' )
5.单选框 (Radio) 1 2 3 4 5 6 7 8 9 <div id ="v-model-radiobutton" > <input type ="radio" id ="one" value ="One" v-model ="picked" /> <label for ="one" > One</label > <br /> <input type ="radio" id ="two" value ="Two" v-model ="picked" /> <label for ="two" > Two</label > <br /> <span > Picked: {{ picked }}</span > </div >
1 2 3 4 5 6 7 Vue .createApp ({data (return {picked : '' mount ('#v-model-radiobutton' )
6.选择框 (Select) 单选时:
1 2 3 4 5 6 7 8 9 <div id ="v-model-select" class ="demo" > <select v-model ="selected" > <option disabled value ="" > Please select one</option > <option > A</option > <option > B</option > <option > C</option > </select > <span > Selected: {{ selected }}</span > </div >
1 2 3 4 5 6 7 Vue .createApp ({data (return {selected : '' mount ('#v-model-select' )
多选时 (绑定到一个数组):
1 2 3 4 5 6 7 <select v-model ="selected" multiple > <option > A</option > <option > B</option > <option > C</option > </select > <br /> <span > Selected: {{ selected }}</span >
7.值绑定 对于单选按钮,复选框及选择框的选项,v-model 绑定的值通常是静态字符串 (对于复选框也可以是布尔值):
1 2 3 4 5 6 7 8 9 10 <input type ="radio" v-model ="picked" value ="a" /> <input type ="checkbox" v-model ="toggle" /> <select v-model ="selected" > <option value ="abc" > ABC</option > </select >
但是有时我们可能想把值绑定到当前活动实例的一个动态 property 上,这时可以用 v-bind 实现,此外,使用 v-bind 可以将输入值绑定到非字符串。
8. 复选框 (Checkbox)1 <input type ="checkbox" v-model ="toggle" true-value ="yes" false-value ="no" />
1 2 3 4 toggle === 'yes' toggle === 'no'
9.单选框 (Radio) 1 <input type ="radio" v-model ="pick" v-bind:value ="a" />
10. 选择框选项 (Select Options)1 2 3 4 <select v-model ="selected" > <option :value ="{ number: 123 }" > 123</option > </select >
1 2 3 typeof vm.selected selected .number
1.7修饰符 1. .lazy在默认情况下,v-model 在每次 input 事件触发后将输入框的值与数据进行同步 (除了上述 输入法组织文字时)。你可以添加 lazy 修饰符,从而转为在 change 事件_之后_进行同步:
1 2 <input v-model.lazy ="msg" >
2. .number如果想自动将用户的输入值转为数值类型,可以给 v-model 添加 number 修饰符:
1 <input v-model.number ="age" type ="number" />
这通常很有用,因为即使在 type="number" 时,HTML 输入元素的值也总会返回字符串。如果这个值无法被 parseFloat() 解析,则会返回原始的值。
3. .trim如果要自动过滤用户输入的首尾空白字符,可以给 v-model 添加 trim 修饰符:
1 <input v-model.trim ="msg" />
2.组件基础 单文件组件(又名*.vue文件,缩写为SFC)是一种特殊的文件格式,它允许将Vue组件的模板、逻辑与样式封装在单个文件中。
1.新建组件
2.加载组件
3.组件的组织 通常一个应用会以一颗嵌套的组建树的形式来组织。
3.Props组件交互 组件与组件之间是需要存在交互的,否则完全没有关系,组件的意义就很小了。
Prop是你可以在组件上注册的一些自定义属性attribute。
==app.vue(传递title和age属性值)==
1 2 3 4 5 6 7 8 9 10 11 12 13 14 15 16 17 18 19 20 21 22 23 24 25 <template>
==MyComponent.vue==
1 2 3 4 5 6 7 8 9 10 11 12 13 14 15 16 17 18 19 20 21 22 23 24 25 26 27 28 <template>
1.Prop类型 Prop传递参数其实是没有类型限制的
1 2 3 4 5 6 7 8 props: {
温馨提示
数据类型为数组或者对象的时候,默认值是需要返回工厂模式(使用函数进行返回 )。
1 2 3 4 5 6 7 8 9 10 11 12 13 14 15 16 17 18 <ul>
4.自定义事件组件交互 自定义事件可以在组件中反向传递数据,prop可以将数据从父组件传递到子组件,那么反向如何操作呢,可以利用自定义时间实现$emit
==app.vue==
1 2 3 4 5 6 7 8 9 10 11 12 13 14 15 16 17 18 19 20 21 22 23 24 25 26 27 28 29 30 31 32 33 34 35 36 37 38 <template>
==MyComponent.vue==
1 2 3 4 5 6 7 8 9 10 11 12 13 14 15 16 17 18 19 20 21 22 23 24 25 26 27 28 29 <template>
5.组件生命周期 每个组件在被创建时都要经过一系列的初始化过程–例如,需要设置数据监听、编译模板、将实例挂载到DOM并在数据变化时更新DOM等。同时在这个过程中也会运行一些叫做生命周期钩子 的函数,这给了用户在不同阶段添加自己的代码的机会。
分类:
创建时:beforeCreate、created
渲染时:beforeMount、mounted
更新时:beforeUpdate、updated
卸载时:beforeUnmount、unmounted
6.Vue引入第三方 Swiper 开源强大的触摸滑动插件。
安装指定版本:npm install --save swiper@8.1.6
案例1:首页轮播图 1 2 3 4 5 6 7 8 9 10 11 12 13 14 15 16 17 18 19 20 21 22 23 24 25 26 27 28 29 30 31 32 33 34 35 36 <template>
7.Axios网络请求 Axios是一个基于promise的网络请求库
安装npm install --save axios
1.引入 组件中引入:import axios from "axios"
全局引入:
1 2 3 4 5 6 7 8 import axios form "axios" const app = createApp (App );config .globalProperties .$axios = axiosmount ('#app' )this .$axios
2.网络请求示例 get请求 1 2 3 4 5 6 7 8 9 mounted () {axios ({method : 'get' ,url : 'http://iwenwiki.com/api/blueberrypai/getChengpinDetails.php' then (res =>console .log (res.data );this .chengpin = res.data .chengpinDetails [0 ];
==get快捷方式==
1 2 3 axios.get ("http://iwenwiki.com/api/blueberrypai/getChengpinDetails.php" ).then (res =>console .log (res.data );
post请求
温馨提示
安装依赖:npm install --save querystring
转换参数格式:qs.stringify()(将字符串格式转为对象)
1 2 3 4 5 6 7 8 9 10 11 12 axios ({method : 'post' ,url : 'http://iwenwiki.com/api/blueberrypai/login.php' ,data : querystring.stringify ({user_id : 'iwen@qq.com' ,password : 'iwen123' ,verification_code : 'crfvw' then (res =>console .log (res.data );
==post快捷方式==
1 2 3 4 5 6 7 axios.post ("http://iwenwiki.com/api/blueberrypai/login.php" , querystring.stringify ({user_id : 'iwen@qq.com' ,password : 'iwen123' ,verification_code : 'crfvw' then (res =>console .log (res.data );
3.axios网络请求封装 日常应用过程中,一个项目中会有很多网络请求,一般采取的方案是将网络请求封装起来。
在src目录下创建文件夹utils,并创建文件request,用来存储网络请求对象axios
4.网络请求跨域解决方案
出于浏览器的同源策略限制。同源策略(Sameoriginpolicy)是一种约定,它是浏览器最核心也最基本的安全功能,如果缺少了同源策略,则浏览器的正常功能可能都会受到影响。可以说Web是构建在同源策略基础之上的,浏览器只是针对同源策略的一种实现。同源策略会阻止一个域的。javascript脚本和另外一个域的内容进行交互。所谓同源(即指在同一个域)就是两个页面具有相同的协议(protocol),主机(host)和端口号(port。
提示: 当一个请求url的**协议、域名、端口 **三者之间任意一个与当前页面url不同即为跨域。
1.主流的解决方案
后台解决:cors
前台解决:proxy
1 2 3 4 5 6 7 8 devServer : {proxy : {'/api' : {target : 'http://iwenwiki.com' ,changeOrigin : true
温馨提示
配置完成后,axios请求的地址直接用域名后的子地址 即可,且需要重启服务器才生效。
8.路由配置(vue-router) 在vue中,我们可以通过vue-router路由管理页面之间的关系
Vue Router是Vue.js的官方路由。它与Vue.js核心深度集成,让用Vue.js构建单页应用变得轻而易举。
1.在Vue中引入路由 第一步:安装路由npm install --save vue-router
第二步:新建路由配置文件
第三步:配置独立的路由文件
1 2 3 4 5 6 7 8 9 10 11 12 13 14 15 16 17 18 19 20 21 22 23 24 25 26 27 28 29 30 31 32 33 34 35 36 37 38 39 40 41 42 43 44 45 46 47 48 import {createRouter,createWebHashHistory} from 'vue-router' import Home from '../views/Home' import About from '../views/About' const routes = [path : '/' , component : Home , path : '/about' ,component : About ,const router = createRouter ({history : createWebHashHistory (),export default router;
温馨提示
createWebHashHistoryhttp://localhost:8080/#/ http://localhost:8080/#/about a标签锚点连接
createWebHistoryhttp://localhost:8080/ http://localhost:8080/about
原理:H5 pushState()
第四步:main.js中使用路由
1 2 3 4 5 6 7 8 9 10 11 import { createApp } from 'vue' import App from './App.vue' import './registerServiceWorker' import axios from "axios" import router from "./router" const app = createApp (App );config .globalProperties .$axios = axiosuse (router)mount ('#app' )
第五步:App.vue中设置路由入口
1 2 3 4 5 6 <template>
2.路由传递参数 页面携带参数跳转非常常见
第一步:在路由配置中指定参数key
1 2 3 4 5 6 path : '/newsdetails/:name' ,name : 'newsdetails' ,component : ()=> import ("../views/NewsDetails.vue" )
第二步:在页面中的路由链接中携带参数
1 2 3 4 5 6 7 8 <template>
第三步:在跳转页面获取参数
1 2 3 4 <template>
3.嵌套路由配置
9.Vue状态管理(Vuex) vuex是一个专门为Vue.js应用程序开发的状态管理模式+库 。它采用集中式存储管理应用的所有组件的状态。
简单来说,状态给管理可以理解成为了更方便的管理组件之间的数据交互,提供了一个集中式的管理方案,任何组件都可以按照指定的方式进行读取和改变数据。
1.引入Vuex的步骤 第一步:安装Vuex cnpm install --save vuex
第二步:新建store文件夹并新建index.js文件
第三步:配置Vuex文件
1 2 3 4 5 6 7 8 9 10 import {createStore} from "vuex" export default createStore ({state : {counter : 0 ,
第四步:在主文件中引入Vuex
1 2 import store from "./store" use (store)
第五步:在组件中读取状态
1 2 3 4 5 6 7 8 9 10 11 12 13 14 15 16 17 18 19 //第一种读取方法
2.状态管理核心
常用的核心概念包含:State,Getter,Mutation,Action
1.Getter 对vuex的数据进行过滤
配置文件
1 2 3 4 5 6 7 8 9 10 11 12 13 14 15 import {createStore} from "vuex" export default createStore ({state : {counter : 0 ,getters : {getCounter (state ){return state.counter > 0 ? state.counter : "counter数据异常"
vue用法
1 2 3 4 5 6 7 8 9 10 11 12 13 14 15 16 17 18 19 20 <template>
2.Mutation 更改Vuex的store中的状态的唯一方法是提交mutation。Vuex中的mutation非常类似与事件:每个mutation都有一个字符串的事件类型(type)和一个回调函数(handler)。这个回调函数就是我们实际进行状态更改的地方,并且它会接受state作为第一个参数。
配置文件
1 2 3 4 5 6 7 8 9 10 11 12 13 14 15 16 17 18 19 20 import {createStore} from "vuex" export default createStore ({state : {counter : 0 ,getters : {getCounter (state ){return state.counter > 0 ? state.counter : "counter数据异常" mutations : {addCounter (state,num ){counter += num;
vue用法
1 2 3 4 5 6 7 8 9 10 11 12 13 14 15 16 17 18 19 20 21 22 23 24 25 26 27 28 29 30 <template>
3.action action类似于mutation,不同在于:
action提交的是mutation,而不是直接变更状态。
action可以包含任意异步操作
主要用于异步请求处理数据。
配置文件
1 2 3 4 5 6 7 8 9 10 11 12 13 14 15 16 17 18 19 20 21 22 23 24 25 26 27 28 29 30 import axios from "axios" ;import {createStore} from "vuex" export default createStore ({state : {counter : 0 ,getters : {getCounter (state ){return state.counter > 0 ? state.counter : "counter数据异常" mutations : {addCounter (state,num ){counter += num;actions : {asyncAddCounter ({commit} ){get ("http://iwenwiki.com/api/generator/list.php" ).then (res =>commit ("addCounter" ,res.data [0 ]);
vue用法
1 2 3 4 5 6 7 8 9 10 11 12 13 14 15 16 17 18 19 20 21 22 23 24 25 26 27 28 29 30 31 32 33 34 35 36 37 38 39 40 41 42 <template>
10.vue3新特性 1.组合式API 1.ref或者reactive 在2.x中通过组建data的方法定义一些当前组件的数据,可以代替data定义数据并显示。
setup(){}里既可以定义数据 ,亦可以定义响应事件(函数) ,从而取代data和methods。
1 2 3 4 5 6 7 8 9 10 11 12 13 14 15 16 17 18 19 20 21 22 23 24 25 26 27 28 29 30 31 32 33 34 35 36 37 <template>
2.setup中使用props和context 在2.x中,组件的方法可以通过this获取当前组件的实例,并执行data变量的修改,方法的调用,组件的通信等等,但是在3.x中,setup()在beforeCreate和created时机就已调用,无法使用和2.x一样的this,但是可以通过接收setup(props,ctx)的方法,获取到当前组件的实例和props。
==父组件(App.vue)==
1 2 3 4 5 6 7 8 9 10 11 12 13 14 15 16 17 18 19 20 //传递name值
==子组件==
接收只需定义接收变量的类型 即可。
1 2 3 4 5 6 7 8 9 10 11 12 13 14 15 16 <template>
context的获取
1 2 3 setup (props, ctx) {console .log (ctx);
setup由于是在组件创建期间完成的,因此其中没有this(当前组件的实例),可以通过传递ctx参数获取当前实例。
3.在setup中使用生命周期函数 可以通过在生命周期钩子前面加上“on”来访问组件的生命周期钩子。
下标包含如何在setup()内部调用生命周期钩子。
options API
Hook inside setup
beforeCreate
Not needed*
created
Not needed*
beforeMount
onBeforeMount
mounted
onMounted
beforeUpdate
onBeforeUpdate
updated
onUpdated
beforeUnmount
onBeforeUnmount
unmounted
onUnmounted
1 2 3 4 5 6 7 8 9 10 11 <script>import { onMounted } from 'vue' ;export default {setup (onMounted (() => {console .log ("渲染1" );
Provide/Inject
project()和inject()可以实现嵌套组件之间的数据传递。
这两个函数只能在setup()函数中使用。
父级组件中使用provide()函数向下传递数据。
子级组件中使用inject()获取上层传递过来的数据。
不限层级。
==父组件==
1 2 3 4 5 import { provide } from 'vue' ;provide ("message" , "我是大哥大消息" )
==子组件==
1 2 3 4 5 6 7 import { onMounted, inject } from 'vue' ;setup (const message = inject ("message" );return {
Fragment Fragment翻译为:“碎片”
11.Element-Plus组件库 1.安装组件库 1 2 # NPM $ npm install element-plus --save
2.全局引用 main.js中引用组件
1 2 3 import ElementPlus from "element-plus" import 'element-plus/dist/index.full.min.mjs' import 'element-plus/dist/index.css'
3.按需导入 配置vue.config.js
1 2 3 4 5 6 7 8 9 10 11 12 13 14 15 16 17 18 19 const { defineConfig } = require ('@vue/cli-service' )const AutoImport = require ('unplugin-auto-import/webpack' )const Components = require ('unplugin-vue-components/webpack' )const { ElementPlusResolver } = require ('unplugin-vue-components/resolvers' )module .exports = defineConfig ({transpileDependencies : true ,configureWebpack : {plugins : [AutoImport ({resolvers : [ElementPlusResolver ()],Components ({resolvers : [ElementPlusResolver ()],
4.加载字体图标 1.下载图标 1 2 # NPM $ npm install @element-plus/icons-vue
2.注册图标 1 2 3 4 5 6 7 8 9 import * as ElementPlusIconsVue from '@element-plus/icons-vue' const app = createApp (App )for (const [key, component] of Object .entries (ElementPlusIconsVue )) {component (key, component)
3.图标实例 1 2 3 <el-icon :size="20" color="green">
15.Elasticsearch 1.基本操作 1.创建(更新)索引 1 2 3 4 5 6 PUT test/_doc/1
1 2 3 4 5 6 7 8 9 -index:索引名称 -type:类型 -id:索引id -version:修改次数(版本号) -result:操作类型 -shards:分片情况
2.基本查询
==返回值为JSON字符串字典==
1.ID查询 2.全查询 3.ID删除 1 2 3 4 5 6 7 8 9 10 11 12 13 14 15 # 返回结果
4.全删除 1 2 3 4 # 返回结果
5.查询所有存在的索引 16.Django+Vue